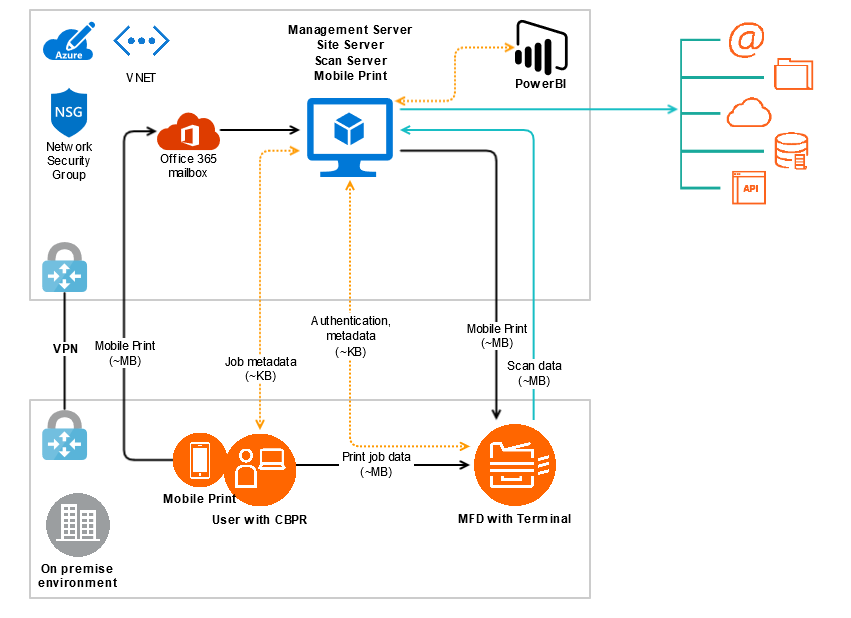
Azure Example: Single Server Deployment
The following is a sample schematics of YSoft SafeQ in a single server deployment with or without CBPR.
Note that some MFD user interfaces are browser-based. In that case, they are served from the Site Services tier. Because of this fact, the upmost importance is to keep low latency to provide a good user experience.
How to Deploy
Examples below are created for PowerShell, but you can get the same result using Azure portal, or CLI.
Before you begin
Install the Azure PowerShell.
Install Az module into PowerShell
Install-Module-NameAz-AllowClobberFor more information refer to Microsoft Azure documentation: https://docs.microsoft.com/en-us/powershell/azure/install-az-ps?view=azps-1.5.0
Login to Azure Portal.
Example of using PowerShell (replace "SubscriptionId" value with yours):
Import-ModuleAzConnect-AzAccount-SubscriptionId"yyyy-yyyy-yyyy-yyyy"For more information refer to Microsoft Azure documentation: https://docs.microsoft.com/en-us/powershell/azure/authenticate-azureps?view=azps-1.5.0
Create a Resource Group (or use an existing one) and place all components in this group.
Example of using PowerShell (change the name and the location as needed):
$resourceGroupName="YSoftSafeQ"$location="eastus"New-AzResourceGroup-Name$resourceGroupName-Location$locationChoose Azure location which is geographically close to the printers. This will reduce the latency and provide a good user experience.
https://azure.microsoft.com/en-us/global-infrastructure/locations/
For more information refer to Microsoft Azure documentation:https://docs.microsoft.com/en-us/powershell/module/az.resources/new-azresourcegroup?view=azps-1.5.0
Create Network Security Group (or use an existing one).
Example of using PowerShell:
$resourceGroupName="YSoftSafeQ"$location="eastus"New-AzNetworkSecurityGroup-Name"YSoftSafeQnsg"-ResourceGroupName$resourceGroupName-Location$locationFor more information refer to Microsoft Azure documentation: https://docs.microsoft.com/en-us/powershell/module/az.network/new-aznetworksecuritygroup?view=azps-1.5.0
Create Virtual Network with subnet (or use an existing one).
Example of using PowerShell:
$resourceGroupName="YSoftSafeQ"$location="eastus"$nsgName="YSoftSafeQnsg"$nsgPS= Get-AzNetworkSecurityGroup-ResourceGroupName$resourceGroupName-Name$nsgName$subnet= New-AzVirtualNetworkSubnetConfig-Name"YSoftSafeQsubnet"-AddressPrefix"10.0.2.0/24"-NetworkSecurityGroup$nsgPSNew-AzVirtualNetwork-Name"YSoftSafeQVNET"-ResourceGroupName$resourceGroupName-Location$location-AddressPrefix"10.0.0.0/16"-Subnet$subnetFor more information refer to Microsoft Azure documentation:
https://docs.microsoft.com/en-us/powershell/module/az.network/new-azvirtualnetwork?view=azps-1.5.0
(Optional) Upload the YSoft SafeQ installation package to a storage account (or download it directly to VM).
This method lets you upload the installation package to only one location and attach it to VMs as a network drive.
Refer to Microsoft Azure documentation: https://docs.microsoft.com/en-us/azure/storage/common/storage-moving-data?toc=%2fazure%2fstorage%2ffiles%2ftoc.json
Prepare the Environment for YSoft SafeQ
Add rules to the Network Security Group
This guide disregards any firewall or proxy configuration. Make sure to also open those communication paths, if required.
Make sure the communication is open - specific settings depend on required functionality and MFD technology.
Always confirm the ports needed, refer to Network Communication.
Please note that communication within the VNet is unrestricted by default (rules AllowVnetInBound and AllowVnetOutBound are always present).
Also outbound communication to internet is unrestricted by default (rule AllowInternetOutBound is always present).
We recommend to restrict communication further by overriding these default rules.
Example of using PowerShell:
$resourceGroupName="YSoftSafeQ"$nsgName="YSoftSafeQnsg"$source="VirtualNetwork"$destination="VirtualNetwork"$prioritySeed= 1000$priorityIterator= 1# SERVER INBOUND$direction="Inbound"$ports=@([pscustomobject]@{name="MGMT-smtp";port=25;protocol="Tcp";direction=$direction;source=$source;destination=$destination;access="Allow"},[pscustomobject]@{name="SMB-1";port=110;protocol="Tcp";direction=$direction;source=$source;destination=$destination;access="Allow"},[pscustomobject]@{name="SMB-2";port=143;protocol="Tcp";direction=$direction;source=$source;destination=$destination;access="Allow"},[pscustomobject]@{name="SMB-3";port=993;protocol="Tcp";direction=$direction;source=$source;destination=$destination;access="Allow"},[pscustomobject]@{name="SMB-4";port=995;protocol="Tcp";direction=$direction;source=$source;destination=$destination;access="Allow"},[pscustomobject]@{name="MGMT-interface";port=443;protocol="Tcp";direction=$direction;source=$source;destination=$destination;access="Allow"},[pscustomobject]@{name="EUI-interface";port=9443;protocol="Tcp";direction=$direction;source=$source;destination=$destination;access="Allow"},[pscustomobject]@{name="job-SQ5CLIENT";port=9100;protocol="Tcp";direction=$direction;source=$source;destination=$destination;access="Allow"},[pscustomobject]@{name="job-LPR";port=515;protocol="Tcp";direction=$direction;source=$source;destination=$destination;access="Allow"},[pscustomobject]@{name="TS-TPR";port=4096;protocol="Tcp";direction=$direction;source=$source;destination=$destination;access="Allow"},[pscustomobject]@{name="TS-TE-1";port=5021;protocol="Tcp";direction=$direction;source=$source;destination=$destination;access="Allow"},[pscustomobject]@{name="TS-TE-2";port=5022;protocol="Tcp";direction=$direction;source=$source;destination=$destination;access="Allow"},[pscustomobject]@{name="TS-TE-3";port=5011;protocol="Tcp";direction=$direction;source=$source;destination=$destination;access="Allow"},[pscustomobject]@{name="TS-TE-4";port=5012;protocol="Tcp";direction=$direction;source=$source;destination=$destination;access="Allow"},[pscustomobject]@{name="TS-TE-5";port=5025;protocol="Tcp";direction=$direction;source=$source;destination=$destination;access="Allow"},[pscustomobject]@{name="TS-TE-6";port=25;protocol="Tcp";direction=$direction;source=$source;destination=$destination;access="Allow"},[pscustomobject]@{name="TS-TE-7";port=5610;protocol="Tcp";direction=$direction;source=$source;destination=$destination;access="Allow"},[pscustomobject]@{name="TS-TE-8";port=139;protocol="Tcp";direction=$direction;source=$source;destination=$destination;access="Allow"},[pscustomobject]@{name="TS-TE-9";port=5555;protocol="Tcp";direction=$direction;source=$source;destination=$destination;access="Allow"},[pscustomobject]@{name="SNMP";port=161;protocol="Udp";direction=$direction;source=$source;destination=$destination;access="Allow"})# SERVER OUTBOUND$direction="Outbound"$ports+=@([pscustomobject]@{name="MGMT-smtp";port=25;protocol="Tcp";direction=$direction;source=$source;destination=$destination;access="Allow"},[pscustomobject]@{name="LDAP1";port=389;protocol="Tcp";direction=$direction;source=$source;destination=$destination;access="Allow"},[pscustomobject]@{name="LDAP2";port=636;protocol="Tcp";direction=$direction;source=$source;destination=$destination;access="Allow"},[pscustomobject]@{name="LDAP3";port=3268;protocol="Tcp";direction=$direction;source=$source;destination=$destination;access="Allow"}[pscustomobject]@{name="SMB-1";port=110;protocol="Tcp";direction=$direction;source=$source;destination=$destination;access="Allow"},[pscustomobject]@{name="SMB-2";port=143;protocol="Tcp";direction=$direction;source=$source;destination=$destination;access="Allow"},[pscustomobject]@{name="SMB-3";port=993;protocol="Tcp";direction=$direction;source=$source;destination=$destination;access="Allow"},[pscustomobject]@{name="SMB-4";port=995;protocol="Tcp";direction=$direction;source=$source;destination=$destination;access="Allow"},[pscustomobject]@{name="job-IPP-1";port=80;protocol="Tcp";direction=$direction;source=$source;destination=$destination;access="Allow"},[pscustomobject]@{name="job-IPP-2";port=631;protocol="Tcp";direction=$direction;source=$source;destination=$destination;access="Allow"},[pscustomobject]@{name="job-IPP-3";port=443;protocol="Tcp";direction=$direction;source=$source;destination=$destination;access="Allow"},[pscustomobject]@{name="job-RAW";port=9100;protocol="Tcp";direction=$direction;source=$source;destination=$destination;access="Allow"},[pscustomobject]@{name="job-LPR";port=515;protocol="Tcp";direction=$direction;source=$source;destination=$destination;access="Allow"},[pscustomobject]@{name="SNMP";port=161;protocol="Udp";direction=$direction;source=$source;destination=$destination;access="Allow"},[pscustomobject]@{name="TUL-discovery";port=64099;protocol="Udp";direction=$direction;source=$source;destination=$destination;access="Allow"},[pscustomobject]@{name="TPR-TS";port=4095;protocol="Tcp";direction=$direction;source=$source;destination=$destination;access="Allow"},[pscustomobject]@{name="TS-WS-SSL-1";port=50001;protocol="Tcp";direction=$direction;source=$source;destination=$destination;access="Allow"},[pscustomobject]@{name="TS-WS-SSL-2";port=50003;protocol="Tcp";direction=$direction;source=$source;destination=$destination;access="Allow"},[pscustomobject]@{name="TS-TE-10";port=7627;protocol="Tcp";direction=$direction;source=$source;destination=$destination;access="Allow"})# DEPLOY$priority=$prioritySeed$nsgPS= Get-AzNetworkSecurityGroup-Name$nsgName-ResourceGroupName$resourceGroupNameforeach($portin$ports){$priority+=$priorityIterator$name=$port.port.ToString() +'-'+$port.name +'-'+$port.direction$nsgPS| Add-AzNetworkSecurityRuleConfig-Name$name`-Access$port.access-Protocol$port.protocol-Direction$port.direction-Priority$priority`-SourceAddressPrefix$port.source-SourcePortRange* `-DestinationAddressPrefix$port.destination-DestinationPortRange$port.port}$nsgPS|Set-AzNetworkSecurityGroupFor more information refer to Microsoft Azure documentation: https://docs.microsoft.com/en-us/powershell/module/az.network/add-aznetworksecurityruleconfig?view=azps-1.5.0
Create Virtual Machine.
It is important to correctly size the VM. Refer to YSoft SafeQ sizing Hardware Requirements.
For small installations or testing: Standard_D2_v3
For production installations: Standard_D4_v3
Example of using PowerShell:
$resourceGroupName="YSoftSafeQ"$vmName="YSoftSafeQVM"$subnet="YSoftSafeQsubnet"$nsgName="YSoftSafeQnsg"$VNETName="YSoftSafeQVNET"$VMsize="Standard_D2_v3"$location="eastus"$admin="sqadmin"$pass="ReallyReallyStrongPassword123-_~"# NETWORK$nsgPS= Get-AzNetworkSecurityGroup-ResourceGroupName$resourceGroupName-Name$nsgName$vnet= Get-AzVirtualNetwork-ResourceGroupName$resourceGroupName-Name$VNETName$subnetPS= Get-AzVirtualNetworkSubnetConfig-VirtualNetwork$vnet-Name$subnet$nicName=$vmName+"-nic"$nic= New-AzNetworkInterface-Name$nicName-ResourceGroupName$resourceGroupName-Location$location-SubnetId$subnetPS.Id-NetworkSecurityGroupId$nsgPS.Id# VM$password=ConvertTo-SecureString$pass-AsPlainText-Force$cred=New-ObjectSystem.Management.Automation.PSCredential ($admin,$password)$vmConfig= New-AzVMConfig-VMName$vmName-VMSize$VMsize| `Set-AzVMOperatingSystem-Windows-ComputerName$vmName-Credential$cred| `Set-AzVMSourceImage-PublisherNameMicrosoftWindowsServer-OfferWindowsServer-Skus2016-Datacenter-Versionlatest | `Add-AzVMNetworkInterface-Id$nic.Id# DEPLOYNew-AzVM-ResourceGroupName$resourceGroupName-Location$location-VM$vmConfigFor more information refer to Microsoft Azure documentation:
https://docs.microsoft.com/en-us/powershell/module/az.compute/new-azvm?view=azps-1.5.0
https://docs.microsoft.com/en-us/azure/virtual-machines/windows/sizes-general
Install YSoft SafeQ
Use Server Installer package and deploy First server scenario, enable Mobile Print Server feature and select Embedded PostgreSQL 11 database. See standard documentation: First server installation for details.
Configure YSoft SafeQ
Follow Standard documentation. Quick links:
Always secure the YSoft SafeQ installation following System communication hardening documentation.
Deploy Terminals, Connect Printers
Follow the standard YSoft SafeQ documentation for:
Deploy Print Queues
Refer to YSoft SafeQ FlexiSpooler Queues Overview for design decision.
Related YSoft SafeQ documentation YSoft SafeQ as a printer at Windows and Mac and Linux