Edit Connector - Configuration
Configure the properties specific to each connector type.
File System
Use the file system type connector to access either the local file system or a network shared folder.
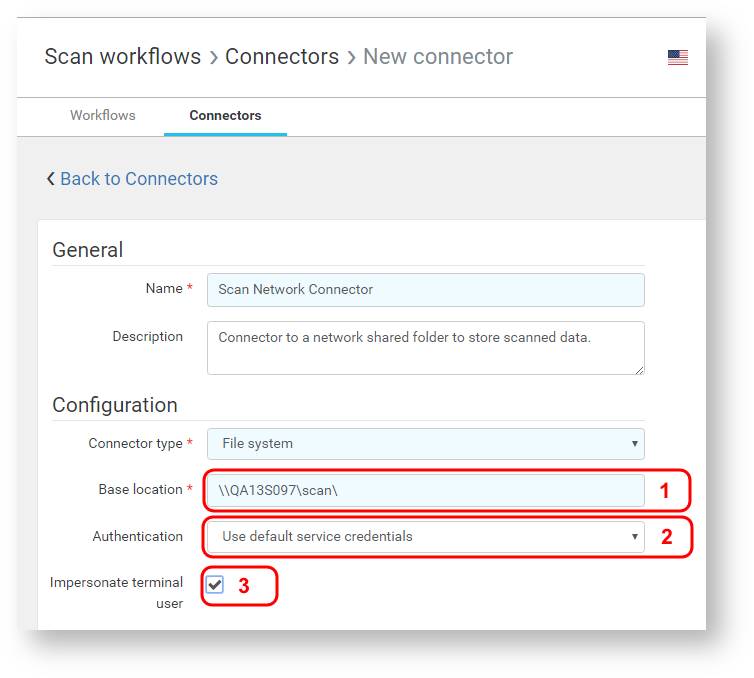
Base location
Defines a starting path for all workflows using this connector. It can be:
the path to a local file system on a server running the YSoft SafeQ Workflow Processing System, e.g., 'C:\scans\'
a UNC path to a network shared folder, e.g., '\\server_hostname\scans\'
The base path can contain capture variables, e.g. '%userHome%' variable.
If the base path of the file system type connector contains a variable %userHome%, then the scanning workflows utilizing this connector will not be displayed to users who don't have the %userHome% variable defined.
Scanning to the home directory of the user is possible only in case users have their home directory defined.
The home directory of the user can be defined during editing of the user in the "Home directory" field.
Authentication
Determines which credentials YSoft SafeQ 6 will use to access the folder. Choose from the below options:
Use default service credentials – the same account under which the YSoft SafeQ Workflow Processing System service is running will be used (most suitable for a local filesystem path or in a Workgroup).
Use custom service account – manually set account credentials (usable only in a Domain environment, suitable for a shared network folder)

Username – an account name in the format 'domain\username'. UPN format ([email protected]) is not supported.
Password – the account password
"Use custom service account" cannot be used in a Workgroup environment. It also cannot be used in the environment where the Workflow Processing System server is in a different domain as a target file server and there is no trust between domains.
In a Workgroup environment it is recommended to:
- Create a local account on a server with Workflow Processing System and give it admin rights.
- Configure Workflow Processing System service run as that user.
- Restart Workflow Processing System service
- Set Connector in the web interface to "Use default service credentials" and set the path to your network location.
- Create on the remote file server another local account with the same username and password. Grant user file and share permissions to the destination path.
Impersonate terminal user
When this option is enabled, YSoft SafeQ 6 will access the file system location as it would be accessed by the user logged in at a YSoft SafeQ terminal. YSoft SafeQ 6 will verify whether the impersonated user has enough permission to write to the folder or to browse it. The file/directory owner will be changed appropriately. Enabling terminal user impersonation is helpful to restrict access to certain folders in a shared folder and to keep track of who created files. Impersonate terminal user is not supported for workgroup environment.
To allow YSoft SafeQ 6 to impersonate a terminal user, additional configuration is needed:
usernames in YSoft SafeQ 6 must be in UPN format (username@domain), e.g. [email protected] – this username will then be seen as the file owner
WPS service must have read and write access to the shared folder and all its contents
use a custom service account that has the required permissions
WPS service must have the Restore files and directories privilege on the machine that hosts the shared folder in order to change the file/directory owners. Accomplish this in several ways:
The Workflow Processing System runs under a Local System account by default. Add all the computers running the service in the Local Security Policy console (secpol.msc) to the 'Restore files and directories' policy located in the Local Policies, User Rights Assignment folder
Or add all computers that host the Workflow Processing System into the Backup Operators group (which has the required privileges as default) in your domain
Or change the account under which the Workflow Processing System services are running in the Services console to the one which has required permissions.
For proper delivery of scans into a distributed file system (DFS), please make sure that the "Network access: Do not allow storage of passwords and credentials for network authentication“ global policy is set to "Disabled" or not set at all on every server running the "WPS" service.
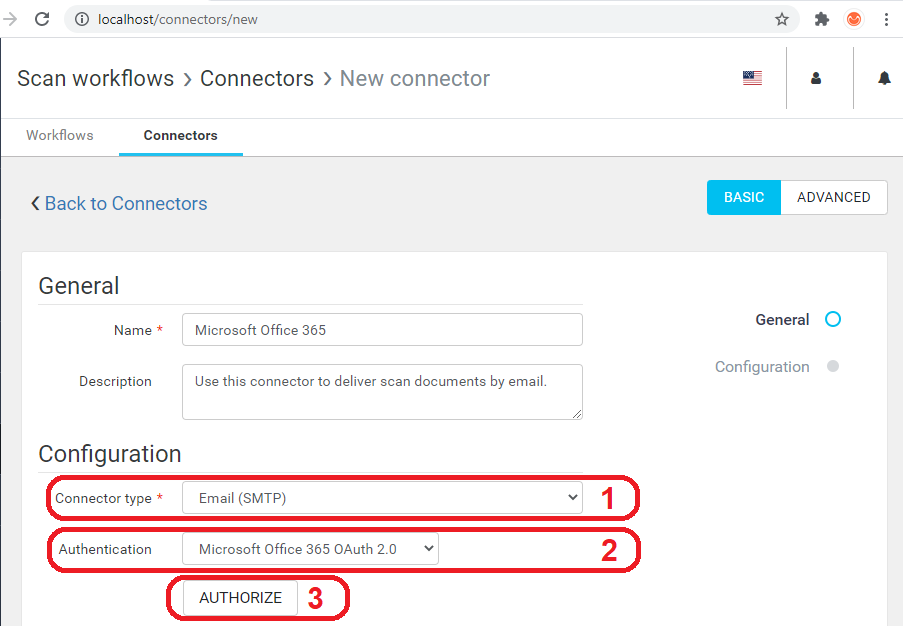
Email (SMTP)
Use the Email (SMTP) type connector to deliver scanned files over email using an SMTP server. You can configure the SMTP server using the system settings in Management or through Microsoft 365 OAuth 2.0.
System settings
There are no editable configuration options for this connector; only the global mail server configuration is displayed. You can configure your SMTP mail server in System/Configuration. If mail server settings are not configured correctly, it is still possible to create an Email (SMTP) connector; however, workflows that use the connector will fail when delivering scanned files. If this occurs, the Workflow Processing System logs an error in the wps.log file.
Connector type – select Email (SMTP) from the connector type list.
Authentication - select System settings from the authentication list.
Primary mail server – the SMTP server host address set on the System > Configuration page or the Dashboard > Welcome widget.
Mail server account – the SMTP username set on the System > Configuration page or the Dashboard > Welcome widget.
Microsoft 365 OAuth 2.0
For on-premise installations only.
Prerequisites
First, you need to create a custom Microsoft Azure App registration, you can follow the guide on How to register a new app in Microsoft Azure for instructions. The application must be registered using the redirect URI set as "https://management/oauth2/client/smtpMicrosoft/authorize-callback" (where https://management is a URI of YSoft SafeQ Management.) It is required to be able to do a successful authorization, if the redirect URI is not set or it's wrongly configured, then you will see an error "The reply URL specified in the request does not match the reply URLs configured for the application". The application must be registered with following scopes:
https://outlook.office.com/SMTP.Send - required, to be able to send emails
openid and profile - optional, to prefill the username field (this requires you to also add "upn" optional claim into ID token in the application token configuration page)
offline_access - required, to allow the authorization last for extended time
Once the application is registered, you need to store the Client ID and Client Secret in the system configuration properties microsoftEmailClientId and microsoftEmailClientSecret .
In addition, the machine where the Management interface is installed must have access to the URLs that Microsoft uses the authorization refresh of the tokens, which are the following:
Limitations
When updating from older MUs to MU65 and higher, or when importing a Microsoft 365 OAuth 2.0 connector, reauthorization of the user configured in the Microsoft 365 OAuth 2.0 connector is needed!
Personal accounts are not supported.
Troubleshooting
If the error is shown in the authorization pop-up window saying "The reply URL specified in the request does not match the reply URLs configured for the application" and you updated from older MUs to MU71 and higher, reconfiguration of the Microsoft Azure registered application is needed. You need to change the redirect URIs according to the prerequisites steps.
For additional troubleshooting issues, you can check the guide in Troubleshooting Microsoft Azure Authorization.
Connector configuration
Log out from all Microsoft accounts linked with your default web browser manually or use this link https://login.microsoftonline.com/logout.srf.
Connector type – select Email (SMTP) from the connector type list.
Authentication - select Microsoft 365 OAuth 2.0 from the authentication list.
Click on the Authorize button
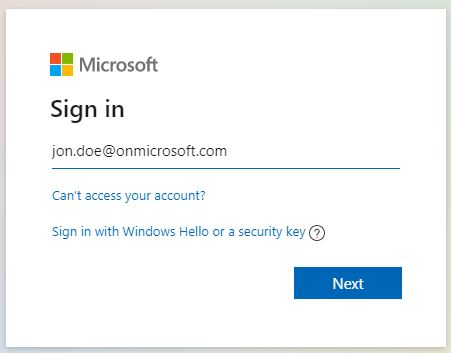
A new window will open fill in the Email address of the account that will be used for delivery of the scanned documents. Click on the Next button.
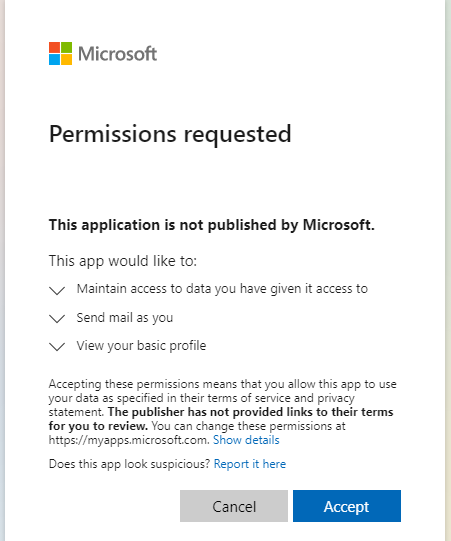
Grant application permission for sending the email.
If the Username was not prefilled, fill in the account used for the Authorization. Username has to be in UPN (User Principal Name) format.
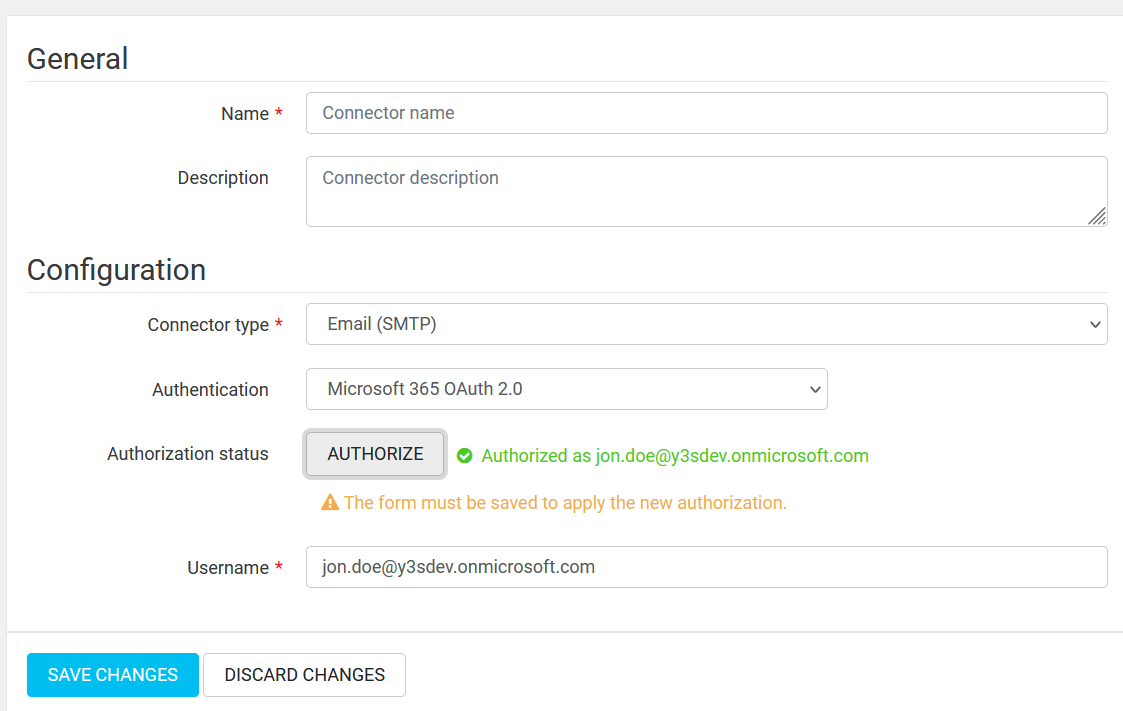
Save the changes.
When validation fails the authorization is cleared because of security reasons and needs to be repeated.
Microsoft Exchange
Use the Microsoft Exchange type connector to deliver scanned files over email using a Microsoft Exchange Server. This connector functions similarly to the Email (SMTP) type connector, however, Microsoft Exchange enables additional capabilities including terminal user impersonation.
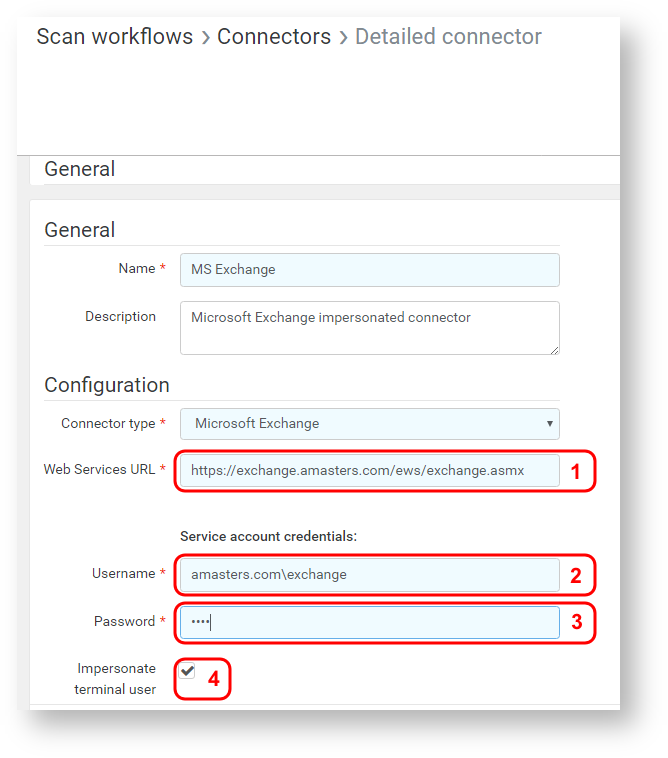
Web Services URL – a Microsoft Exchange 2010 or Microsoft Exchange 2013 Web Services URL (usually https://<mail.server>/EWS/Exchange.asmx).
Username – the domain and username of the Microsoft Exchange account used for authentication. If the domain is omitted, the local host is used (.\username).
Password – the password of the Microsoft Exchange account used for authentication.
Impersonate terminal user (optional) – when terminal user impersonation is enabled, the connector acts as the mailbox owner. In this case, the email address of the YSoft SafeQ 6 user logged in at the terminal must also exist in MS Exchange (you can configure a user's email address in the Users tab of the YSoft SafeQ management interface). Emails sent using a Microsoft Exchange type connector with user impersonation enabled will be stored in the user's Sent Items folder. The service account should be in ApplicationImpersonation MS Exchange role when using terminal user impersonation.
When terminal user impersonation is disabled, all emails sent using the connector will be sent using the service account mailbox. The email sender will be the specified service account and sent emails will be in the service account's Sent Items folder in Microsoft Exchange. Please refer to Edit workflow – MS Exchange to use the Send on behalf or Send as functionality.
Dropbox Business/Enterprise
Use the Dropbox Business/Enterprise type connector to deliver scanned files to a Dropbox Business or Enterprise team member. It is possible to deliver scanned files to a team member's private folder as well as to team-shared folders.
Prerequisites
In order to use the Dropbox Business/Enterprise connector, a working Internet connection on the machine where the Management Service is installed is required. If your network configuration requires a proxy to access the Internet, please follow the steps below.
The proxy connection can be configured via several options but applies only when YSoft SafeQ Management Server is not licensed with a multitenant license.
Setting up an Internet proxy
To use an Internet proxy, a configuration of several expert level settings in the system configuration of the YSoft SafeQ management interface must be made. Switch to expert settings and use the search function to find proxy-related settings (i.e., by typing proxy into the search field).
useProxy – This setting is ignored for YSoft SafeQ Management Server running in multitenant mode.
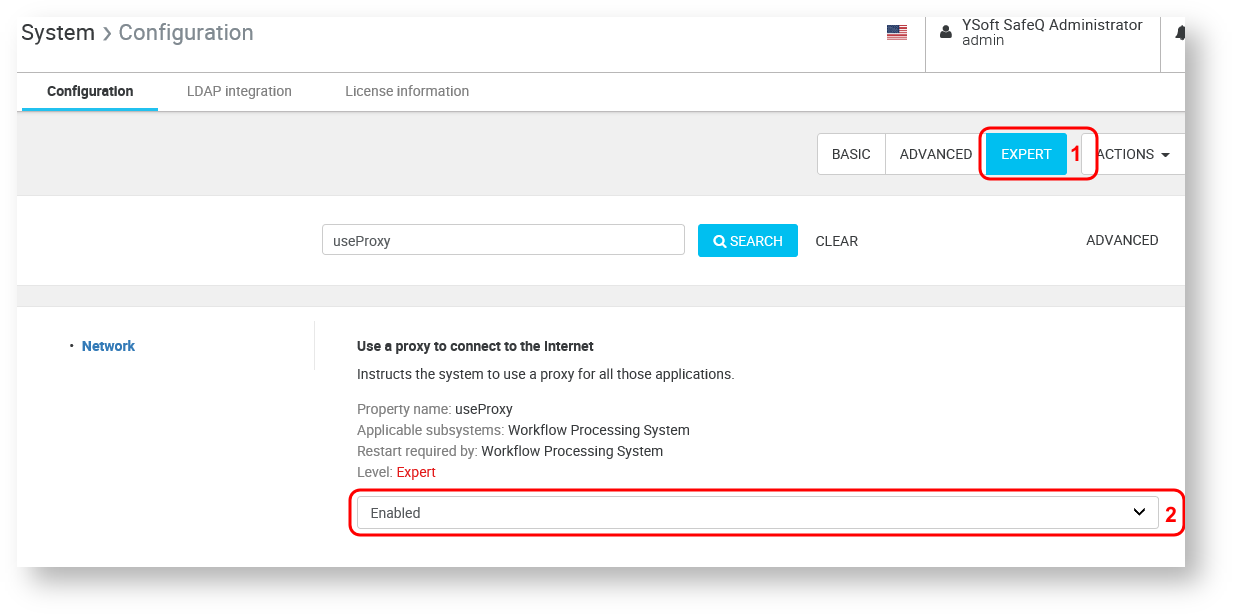
To see the Internet proxy configuration, select the Expert level settings.
Ensure that YSoft SafeQ Management Server is not deployed with a multitenant license (because all proxy settings would be ignored). Be aware that the Workflow Processing System server respects proxy settings all the time.
Set the Use a proxy to connect to the Internet setting to Enabled.
proxyEndpoint
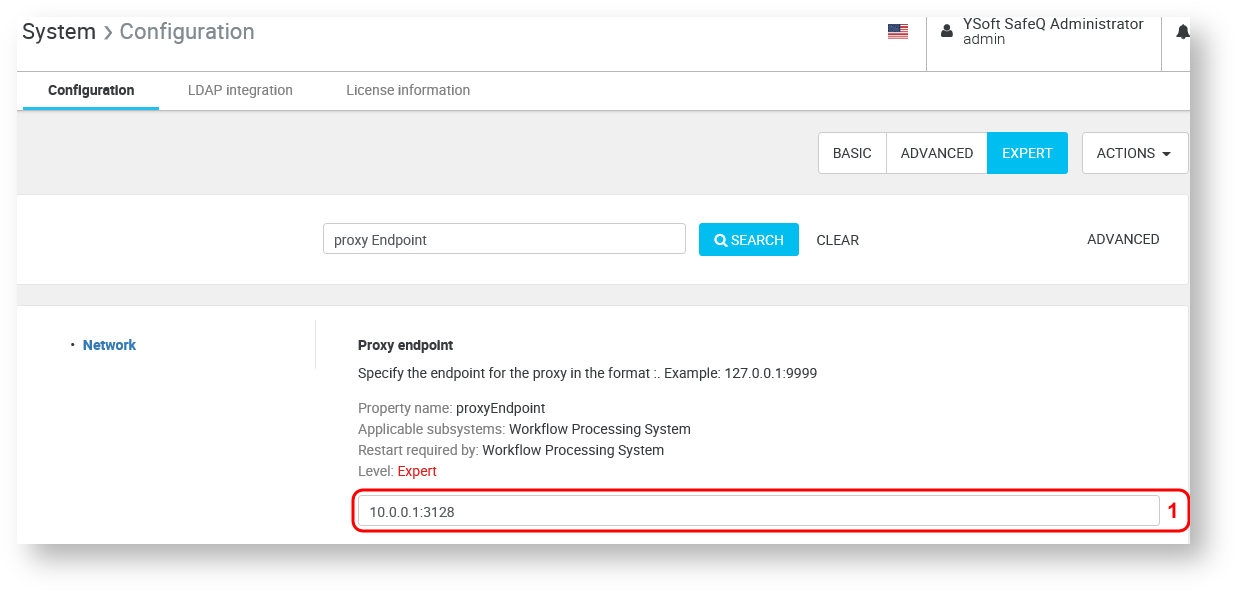
When using a proxy to access the Internet, specify the proxy endpoint address. The proxy endpoint must be in the <IP address>:<port> format.
proxyAuthenticate
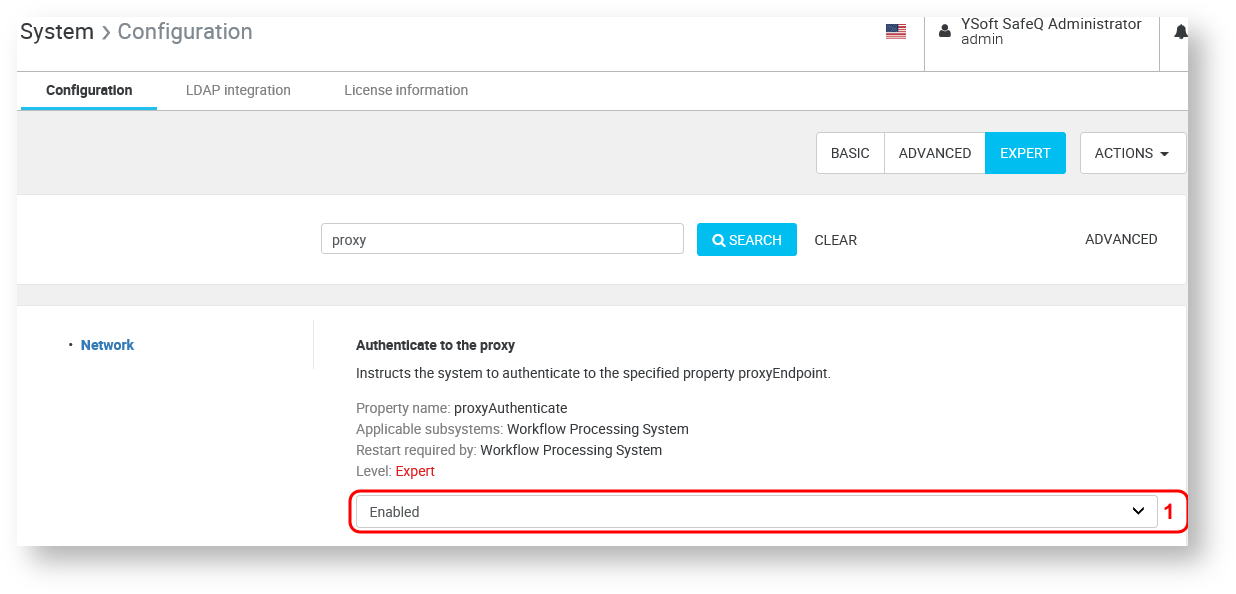
If your proxy server requires authentication, set the Authenticate to the proxy setting to Enabled.
proxyUser
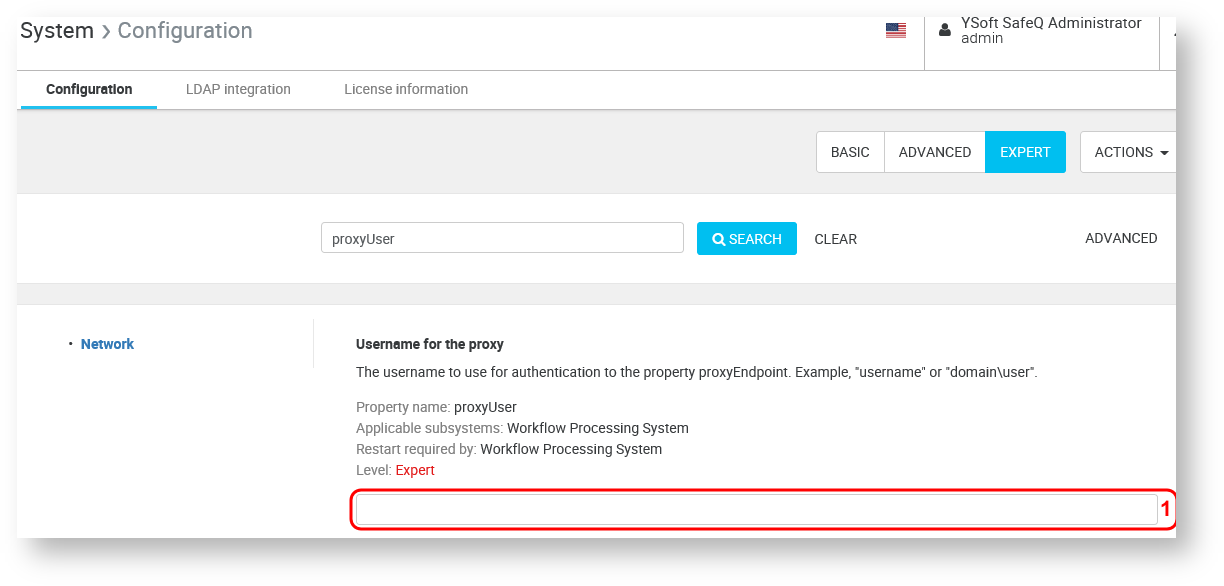
If your proxy server requires authentication, specify the proxy username. If proxy authentication is not required, leave the field empty.
proxyPassword
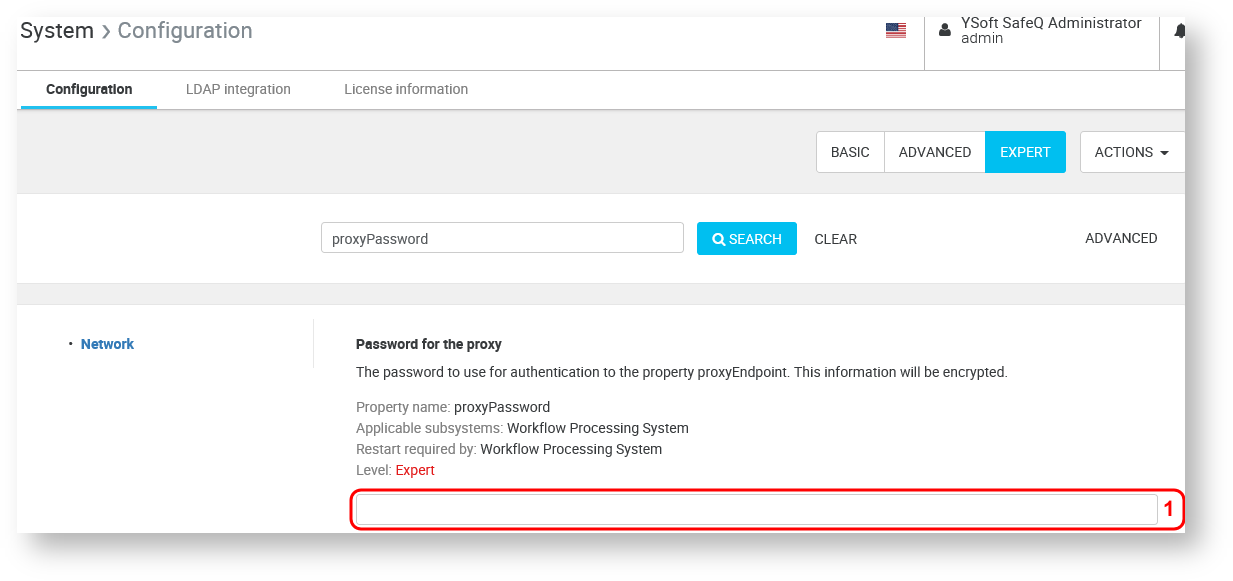
If your proxy server requires authentication, specify the proxy password. If authentication is not required, leave the field empty.
Setting up the Dropbox connector
To use a Dropbox Business/Enterprise type connector, it is necessary to authenticate with Dropbox using OAuth 2 as described in the following paragraphs.
Drobox connector setup
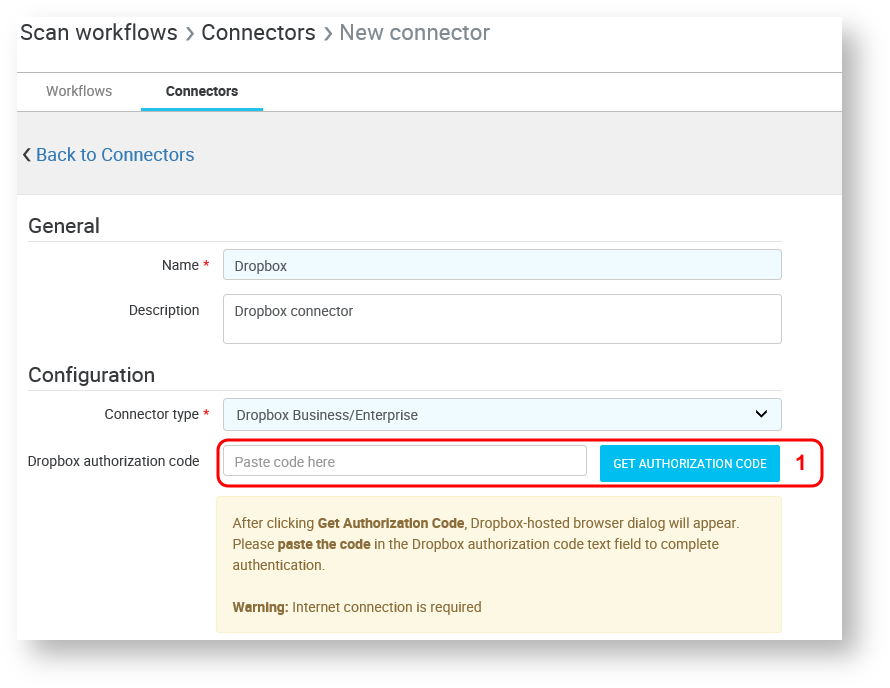
Dropbox authorization code – After clicking the Get Authorization Code button, a Dropbox-hosted browser dialog appears (see the picture below).
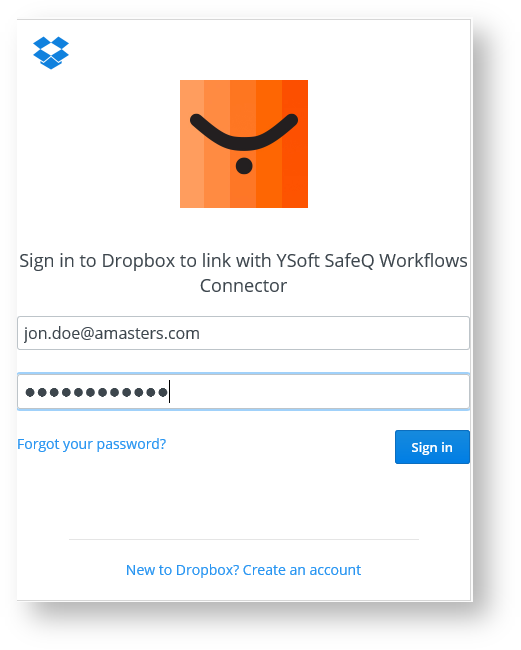
In this dialog, enter your Dropbox Business administrator account email, password and click the Sign in button. Another Dropbox-hosted page will prompt for authorization of the YSoft SafeQ Workflows Connector (see the picture below).
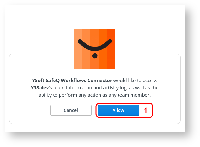
Click the Allow button to allow the YSoft Dropbox Business/Enterprise connector to access your Dropbox Business account and act as a team member. After confirmation, a Dropbox-hosted screen will be displayed with an authorization code (see the picture below).
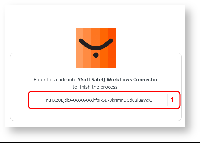
Copy the displayed code and paste it into the Dropbox authorization code field in the YSoft SafeQ management interface (see the picture below).
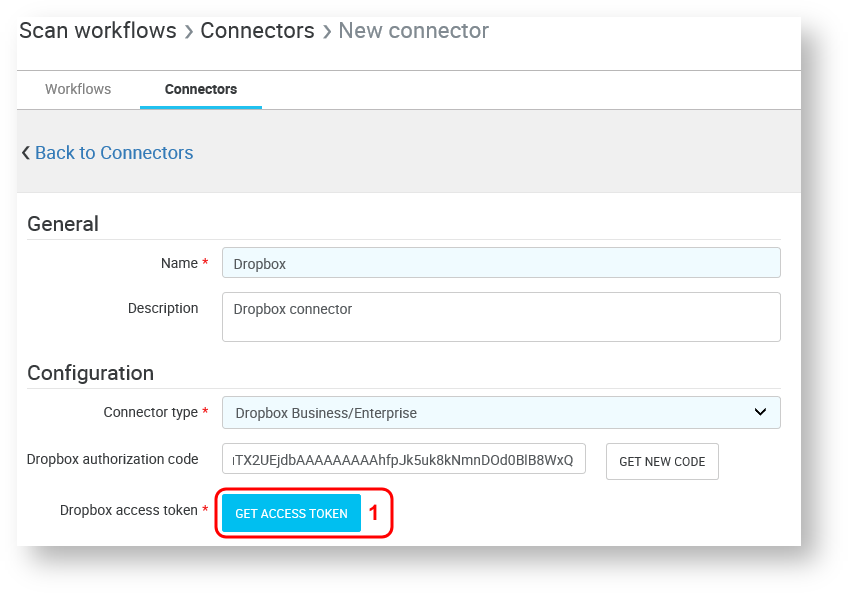
Dropbox access token – After pasting in the Dropbox authorization code, click the Get Access Token button to generate a unique access token.
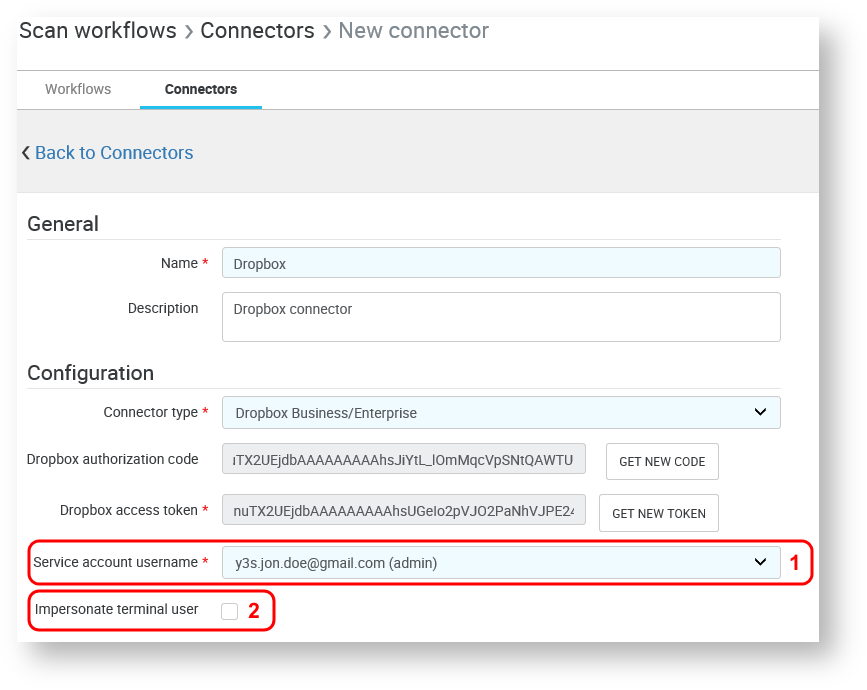
Service account username – After the management interface generates a Dropbox access token, select a service account username. This does not have to be the Dropbox Business team administrator – the Service account username list contains all Dropbox team members.
Impersonate terminal user – When terminal user impersonation is enabled, the DropBox Business connector will deliver scanned files as the user logged in at the YSoft SafeQ terminal. In such a case, the email address of the YSoft SafeQ user logged in at the terminal must match an email address of a user in your Dropbox Business team account (configure a user's email address in the Users tab of the YSoft SafeQ management interface). When terminal user impersonation is disabled, all documents delivered using the connector will be delivered under the specified service account.
Microsoft SharePoint 2010
Use the SharePoint 2010 type connector to deliver scanned files to a location in a Microsoft SharePoint 2010 document library.
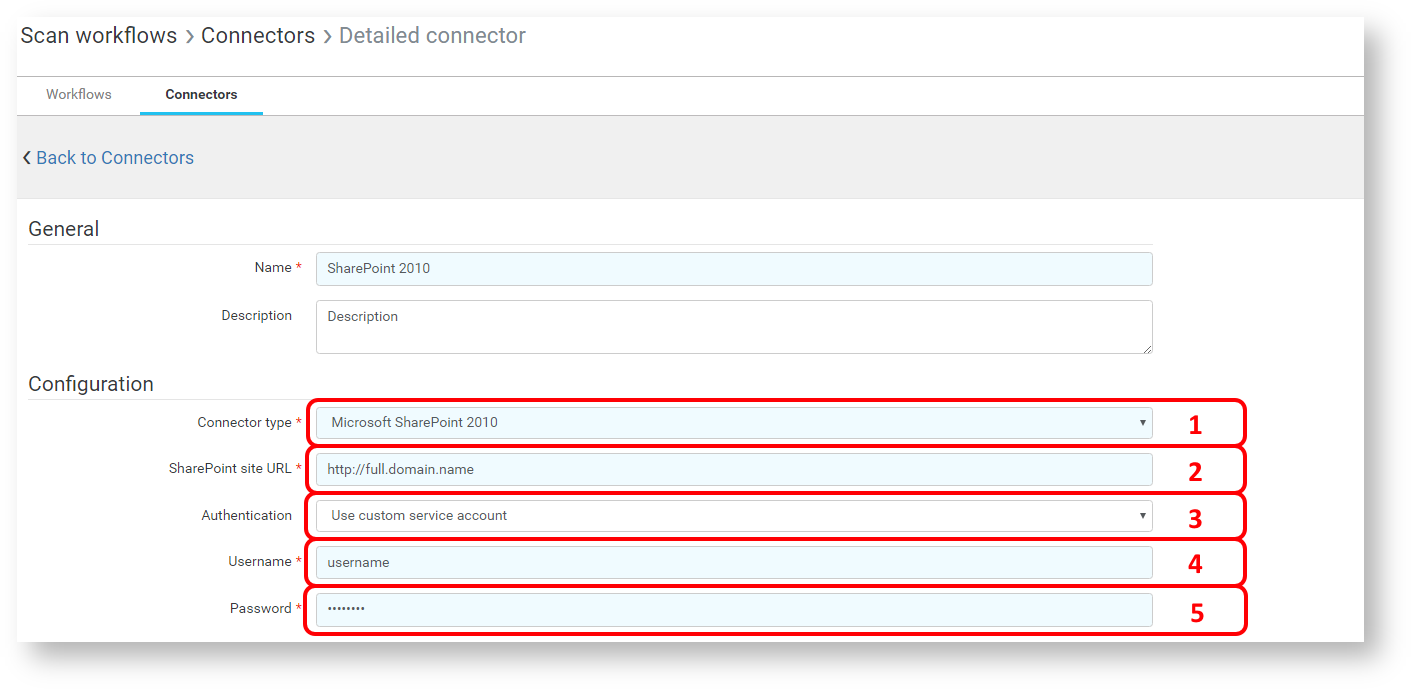
Connector type – Select Microsoft SharePoint 2010 from the connector type list.
SharePoint site URL – Sharepoint 2010 site URL. This URL is a fully qualified domain name, e.g, http://full.domain.name
To acquire this information, please contact your Sharepoint administrator. There is no other way to find it.
Authentication – At this time, the only option is to use a custom service account to authenticate with Microsoft SharePoint 2010. Authentication using the default service account is planned for a future release of YSoft SafeQ 6.
Username – The domain and username of the Microsoft SharePoint 2010 account used for authentication. If the domain is omitted, the local host is used (.\username).
Password – The password of the Microsoft SharePoint 2010 account used for authentication.
Sharepoint 2010 Foundation is not supported.
Microsoft SharePoint 2013
Use the SharePoint 2013 type connector to deliver scanned files to a location in a Microsoft SharePoint 2013 document library. The Microsoft SharePoint 2013 connector allows the impersonation of a YSoft SafeQ terminal user.
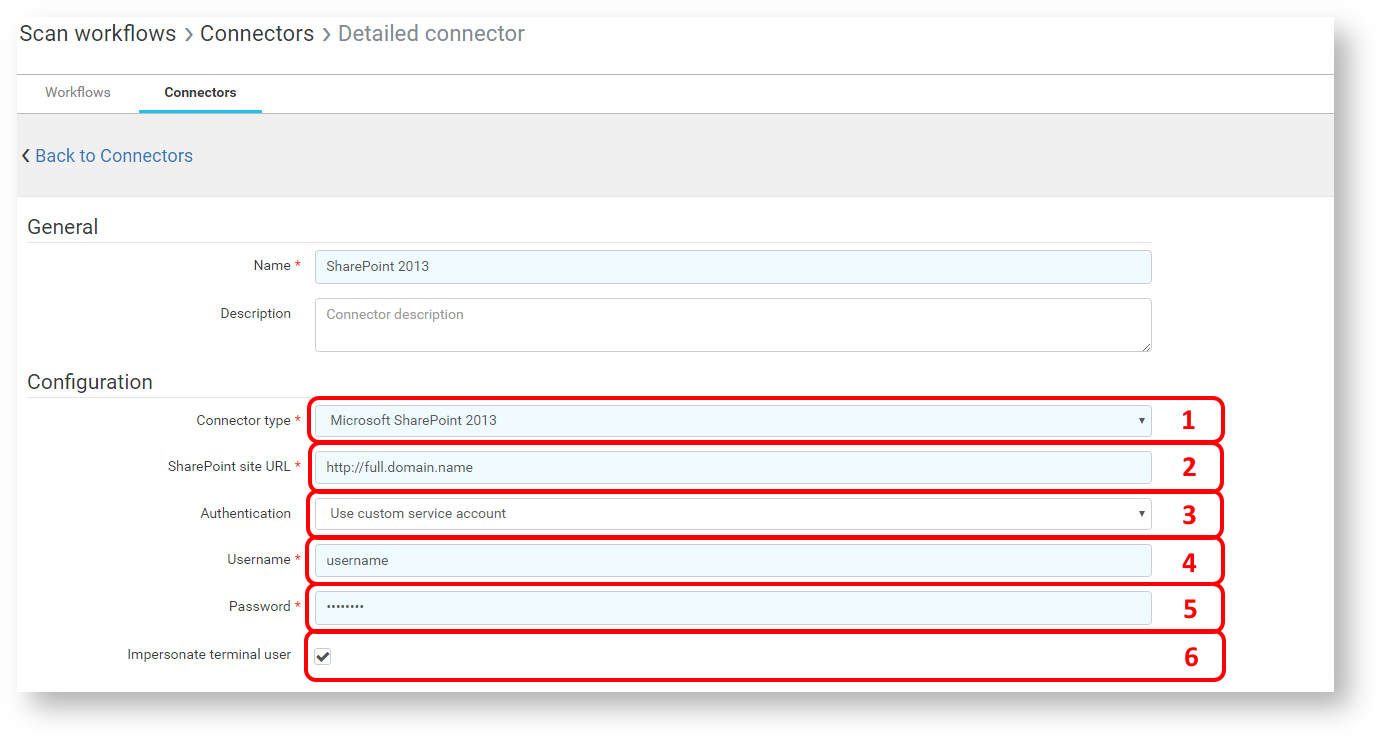
Connector type – Select Microsoft SharePoint 2013 from the connector type list.
SharePoint site URL – Sharepoint 2013 site URL. This URL is the fully qualified domain name, e.g., http://full.domain.name
To acquire this information, please contact your Sharepoint administrator. There is no other way to find it.
Authentication – At this time, the only option is to use a custom service account to authenticate with Microsoft SharePoint 2013. Authentication using the default service account is planned for a future release of YSoft SafeQ 6.
Username – The domain and username of the Microsoft SharePoint 2013 account used for authentication. If the domain is omitted, the local host is used (.\username). The selected user must have read/write rights for all folders intended to be used in the related workflows.
Password – The password of the Microsoft SharePoint 2013 account used for authentication.
Impersonate terminal user – When this option is enabled, YSoft SafeQ will no longer use the service account (4,5) to access the Microsoft SharePoint 2013 document library but it will act on behalf of the user logged in at the YSoft SafeQ terminal. SharePoint will verify whether the impersonated user has enough permission to write to the document library or to browse it. The service account will be used to acquire the user's windows identity token. Enabling terminal user impersonation is helpful to restrict access to certain folders in a document library and to keep track of who creates files.
In order to allow terminal user impersonation in Microsoft SharePoint 2013, the YSoft SafeQ user's email address has to match to the same user in Microsoft SharePoint and Microsoft SharePoint impersonation add-on has to be installed. Please follow the instructions inConfiguring User Impersonation in Microsoft SharePoint 2013 and 2016 to install the SharePoint add-on.
Sharepoint 2013 Foundation is not supported.
Microsoft OneDrive for Business (registered app with full access)
Scan to OneDrive is NOT supported for national cloud deployments, see https://docs.microsoft.com/en-us/graph/deployments for more information about national cloud deployments.
Use the Microsoft OneDrive for Business (registered app with full access) type connector to deliver scanned files to a location in OneDrive for Business.
In order to successfully configure the Microsoft OneDrive for Business (registered app with full access) connector, it is necessary to create an Office 365 application in your Microsoft Azure Active Directory – Please refer to Configuring and Deploying the Office 365 application for SharePoint Online and OneDrive Business for tips on how to set up your Azure Active Directory environment. Additionally, the computer where the WPS server runs must have access to the Internet. If there is a proxy, please make sure to set it up in YSoft SafeQ management interface > System > Configuration – set the view setting to "Expert" and search for the term "proxy". This is important because WPS ignores the Internet proxy settings of the computer it runs on. There is an option to configure the proxy (see the Dropbox guide for more details).
Please make sure to set up the SharePoint client certificate thumbprint property in the system settings with your Azure certificate thumbprint.
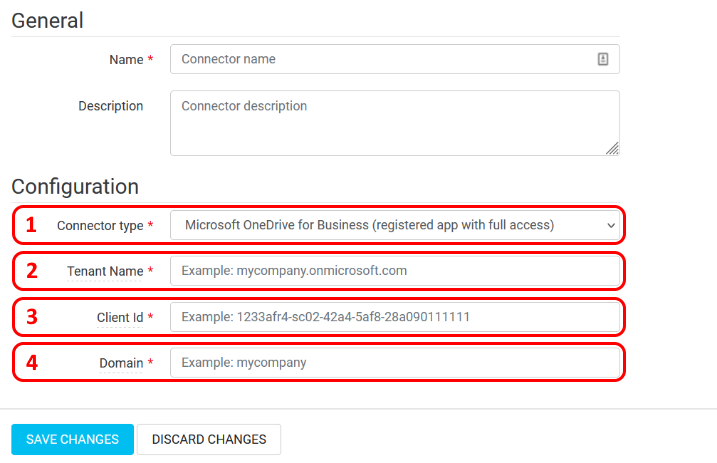
Connector type – Select Microsoft OneDrive for Business (registered app with full access) from the connector type list.
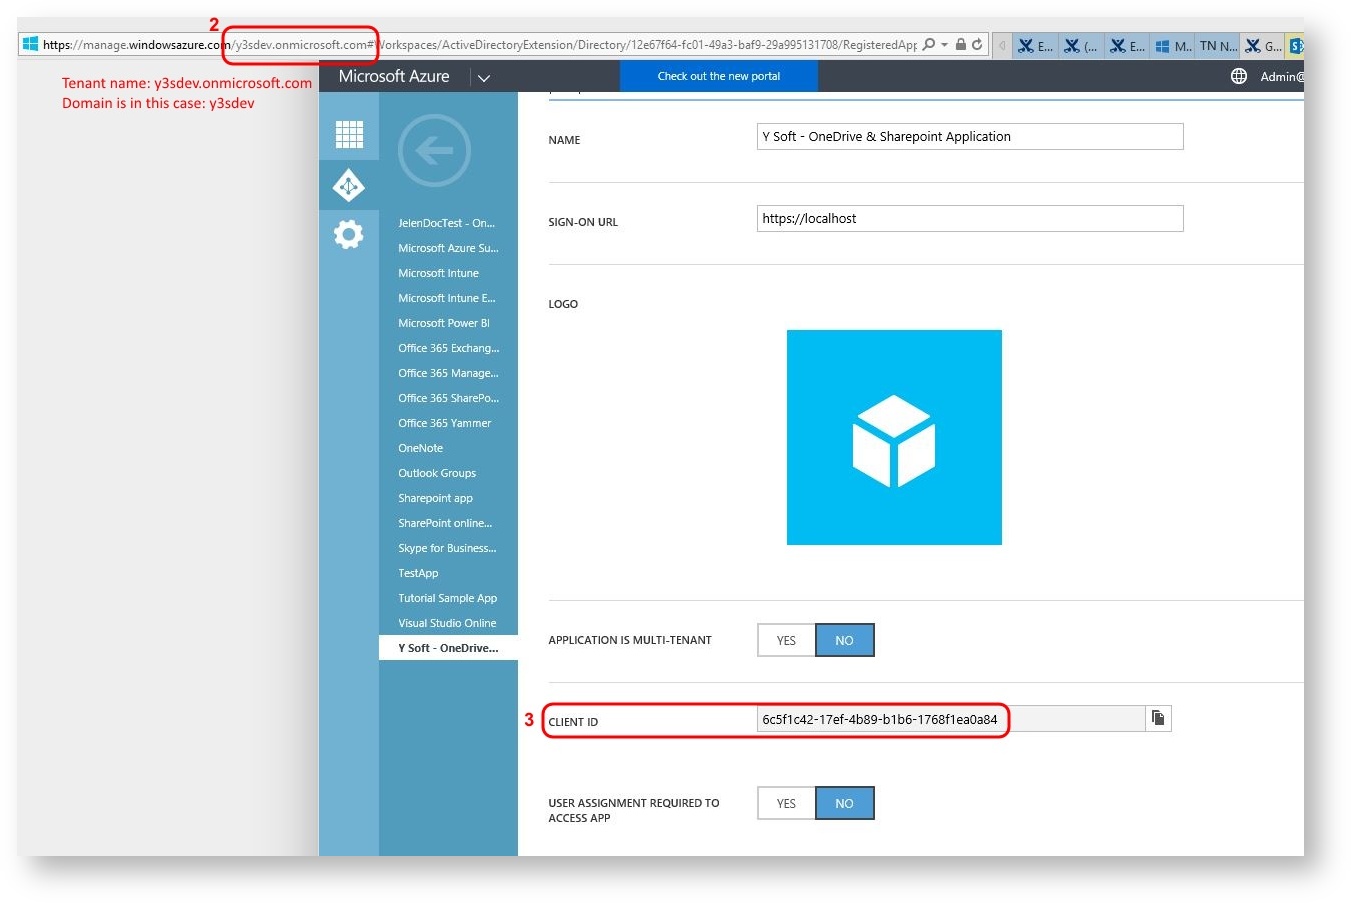
Tenant Name – The Office 365 Tenant Name obtained from the Microsoft Azure Active Directory, e.g., 'mycompany.onmicrosoft.com'
Client ID – The client ID of the Office 365 app obtained from Microsoft Azure Active Directory.
Domain – The domain obtained from Microsoft Azure Active Directory, e.g., 'mycompany' (the full application URL is 'https://{domain}-my.sharepoint.com')
For more info, see the picture below.
Append to PDF might not work properly with Microsoft OneDrive for Business (registered app with full access) for files greater than 3MB if two or more users are modifying the same document at the same time due to a limitation in OneDrive's ability to solve conflicts.
Microsoft OneDrive for Business (OAuth 2.0 with user-based access)
Use the Microsoft OneDrive for Business (OAuth 2.0 with user-based access) type connector to deliver scanned files to a location in a selected Microsoft OneDrive for Business library with user-based authorization. There are two ways how users can authorize:
in advance – administrators can share an authorization link provided in the connector configuration with users so they can authorize YSoft SafeQ before going to terminal
during scanning – the user can request instructions for authorization from the terminal when trying to access Microsoft OneDrive for Business workflows, the email template can be modified from the connector configuration page by administrators
Prerequisites
If using the on-prem solution app registration in Microsoft azure is required. You can follow the guide on Configuring Microsoft OneDrive for Business or SharePoint Online with user based access. You will have to use two specific properties mentioned below.
Redirect URI - http://your.management.com/oauth2/client/onedrive/user-authorize-callback
API Permissions - Microsoft Graph -> Delegated Permissions -> Files.ReadWrite
Client ID and secret for SharePoint Online must be set. (These properties are obtained during the app registration process.)
onedriveOAuth2ClientId - property can be found in management and should be set to OneDrive Application Client ID
onedriveOAuth2ClientSecret - property can be found in management and should be set to OneDrive Application Client Secret
The authorization page must be accessible by end users from all site servers.
The authorization page is hosted in YSoft SafeQ Management.
managementServiceUrl - is used to create an authorization invitation link and must be configured to an address on which YSoft SafeQ Management Service is accessible
YSoft SafeQ Management Service should be protected by a valid certificate, please refer to Configuring SSL/TLS for YSoft SafeQ Management Service for detailed information.
In addition, the machine where the Management interface is installed must have access to the URLs that Microsoft uses the authorization refresh of the tokens, which are the following:
Additionally, the computer where the WPS server runs must have access to the Internet. If there is a proxy, please make sure to set it up in YSoft SafeQ management interface > System > Configuration – set the view setting to "Expert" and search for the term "proxy". This is important because WPS ignores the Internet proxy settings of the computer it runs on. There is an option to configure the proxy (see the Dropbox guide for more details).
National cloud deployment configuration & Limitations
See section OAuth 2.0 with user-based access common limitations and National cloud deployment below.
Troubleshooting
"The reply URL specified in the request does not match the reply URLs configured for the application" shown after authentication and authorization
"Redirect URI" does not match with the Azure AD App Registration. Please make sure you are accessing YSoft SafeQ via a valid and registered address and make sure the OpenID Connect setup was finished correctly. Redirect URI should be similar to:
http://your.management.com/oauth2/client/onedrive/user-authorize-callback - if you use Microsoft SSO directly
After upgrade from an older version of SafeQ6 to 6.0.76 or higher, new OneDrive user authorizations end with error "AADSTS50011: The redirect URI 'https://your.management.com/oauth2/client/onedrive/user-authorize-callback' specified in the request does not match the redirect URIs configured for the application 'your-azure-app-id'"
Because of changes in the OneDrive OAuth 2.0 connector, it is necessary to add the new callback URL to your Azure AD App Registration for OneDrive - please refer to the previous troubleshooting point for the new callback URL format.
"Microsoft.Graph.ServiceException: Code: accessDenied" or "Microsoft.Graph.ServiceException: Code: itemNotFound" in YSoft SafeQ Workflow Processing System
The issue appears when you execute workflow or when you try to do folder browsing on terminals. The reason is that Files.ReadWrite scope was not set (see the prerequisites) and authorization was finished without it. The authorization token received from Microsoft does not possess the right to access OneDrive business and that is why it later responds with "access denied" or "item not found".
The solution is that administrator must configure the missing scope by following the prerequisites above (please note that after that YSoft SafeQ Management Service must be restarted) and then users with incorrect authorization must repeat the authorization process, e.g. by navigating to Authorization URI and following instructions there.
Connector configuration
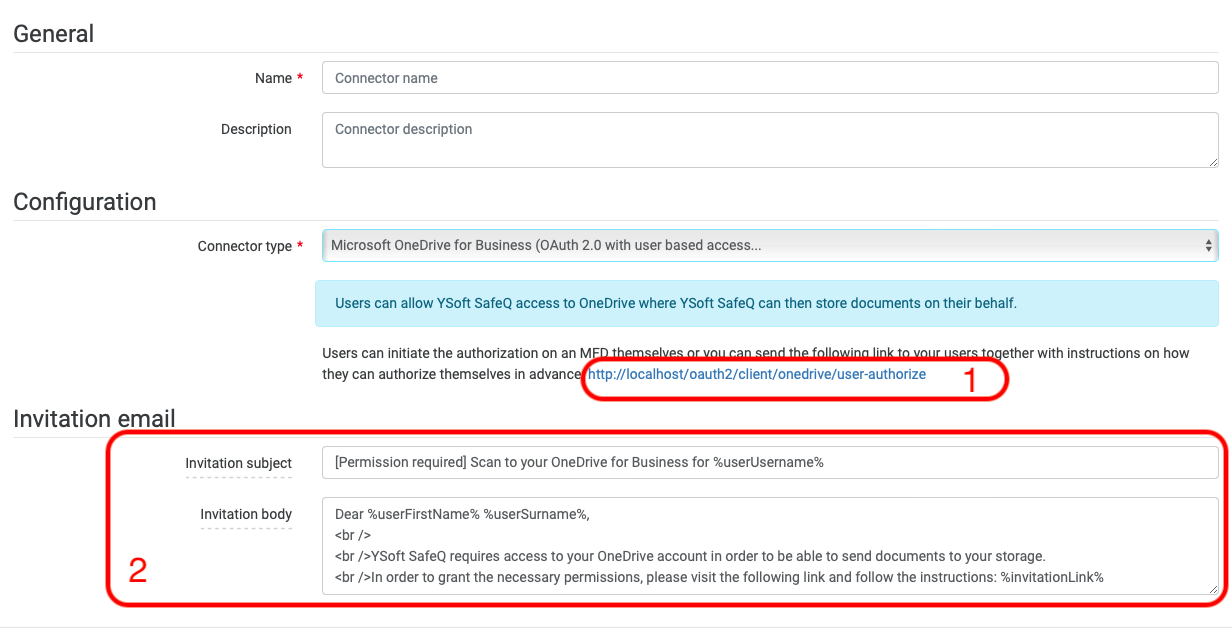
Authorization URI - This is information for an administrator to distribute it to users so they can perform authorization in advance, before going to the terminal.
Invitation email template - This is a template of an email user can request from the terminal with instructions on how to perform SharePoint Online authorization. The template supports workflow variables and also HTML tags.
Microsoft SharePoint Online
Scan to SharePoint Online is NOT supported for national cloud deployments, see https://docs.microsoft.com/en-us/graph/deployments for more information about national cloud deployments.
Use the Microsoft SharePoint Online type connector to deliver scanned files to a location in a selected Microsoft SharePoint Online library.
In order to successfully configure the Microsoft SharePoint Online connector, it is necessary to create an Office 365 application on your Microsoft Azure AD – Please refer to Configuring and Deploying the Office 365 application for SharePoint Online and OneDrive Business for tips on how to set up your Azure AD environment. Additionally, the computer where the WPS server runs must have access to the Internet. If there is a proxy, please make sure to set it up in YSoft SafeQ management interface > System > Configuration – set the view setting to "Expert" and search for the term "proxy". This is important because WPS ignores the Internet proxy settings of the computer it runs on. There is an option to configure the proxy (see the Dropbox guide for more details).
Please make sure to fill in your Azure certificate thumbprint in the parameter sharepointClientCertificateThumbprint in the system settings of the management interface.
https:// <myCompanyName> .sharepoint.com/ sites/<mySite>/<myOptionalSubsite> / <myDocumentLibrary> /Forms/AllItems.asp - when using custom site
https:// <myCompanyName> .sharepoint.com/ <myOptionalSubsite> / <myDocumentLibrary> /Forms/AllItems.asp - when using default SharePoint site, typically "Communication site"
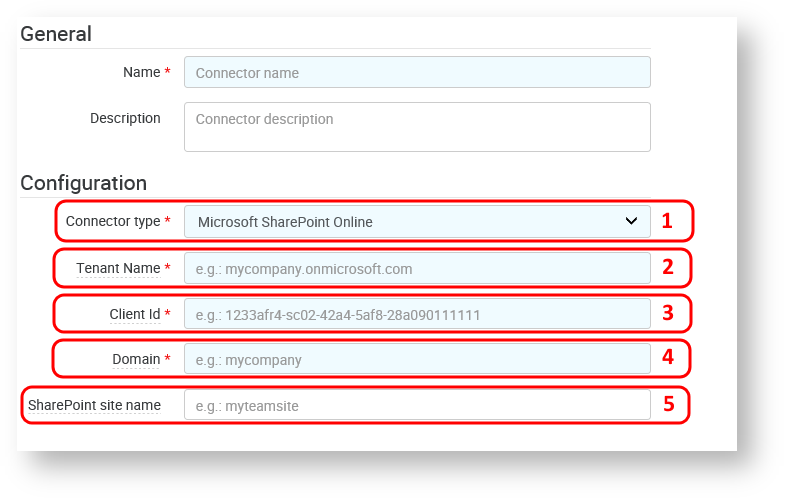
Connector type – Select Microsoft SharePoint Online from the connector type list.
Tenant Name – The Office 365 Tenant Name obtained from Microsoft Azure Active Directory.
Client ID – The client ID of the Office 365 app obtained from Microsoft Azure Active Directory.
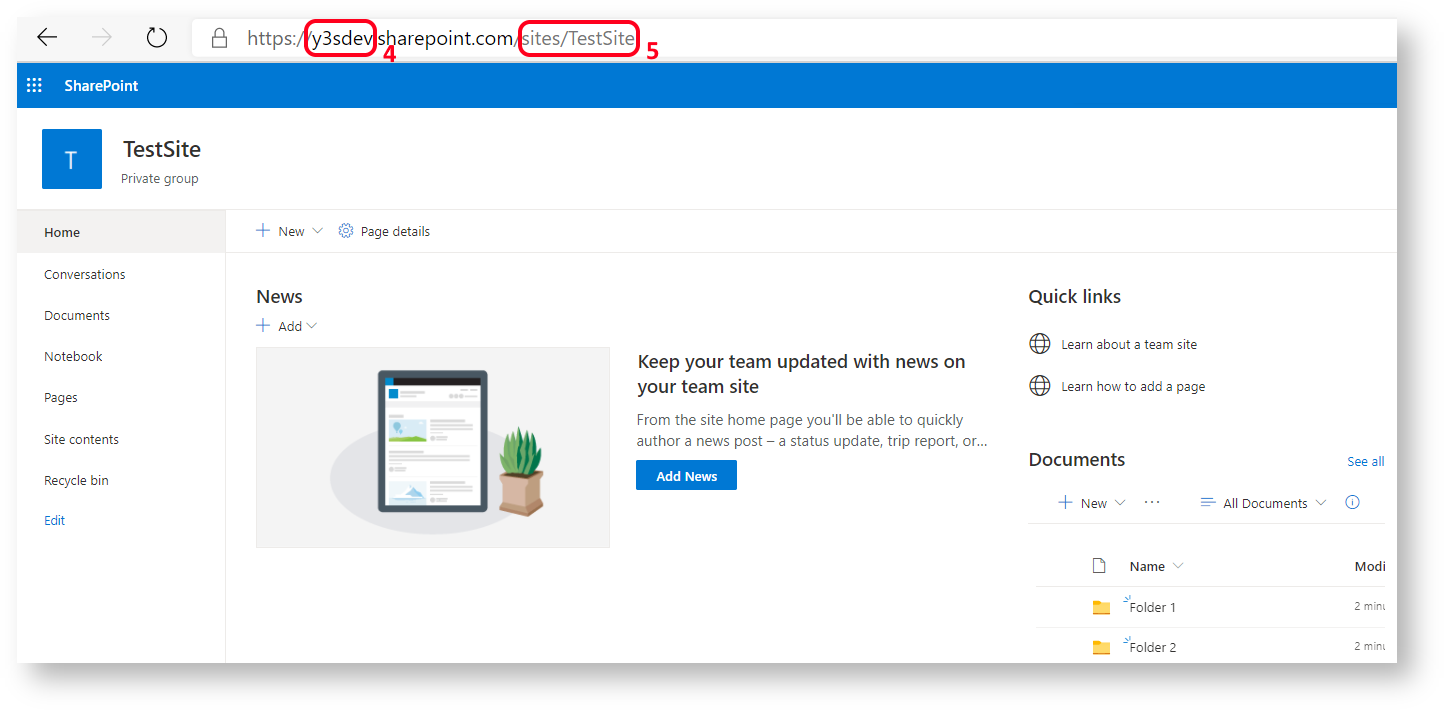
Domain (yellow) – The server name part of the domain obtained from Microsoft Azure Active Directory. It is usually the first part of the tenant's name. For example, with the tenant name "companyname.sharepoint.com", the domain would be companyname.
SharePoint site name (green) – The name of the SharePoint site to use. When empty, the default SharePoint site is used - this is mainly useful when doing the initial configuration of the connector. Once you are sure this works, you may use a different site name. For example, for the URL https://companyname.sharepoint.com/sites/Accounting/Invoices/, you need to specify the site as sites/Accounting (Invoices is the document library in this case). When using sub-sites, you need to specify the hierarchy (e.g. for the URL https://companyname.sharepoint.com/sites/Accounting/Services/Invoices/, you need to specify sites/Accounting/Services).
We strongly recommend not renaming sites. If the site's name in SharePoint is renamed, its internal name will not change. That means that the connector has to be configured with the original site's name.
For more info, see the pictures below.

Microsoft SharePoint Online (OAuth 2.0 with user-based access)
Use the Microsoft Sharepoint Online (OAuth 2.0 with user-based access) type connector to deliver scanned files to a location in a selected Microsoft SharePoint Online library with user-based authorization. There are two ways how users can authorize:
in advance – administrators can share an authorization link provided in the connector configuration with users so they can authorize YSoft SafeQ before going to terminal
during scanning – the user can request instructions for authorization from the terminal when trying to access Microsoft OneDrive for Business workflows, the email template can be modified from the connector configuration page by administrators
Prerequisites
If using the on-prem solution app registration in Microsoft azure is required. You can follow the guide on Configuring Microsoft OneDrive for Business or SharePoint Online with user based access. You will have to use two specific properties mentioned below.
Redirect URI - http://your.management.com/oauth2/client/sharepoint/user-authorize-callback
API Permissions - Microsoft Graph -> Delegated Permissions -> Sites.ReadWrite.All
Client ID and secret for SharePoint Online must be set. (These properties are obtained during the app registration process.)
sharepointOAuth2ClientId - property can be found in management and should be set to SharePoint Application Client ID
sharepointOAuth2ClientSecret - property can be found in management and should be set to SharePoint Application Client Secret
The authorization page must be accessible by end users from all site servers.
The authorization page is hosted in YSoft SafeQ Management.
managementServiceUrl - is used to create an authorization invitation link and must be configured to an address on which YSoft SafeQ Management Service is accessible
YSoft SafeQ Management Service should be protected by a valid certificate, please refer to Configuring SSL/TLS for YSoft SafeQ Management Service for detailed information.
In addition, the machine where the Management interface is installed must have access to the URLs that Microsoft uses the authorization refresh of the tokens, which are the following:
Additionally, the computer where the WPS server runs must have access to the Internet. If there is a proxy, please make sure to set it up in YSoft SafeQ management interface > System > Configuration – set the view setting to "Expert" and search for the term "proxy". This is important because WPS ignores the Internet proxy settings of the computer it runs on. There is an option to configure the proxy (see the Dropbox guide for more details).
National cloud deployment configuration & Limitations
See section OAuth 2.0 with user-based access common limitations and National cloud deployment below.
Troubleshooting
"The reply URL specified in the request does not match the reply URLs configured for the application" shown after authentication and authorization
"Redirect URI" does not match with the Azure AD App Registration. Please make sure you are accessing YSoft SafeQ via a valid and registered address and make sure the OpenID Connect setup was finished correctly. Redirect URI should be similar to:
http://your.management.com/oauth2/client/sharepoint/user-authorize-callback – if you use Microsoft SSO directly
"Microsoft.Graph.ServiceException: Code: accessDenied" or "Microsoft.Graph.ServiceException: Code: itemNotFound" in YSoft SafeQ Workflow Processing System
The issue appears when you execute workflow or when you try to do folder browsing on terminals. The reason is that https://graph.microsoft.com/Sites.ReadWrite.All scope was not set (see the prerequisites) and authorization was finished without it. The authorization token received from Microsoft does not possess the right to access SharePoint Online and that is why it later responds with "access denied" or "item not found".
The solution is that administrator must configure the missing scope by following the prerequisites above (please note that after that YSoft SafeQ Management Service must be restarted) and then users with incorrect authorization must repeat the authorization process, e.g. by navigating to Authorization URI and following instructions there.
Version 6.0.75 does not support the folder browsing on embedded terminal and also the check out/check in is not supported in this version.
The folder browsing and check out/check in support was added in version 6.0.76.
Connector configuration
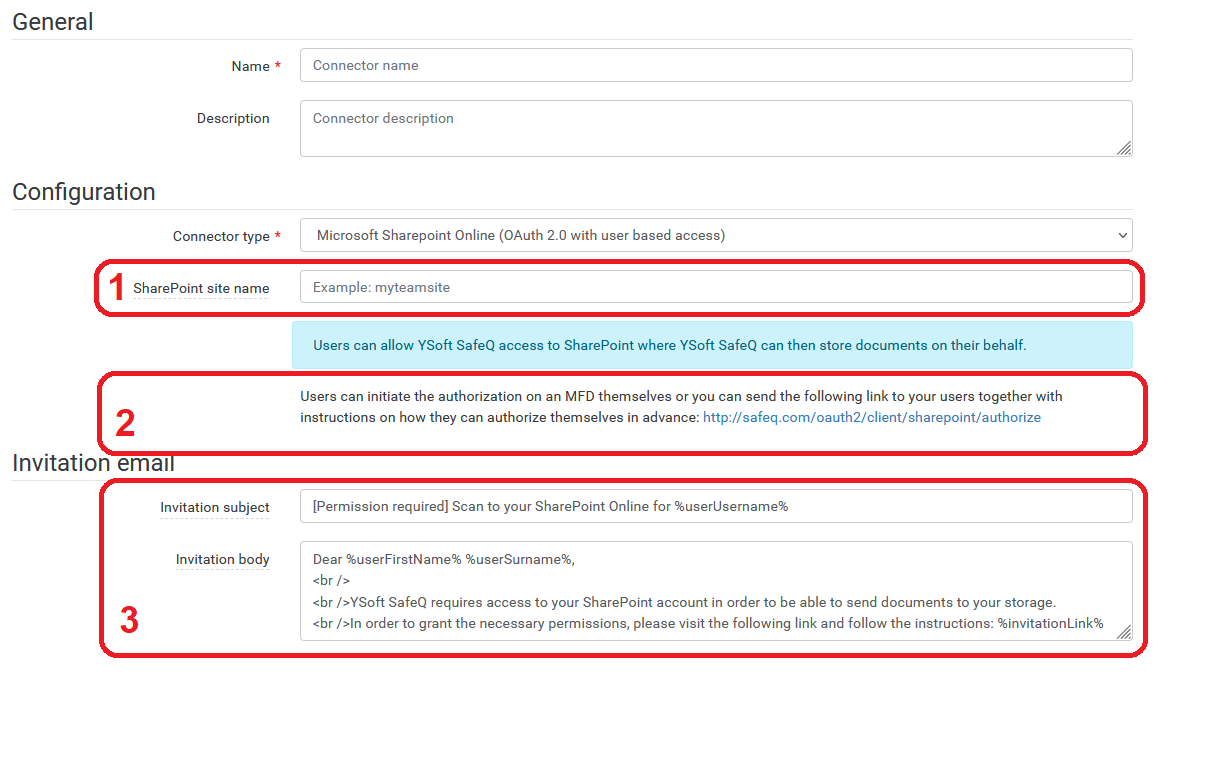
SharePoint site name - Define the site names you want your scans to be delivered to. (green)
https://myCompanyName.sharepoint.com/ sites/<mySite>/<myOptionalSubsite> / <myDocumentLibrary> /Forms/AllItems.asp - when using custom site
https://myCompanyName.sharepoint.com/ <myOptionalSubsite> / <myDocumentLibrary> /Forms/AllItems.asp - when using default SharePoint site, typically "Communication site
Version 6.0.75 automatically adds the "sites/" prefix to SharePoint site name, so it except "sites/mySite" only "mySite" should be mentioned in SharePoint site name.
This result in one limitation in version 6.0.75, subsites are not supported in this version.
Since version 6.0.76 (and highter) the "sites/" prefix is not automatically added, so the sites and subsites are supported and works the way as it is described above.
Authorization URI - This is information for an administrator to distribute it to users so they can perform authorization in advance, before going to the terminal.
Invitation email template - This is a template of an email user can request from the terminal with instructions on how to perform SharePoint Online authorization. The template supports workflow variables and also HTML tags.
OAuth 2.0 with user-based access common limitations and National cloud deployment
National cloud deployment configuration
In addition to the Microsoft global network of data centers, Microsoft cloud services are available in separate national cloud instances which are physically and logically network-isolated within the geographic borders of specific countries. By default, YSoft SafeQ is configured to use the Microsoft Graph API root endpoint of the global Azure service .
To configure the Microsoft Graph API root endpoint, navigate to System configuration in the YSoft SafeQ management interface and update the microsoftGraphBaseUrl property value.
For more information about national cloud deployments, see https://docs.microsoft.com/en-us/graph/deployments.
Limitations
Offline mode is not supported - Site servers must have a connection to YSoft SafeQ Management established in order to retrieve authorization information (access token) which is needed in communication with OneDrive
Authorization on the terminal during scanning is supported only on selected embedded terminals listed below. On other terminals, workflows are hidden until the user authorizes workflow in advance (using instructions provided by the administrator).
Konica Minolta: YSoft SafeQ Terminal Application - 2nd Gen., Native
Develop: YSoft SafeQ Terminal Application - 2nd Gen., Native
Olivetti: YSoft SafeQ Terminal Application - 2nd Gen., Native
Aurora: YSoft SafeQ Terminal Application - 2nd Gen., Native
HP
Epson
FUJIFILM BI
Fuji Xerox: YSoft SafeQ Terminal Application - 2nd Gen.
Fuji Xerox XCP: YSoft SafeQ Terminal Application - 2nd Gen.
Sharp: YSoft SafeQ Terminal Application - 2nd Gen.
Microsoft SharePoint 2016
Use the SharePoint 2016 type connector to deliver scanned files to a location in a Microsoft SharePoint 2016 document library. The Microsoft SharePoint 2016 connector allows the impersonation of a YSoft SafeQ terminal user.
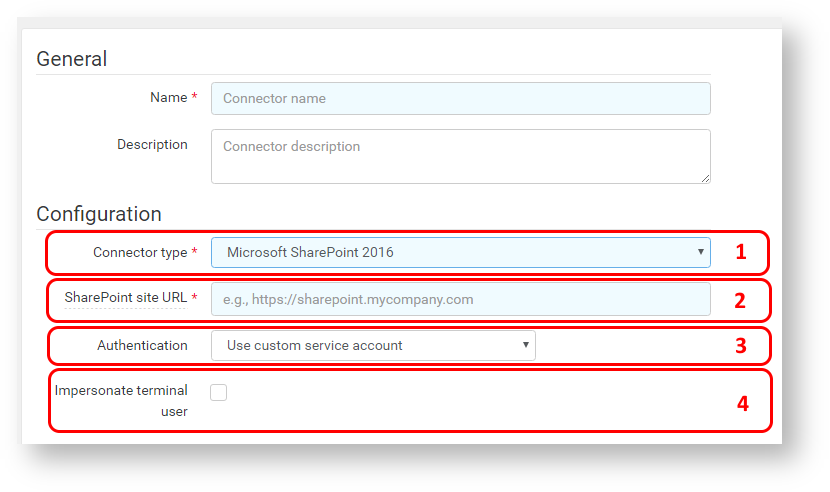
Connector type – Select Microsoft SharePoint 2016 from the connector type list.
SharePoint site URL – The Sharepoint 2016 site URL. This URL is the fully qualified domain name, e.g., http://full.domain.name
To acquire this information, please contact your Sharepoint administrator. There is no other way to find it.
Authentication – Administrators can only authenticate with a Service account.
Impersonate terminal user – When this option is enabled, YSoft SafeQ will no longer use the service account to access the Microsoft SharePoint 2016 document library but it will act on behalf of the user logged in at the YSoft SafeQ terminal. SharePoint will verify whether the impersonated user has enough permission to write to the document library or to browse it. The service account will be used to acquire the user's windows identity token. Enabling terminal user impersonation is helpful to restrict access to certain folders in a document library and to keep track of who creates files.
In order to allow terminal user impersonation in Microsoft SharePoint 2016, the YSoft SafeQ user's email address has to match to the same user in Microsoft SharePoint and the Microsoft SharePoint impersonation add-on has to be installed. Please follow the instructions inConfiguring User Impersonation in Microsoft SharePoint 2013 and 2016 to install the SharePoint add-on.
Sharepoint 2016 Foundation is not supported.
Micro Focus Content Manager WORKFLOW CONNECTORS B
Use the Micro Focus Content Manager connector (previously known as HPE Records Manager) to deliver scanned files to a location in Micro Focus Content Manager or HPE Records Manager. This connector supports the following versions:
Micro Focus Content Manager
version 9.x
HPE Records Manager
version 8.x
The Micro Focus Content Manager connector allows the impersonation of a YSoft SafeQ terminal user.
Note that the Micro Focus Content Manager connector is only available when your YSoft SafeQ is activated with a valid Workflow Connectors B license. Please contact your sales representative if you require a license for the Micro Focus Content Manager connector.
Prerequisites
The Micro Focus Content Manager Client or HPE Records Manager Client must be installed on all machines running YSoft SafeQ Workflow Processing System, according to the version that will be used. The libraries installed with the client are used to access the Workgroup Server.
Some HPE Records Manager client versions (e.g. 8.3.0.9365) are unable to write custom properties due to a bug in the SDK. A workaround is to install a newer HPE Records Manager or Micro Focus Content Manager client on servers running YSoft SafeQ Workflow Processing System. Please note, that connecting newer clients to servers is not recommended and you should always test that the connector works as expected.
Micro Focus Content Manager Client installer no longer registers its Software Development Kit (SDK) used by YSoft SafeQ into Microsoft .NET Global Assembly Cache (GAC). In order to allow YSoft SafeQ to use it, Micro Focus Content Manager SDK (usually located in 'c:\Program Files\Micro Focus\Content Manager\HP.HPTRIM.SDK.dll') needs to be copied into the YSoft SafeQ Workflow Processing System folder (located in '<install_dir>\WPS') or registered manually into GAC. Failure in doing so will result in 'Could not load file or assembly HP.HPTRIM.SDK' errors during workflow processing.
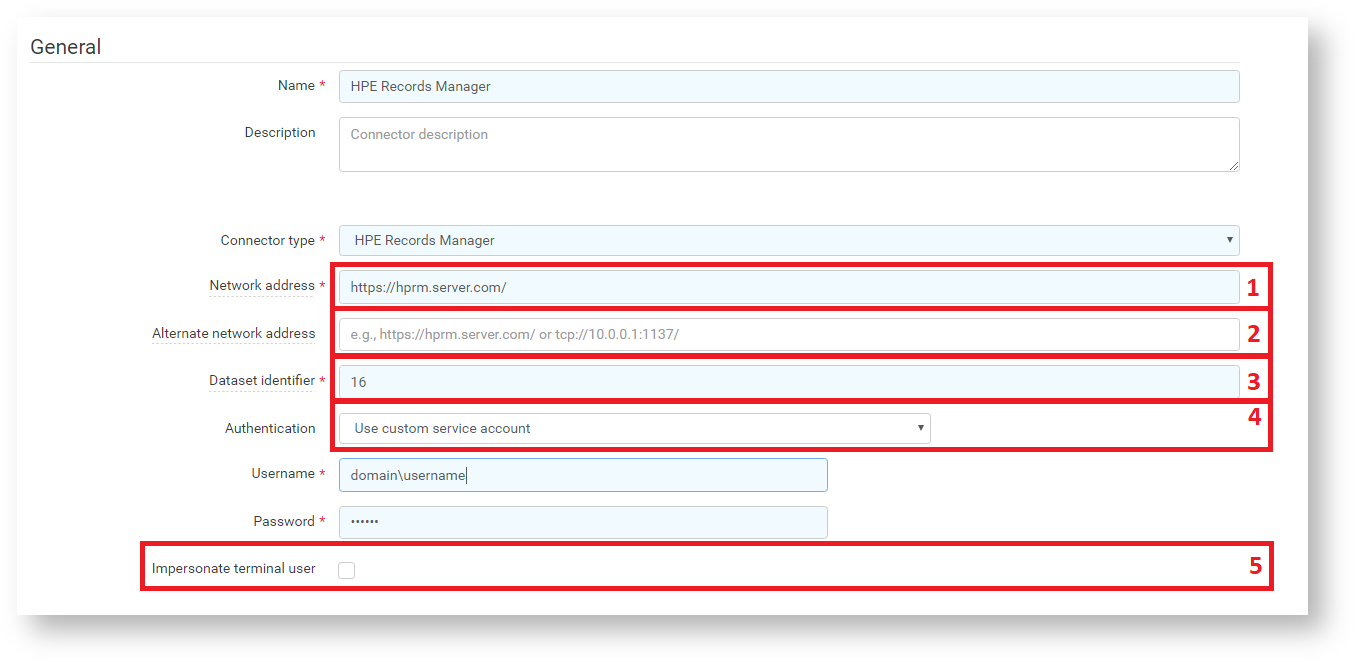
Network address – the address of the primary Micro Focus Content Manager or HPE Record Manager server in '{protocol}://{machine}:{port}' format, e.g., 'tcp://server:1137'.
Alternate network address – the address of the secondary Micro Focus Content Manager or HPE Record Manager server in '{protocol}://{machine}:{port}' format, e.g., 'tcp://server:1137', optional.
Dataset identifier – the two alphanumeric characters that identify the dataset on the server.
Authentication – the user that will be used to access the Micro Focus Content Manager or HPE Record Manager server.
Default service credentials – the user under which YSoft SafeQ 6 WPS subsystem is running will be used (IntegratedWindows).
Custom service account – custom credentials will be used (ExplicitWindows):
Username – the service account username, e.g., 'myserver\myuser' for the local user on the server.
Password – the service account password.
Impersonate terminal user – YSoft SafeQ6 will act on behalf of the user who initiated the scan, this requires that the service account has the right to do so.
Encrypted communication
HPE Records Manager 8.x supports encrypted communication but it must be manually enabled.
Open HPE Records Manager Enterprise Studio (usually located on the HPE Records Manager server).
Go to the properties of a selected workgroup server (see the screenshot below).
Enable HTTPS, select a port and a certificate (a personal certificate for the local computer).
Save and restart the workgroup server.
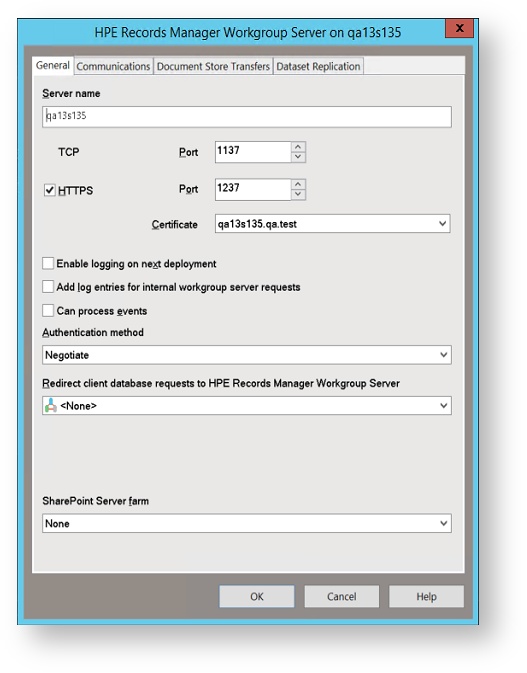
In the connector settings, use the HTTPS protocol and the selected port, e.g., ' https://server:1237 '
The screenshots are from the HPE Records Manager 8.3 version build 9635 and may differ in your version.
Warning
Due to a known security limitation of the third-party components YSoft SafeQ depends on, an IT administrator using the YSoft SafeQ connector for Micro Focus Content Manager or HPE Record Manager should be aware of the following limitation: The third-party components YSoft SafeQ depends on do not verify a server’s identity through the server’s certificate. The certificate on the client side gets ignored, therefore, anyone with access to an organization’s internal network could intercept the connection between YSoft SafeQ servers and the Micro Focus Content Manager or HPE Record Manager and read or modify data. However, user login passwords are not transmitted through the YSoft SafeQ connector to Micro Focus Content Manager or HPE Record Manager and cannot be intercepted.
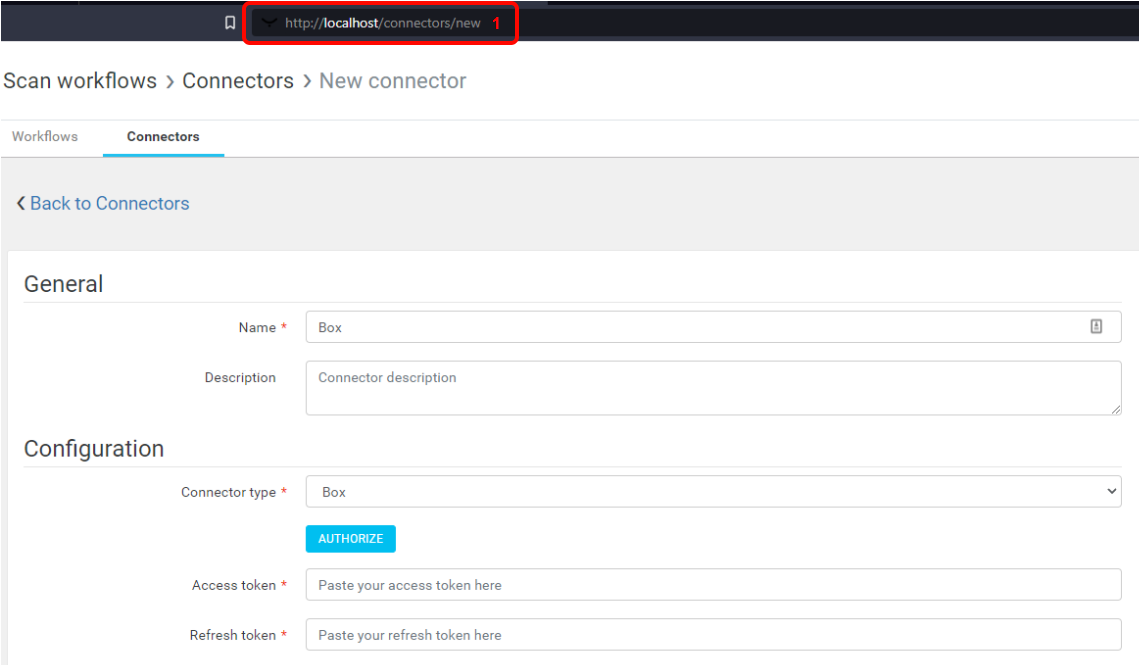
Box
In order to successfully configure the Box connector, it is necessary to create a Box application on your Box administrator account – Please refer to Configuring and Deploying the Box application for the instructions.
Use the Box connector to deliver scanned files to the Box storage.
Prerequisites
In order to use the Box connector, a working Internet connection on the machine where the Management Service is installed is required.
The authorization process when creating a new Box connector must happened on the machine that runs the Management Service and you must access the Management Service via a http://localhost /.
Setting up the Box connector
To use a Box-type connector, it is necessary to authenticate with Box using OAuth 2 as described in the following paragraphs.
After creating a new Box connector, the connector will have the same rights to access folders, create folders, edit files and create files as your account that you authorized the Box connector with.
Check that you are accessing the Management service via a http://locallhost.
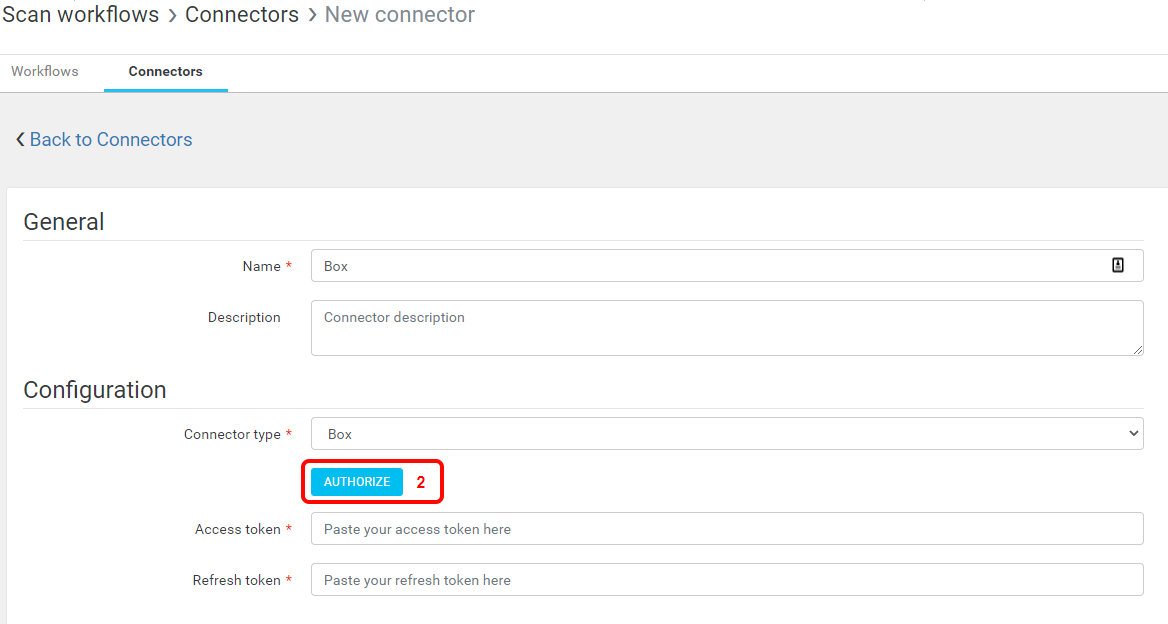
Box storage authorization - After clicking the Authorize button, a Box-hosted browser dialog appears (see the picture below).
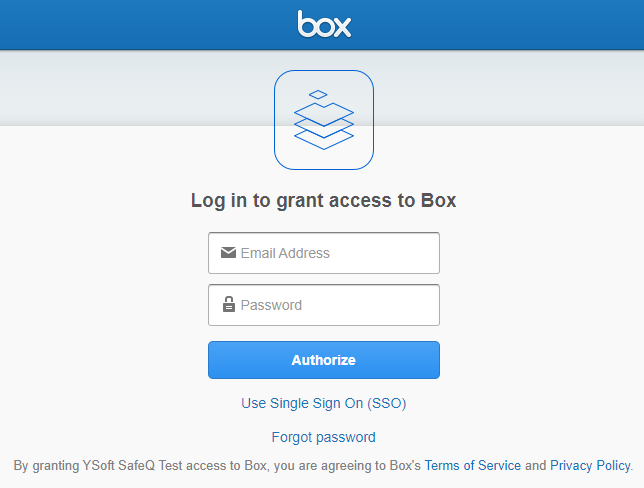
In this dialog, enter your Box administrator or co-administrator account email, password and click Authorize button. Another Box-hosted page will prompt for granting access to your new Box storage for your new Box connector (see the picture below).
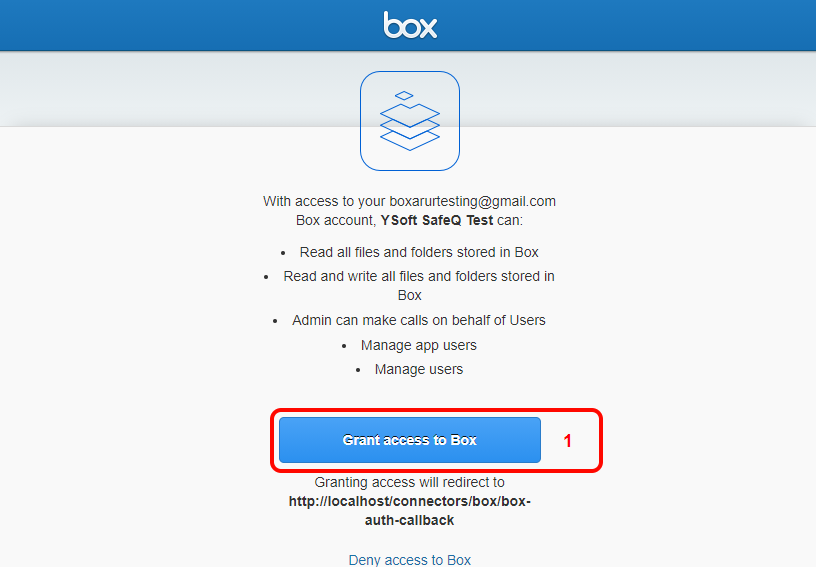
The table below describes which application permissions are needed for which YSoft SafeQ scanning feature
Access permission | YSoft SafeQ feature |
Read all files and folders stored in Box | Read access is necessary to be able to browse the target folder on the MFD terminal, or to specify behavior in case the document with a defined filename already exists (append to it, replace it, keep both files) - if specified in the Scan workflow definition by YSoft SafeQ administrator. |
Read and write all files and folders stored in Box | Write access is necessary to be able to upload the scanned document and create folders. |
Admin can make calls on behalf of Users | Necessary to make impersonated calls - if specified in the Scan connector definition by YSoft SafeQ Administrator. |
Manage app users | Necessary for associating the Box user with the YSoft SafeQ user by the user email address - if specified in Scan workflow definition by YSoft SafeQ administrator. |
Manage users |
Click the Grant access to Box to allow the YSoft Box connector to access your Box account. After confirmation, a Management service hosted screen will be displayed with an Access token and Refresh token (see the picture below).
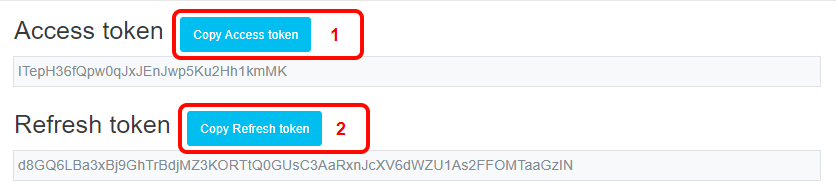
Copy the displayed Access token and Refresh token and paste it to the Box access token and Box refresh token field in the YSoft SafeQ management interface (see the picture below)
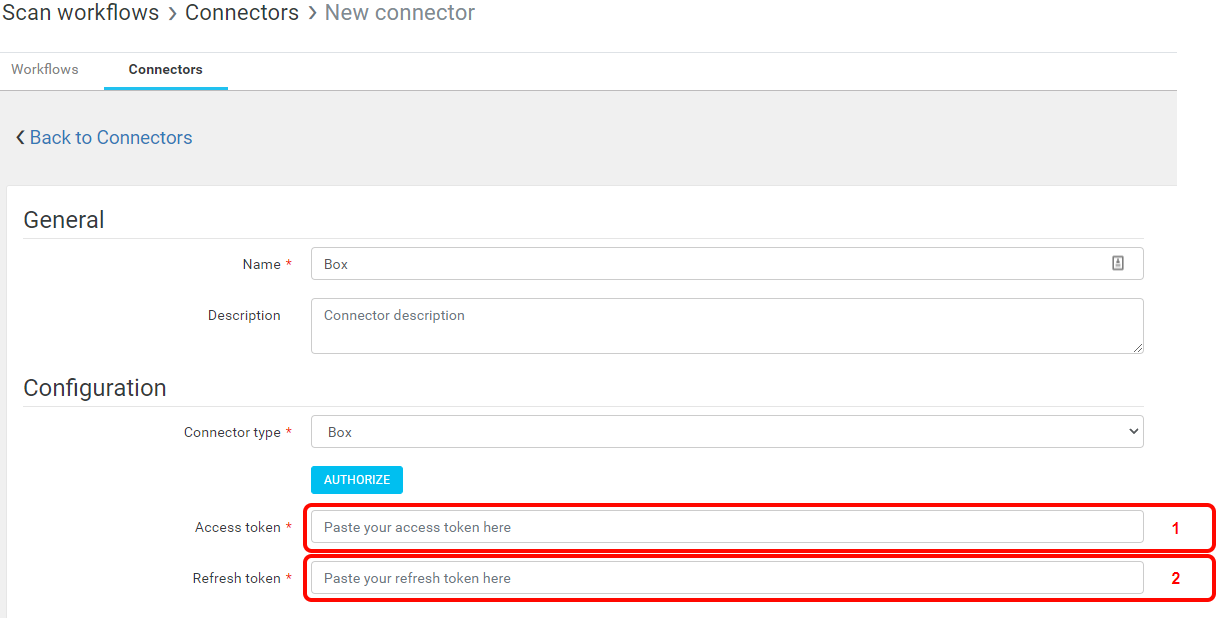
After entering a connector's name and copying the Access token and Refresh token you can save the new Box connector.
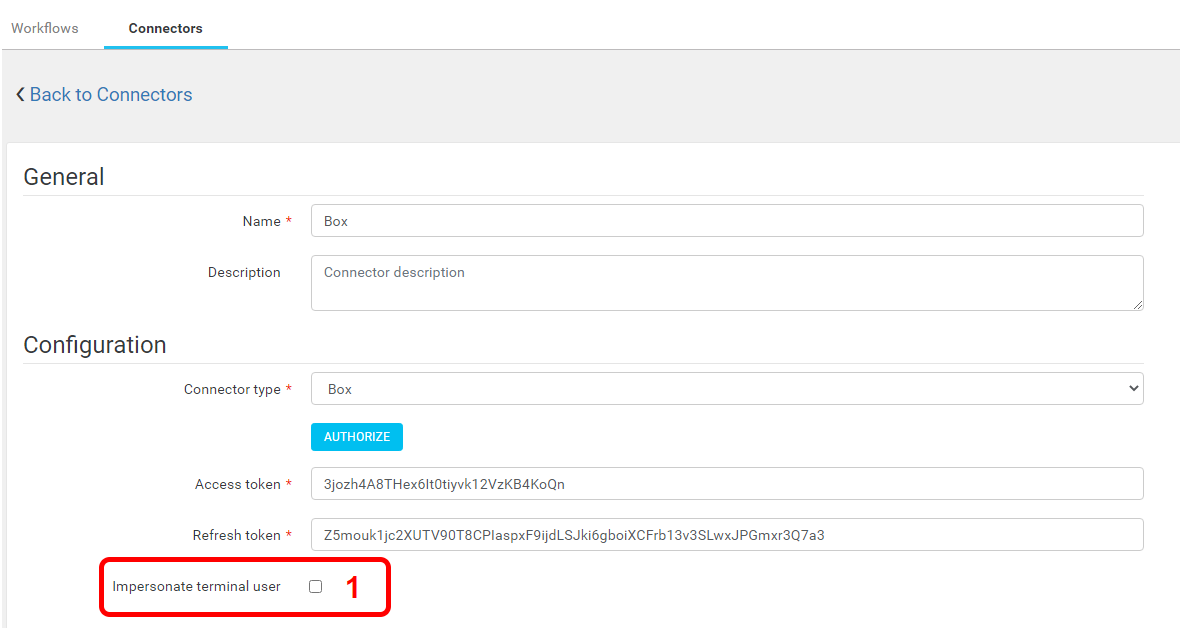
Impersonate terminal user – When terminal user impersonation is enabled, the Box connector will deliver scanned files as the user logged in at the YSoft SafeQ terminal only if you authenticate the Box connector with an admin or co-admin account. However, if you authenticate with a co-admin account the connector will not be able to impersonate another co-admin and admin accounts. The email address of the YSoft SafeQ user logged in at the terminal must match an email address of a user in your Box storage (configure a user's email address in the Users tab of the YSoft SafeQ management interface). When terminal user impersonation is disabled, all documents delivered using the connector will be delivered under the specified admin or co-admin account.
Append, prepend to PDF or replace original might not work properly with Box for files greater than 50MB if two or more users are modifying the same document at the same time due to a limitation in Box's ability to solve conflicts for big files.
Troubleshooting
If an error is shown in the Box-hosted window for the authorization, check If you are accessing the Management Service via http://localhost / (first step of the Setting up the Box connector section).
If you see this warning
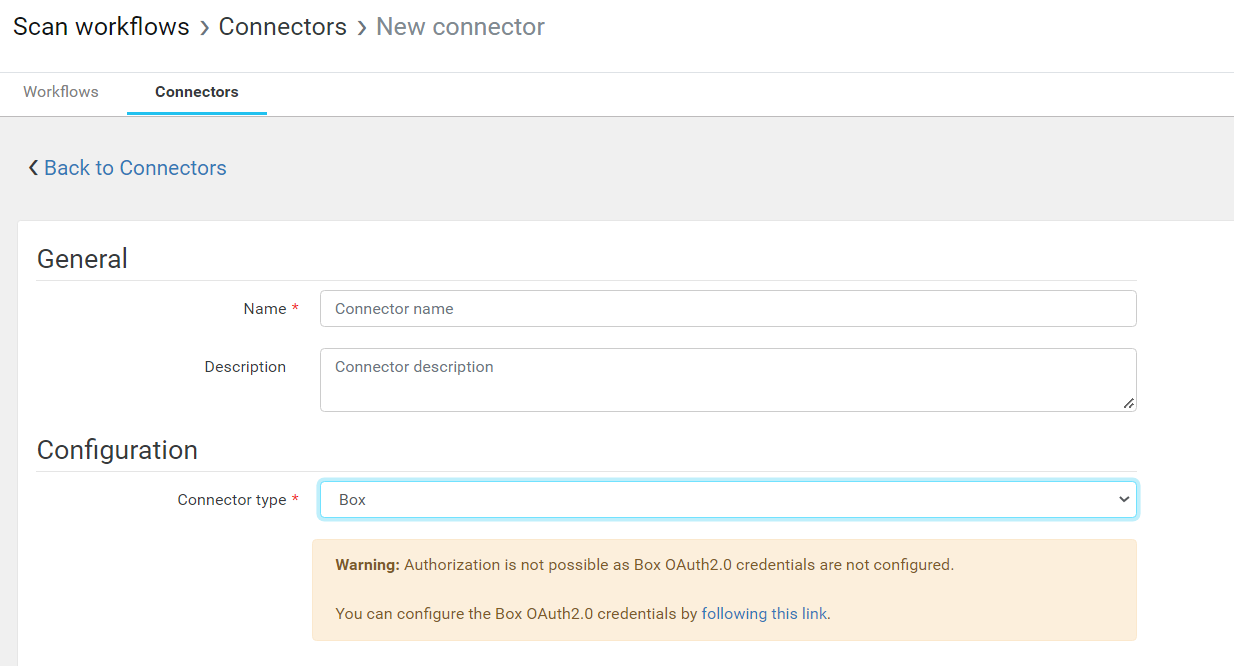
as an administrator, you need to create and configure the Box application. Please follow these instructions Configuring and Deploying the Box application
Extension
Extension connector set up
Use the Extension connector to deliver scanned files to the specific HTTP endpoint. This allows custom post-processing and delivery of the scanned files. The endpoint should handle the predefined request format.
It is strongly recommended to use HTTPS only since the data (scanned document or extension properties) might contain sensitive information.
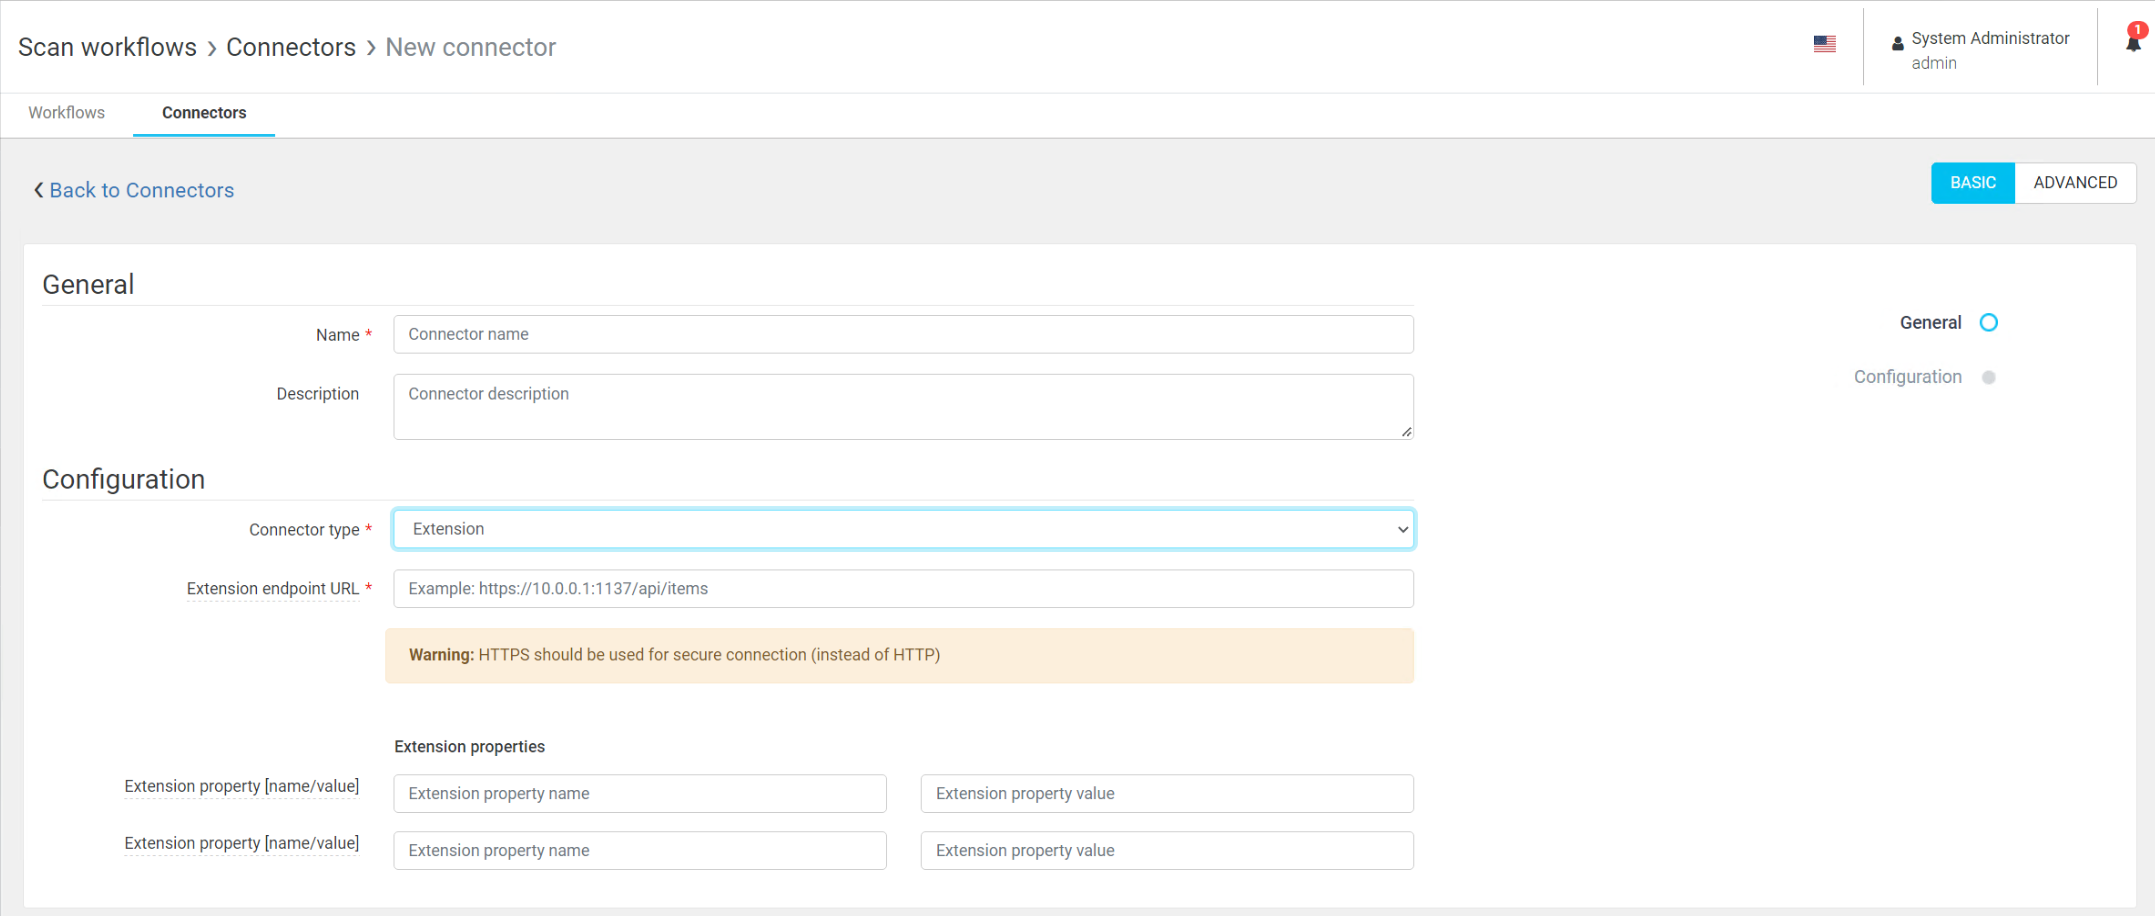
1. Extension endpoint URL – URL of the endpoint where the scanned documents should be sent (for example azure function URL )
2. Extension properties (optional) – properties in the name-value pair propagated to the extension endpoint URL. These properties are optional and up to two name-value pairs can be used.
(These extension properties have automatically added 'custom_' prefix to prevent collision and override from already existing properties e.g. property name set to "MyProperty" in the Management interface will be delivered as "custom_MyProperty" to the extension endpoint URL.
Request
The scanned job files are sent all together in a single multipart/form-data request. The request also includes all scan parameters which are added dynamically.
API documentation that the extension should implement
openapi: 3.0.0info:description: This is an API for uploading scan jobsversion: "1.0.0"title: API scan connectorpaths:/api/scan:post:summary: Uploads and process scan jobdescription: |Upload scan job (both data and metadata),responses:'200':description: scan job processed successfully'400':description: 'error'requestBody:content:multipart/form-data:schema:type: objectproperties:username:type: string# all other connector-specified and user-defined variables goes here# in the same way as username# e.g:# mailTo:# type: string# mailFrom:# type: stringfilename:# default is application/octet-stream, need to declare the type# e.g. application/pdf or image/jpgtype: arrayitems:type: stringformat: binaryencoding:filename:contentType: image/jpeg, image/tiff, applicaton/pdfstyle: formexplode: trueExample of request
This example shows requests with one variable userEmail and one document. The real request will contain all the scan metadata and user inputs that are available and all files. The boundary is randomly generated with each request.
POST / HTTP/1.1Connection: keep-aliveContent-Type: multipart/form-data; boundary=---------------------------123456789Content-Length: 554-----------------------------123456789Content-Disposition: form-data; name="userEmail"-----------------------------123456789Content-Disposition: form-data; name="file1"; filename="document.pdf"Content-Type: text/plainContent of document.pdf.-----------------------------123456789Example parameters that are added to the multipart/form-data request
billingCode: ,userEmail: ,deviceCostCenterID: 1694,deviceGroupName: ExampleDeviceGroup,scanDate: 2021-02-17,userCostCenterName: Default cost center,safeqHome: /opt,deviceEquipmentID: ,pdfComplianceLevelFYkBZw7CcS9zKp: None,deviceGroupIP: tenant.dev.ysoft-dev.net,workflowName: Scan to fax,userFirstName: l,scanTime: 12-00-03-518,userCostCenterID: 0,userUsername: ls,userSurname: s,deviceLocation: ,deviceID: 265,custom_MyPropertyName: MyPropertyValue,deviceServiceAgreementID: ,scanJobID: 4e19a6a0-d580-457f-ad59-fcb08584c5ba,deviceIP: ,deviceCostCenterName: Default cost center,deviceName: iws,userHome: ,deviceContactPerson: ,workflowID: 151,fileTypeFYkBZw7CcS9zKp: PDF,deviceGroupID: 179Other than this, also all custom input variables defined in management for example %faxNumber% will be sent in the request.