Updating from MU/Build to Build
This page contains a detailed update procedure for updating the YSoft SafeQ 6 installation to a higher build.
The YSoft SafeQ version was previously known as YSoft SafeQ MUXX (Maintenance Update XX). We are changing naming, MU will be replaced with Build so the YSoft SafeQ version will be known as YSoft SafeQ Build XX. This page contains mixed naming as YSoft SafeQ versions older than Build 32 are still referred to as MUXX.
Before the Update
Expected System Outage
It is expected that the system will be out of order until the update is finished.
Expected Data Loss
If executed as documented, no data loss is expected.
In the case of a rollback, the data between step 1.5 (database backup) and Rollback is lost. Users will need to reprint their jobs once the system is operational again.
General Requirements
When updating to a new build, all installed components (YSoft SafeQ Management Servers, YSoft SafeQ Spooler Controllers, YSoft SafeQ FlexiSpoolers, YSoft SafeQ Mobile Print Server, YSoft SafeQ Workflow Processing Systems, YSoft SafeQ Payment System, and YSoft SafeQ Payment System plugins) have to be updated.
If one or more YSoft SafeQ services have the state Disabled, enable them before starting. If necessary, you can disable them again once the update is finished.
Make sure that no processes or services (e.g., from third-party backup tools) are using resources from the YSoft SafeQ directory. Files in those directories are about to be replaced and if they are locked by any process, the update will fail. A common cause of an update failure is having pgAdmin running while updating or uninstalling Management Server with an embedded PostgreSQL.
Make sure that the pgAdmin4 server is shut down
Make sure that you have enough free space on disk in case of the PostgreSQL 11 update. Two new copies of PGSQL and PGSQL-data folders will be created for the update process.
Make sure the server hosting YSoft SafeQ still fulfills the minimal requirements for the new version (such as OS version, see YSoft SafeQ server requirements)
Stop YSoft SafeQ Services
Stop all YSoft SafeQ services in the whole environment (Management Servers, Site Servers) except the following (leave the services listed below running):
YSoft SafeQ Bundled PostgreSQL (available if an embedded PostgreSQL DB is used)
You can use the following PowerShell script to perform the task:
Get-Service*YSoft* |Where-Object{$_.Name-ne'YSoftPGSQL'-and$_.Name-ne'YYSoftPGSQL'} |Stop-ServicepgAdmin4
Backing Up Databases
Back up the SQDB6 and SQDB6_IMS databases. If you are using a separated database for the data warehouse, also back up SQDB6_DWH. If you are using YSoft SafeQ Payment System, back up the SQDB6_YPS database too.
See Backup of Databases for detailed instructions.
Backup Configuration Files
If you are using some local changes in your configuration files - for example, because of using some customizations, extensions, or applying your own security rules be aware to make a backup of your configuration files before the update.
See Backing Up Configuration and Binary Files and perform the procedure on all Management and Site Servers.
Create a Snapshot (Optional but Recommended)
If you have YSoft SafeQ 6 installed on virtual servers, create a snapshot of all Management and all Site servers to simplify the rollback procedure. Snapshots should be made with all YSoft SafeQ 6 servers being stopped completely or at least services stopped on all servers, as described above.)
Updating Procedure
Checking MS SQL Server Database Snapshot Isolation state
If you are using the PostgreSQL database, then please skip this part and go to the section Update Management Servers.
If you are using MS SQL database and if you are updating from YSoft SafeQ 6 MU23 or earlier or if the MS SQL YSoft SafeQ databases were created manually (i.e. not by YSoft SafeQ 6 installer), then snapshot isolation needs to be enabled manually.
If the Payment System is in use, then snapshot isolation needs to be enabled for its database manually (if you did not do so before).
How to check snapshot isolation current state
Connect to the SQL Server and run the following query:
SELECTname, collation_name, state_desc, snapshot_isolation_state_desc, is_read_committed_snapshot_on, recovery_model_desc, containment_desc, is_trustworthy_onFROMsys.databasesWHEREnamelike'%SQDB6%'If you see that snapshot_isolation_state_desc is OFF for YSoft SafeQ databases, then please continue with the next section.
How to set up the database
If the database name does not equal SQDB6, please change the name according to the end customer configuration. Connect to SQL Server and run the following commands:
ALTERDATABASE[SQDB6]SETALLOW_SNAPSHOT_ISOLATIONONALTERDATABASE[SQDB6]SETREAD_COMMITTED_SNAPSHOTONALTERDATABASE[SQDB6_IMS]SETALLOW_SNAPSHOT_ISOLATIONONALTERDATABASE[SQDB6_IMS]SETREAD_COMMITTED_SNAPSHOTONIf the end-customer environment has a separate database for the data warehouse, reconfigure it as well:
ALTERDATABASE[SQDB6_DWH]SETALLOW_SNAPSHOT_ISOLATIONONALTERDATABASE[SQDB6_DWH]SETREAD_COMMITTED_SNAPSHOTONThe same applies to the Payment System database if Payment System is in use:
ALTERDATABASE[SQDB6_YPS]SETALLOW_SNAPSHOT_ISOLATIONONALTERDATABASE[SQDB6_YPS]SETREAD_COMMITTED_SNAPSHOTONSee Microsoft documentation of Snapshot Isolation in SQL Server for more information.
Update Management Servers
If Management Server was installed using the Management Server installer, use ysq-management-server-install.exe for the update. Also:
see Updating YSoft SafeQ Management Server for detailed instructions.
see Updating YSoft SafeQ Management Server cluster for detailed instructions.
If Management Server was installed using the server installer (First Server or Additional Management Server deployment), see Updating Using the Server Installer for detailed instructions, and use one of the following packages for the update:
ysq-server-install.zip
YSoft-SafeQ-6-Build-XX-Server-installer.zip (without OCR engine)
ysq-server-ocr-install.zip
YSoft-SafeQ-6-Build-XX-Server-installer-with-Advanced-workflows.zip (with OCR engine)
On some systems, the following issue may appear: during installation of the YSoft SafeQ Workflow Processing System, the service is "marked for removal". In the Workflow Processing Server install log (<install_dir>\WPS\WPS-install.log), there is an error saying that the service is already installed, and after restarting, the service is removed. If you encounter it, let Customer Support Services know about it. A workaround is to install the service manually after the restart by running WpsService.exe install from the elevated command line.
Re-activate the YSoft SafeQ license
Re-activate the YSoft SafeQ license once the update of Management Server(s) is finished. See Management Interface - License Activation for detailed instructions.
Additional steps
If you want to change any YSoft SafeQ configuration, you can do it now in System > Configuration.
If you are using the Management Server cluster which replicates users from secured LDAP and you are updating from YSoft SafeQ Build34 or earlier, make sure that the LDAP server certificate is imported in trust store on all Management Server nodes. Any node can start scheduled LDAP replication now.
You should verify LDAP replication functionality by testing replication from the YSoft SafeQ management interface of each node:
System > LDAP integration > Test tab > TEST SETTINGS button
If you are using failover/load balancing of terminals and updating from YSoft SafeQ MU27 or earlier, make sure that enableNetworkLoadBalancer property is enabled in YSoft SafeQ settings:
Log in to the YSoft SafeQ management interface with sufficient rights to administer printers (for example, "admin").
Go to System > System settings
Set enableNetworkLoadBalancer property to enabled and save the configuration.
Capture changes and update the Solution Reference Guide (optional)
Export settings and update the respective settings in Solution Reference Guide (if used). The export can be done using YSoft SafeQ management interface > System > Configuration > Actions > Export the changed configuration into the XML file.
Updating Site Servers
See Updating Using the Server Installer for detailed instructions.
Use one of the following packages for the update:
ysq-server-install.zip
YSoft-SafeQ-6-Build-XX-Server-installer.zip (without OCR engine)
ysq-server-ocr-install.zip
YSoft-SafeQ-6-Build-XX-Server-installer-with-Advanced-workflows.zip (with OCR engine)
If you are using a third-party load balancer:
If you are updating from YSoft SafeQ MU28 or earlier, make sure that scanServerIp is configured in TerminalServer.exe.config on each node:
Edit the file <install_dir>\SPOC\terminalserver\TerminalServer.exe.config.
Into the AppSettings section of the config file add a new scanServerIp parameter and set it to the physical IP address of the local TS node.
<add key="scanServerIp"value="physical_IP_address"/>Save the file.
Restart YSoft SafeQ Terminal Server services to apply the settings
And you are updating from YSoft SafeQ Build 37 or earlier to Build 38 and higher:
Due to the security patch of the YSoft SafeQ Spooler Controller Group Service, the service does not answer on TCP-based port 9999 anymore and thus all your servers will be considered down by the load balancer.
The recommended solution is to change the configuration of the load balancer and to remove the monitoring of port 9999.
Alternative solution is to change value of the system parameter spocJmxNetworkInterface to 0.0.0.0 (default is 127.0.0.1).
Please note that such configuration decreases the security of the system and is not recommended!
If you are using YSoft SafeQ Payment System and you are updating from YSoft SafeQ Build 43 or earlier:
From Build 44 the system property terminalServerListeningAddress is set to the tcp://127.0.0.1:5556 for security reasons. With this setting YSoft SafeQ Spooler Controller will not answer to calls made against the real server address, which may cause inability of YSoft SafeQ Payment System to load the configuration and to function well.
If you face issues with accessing the Payment System website after the update, the recommended solution is:
if the YSoft SafeQ Payment System runs on the same server as YSoft SafeQ Spooler Controller
edit <YSoft SafeQ Payment System>\ps-conf\environment-configuration.properties and set the SPOC address as follows:
safeq.authentication.address=tcp://127.0.0.1:5556restart YSoft SafeQ Payment System service
if the YSoft SafeQ Payment System runs on a server without YSoft SafeQ Spooler Controller
edit <SPOC>\conf\modules\spoc.conf and add this line at the end of file:
terminalServerListeningAddress=tcp://<physical_IP_accessible_from_payment_server>:5556restart YSoft SafeQ Spooler Controller service
In case of updating from MU13 or earlier to MU14 or later using standalone installers, make sure you delete the cache the during update of the YSoft SafeQ Spooler Controller. (Clear the YSoft SafeQ Spooler Controller cache during update - enabled.)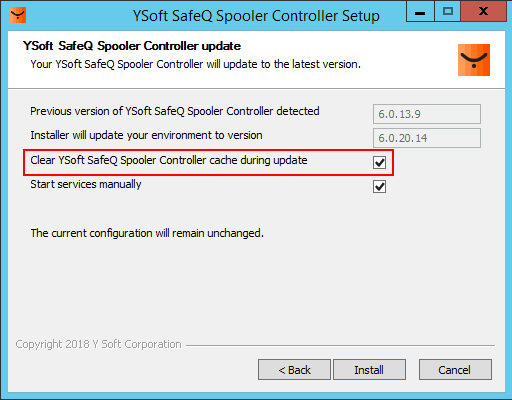
The YSoft SafeQ Spooler Controller cache recovery mechanism on a standalone SPOC with the recommended hardware is processing on average 3000 jobs per minute. That means with 60 000 jobs the recovery will take about 20 minutes. SPOC is not fully functional until the recovery is finished. To see how many jobs is going to be recovered use the following SQL query:
-- query to be launched on SQDB6 database-- use proper tenant prefix at smartq_jobs table-- use proper server_guid, SPOC guid can be found on YSoft SafeQ management interface -> tab Spooler Controller groupsSELECT count(1) FROM tenant_1.smartq_jobs where server_guid = 'j1dvczklt5l5hm69' and cur_status in (1,2,4,8,16,32,64,128,256,512)End User Interface
If you use a custom configuration in the <install_dir>\SPOC\EUI\conf\server.xml, review the sc-install.log for possible issues with the update of server.xml. The update process tries to merge the old configuration with the new one. In some cases the merging is impossible and a new server.xml is generated, in such a case it is needed to do the custom configuration again based on the current documentation. The old file is available for manual review in the same folder with the name server.xml.bak .
Starting from Build 39 the generated Terminal Server certificate was changed from self-signed to certificate signed by Certification Authority.
In case the certificates need to be refreshed, remove these files SafeQTerminalServer.pfx and SafeQTerminalServer.crt found in the following path: <install_dir>\SPOC\terminalserver\Certificates\ prior to updating. In the case of Build 38 or earlier only SafeQTerminalServer.pfx will be present. After updating both of the aforementioned certification files should be created again.
Updating Other Products
Updating SafeQube 2
See Updating YSoft SafeQube 2 for detailed instructions.
Updating Terminals
See Updating Terminals for detailed instructions.
Updating Client Components
See Updating Client Components for detailed instructions.
Updating YSoft SafeQ Payment System plugins
See Payment gateway plugin deployment for detailed instructions.
Updating Mobile Integration Gateway
Reinstall the existing Mobile Integration Gateway installation using the new installation package. See Updating Mobile Integration Gateway for detailed instructions.
After update steps
After a successful update, don't forget to apply back your local changes (if you are using any) of configuration files from their backups (made in point Back Up Configuration Files).
Verifying the Functionality
Verify the basic functionality such as Printing, Copying, Scanning, Accounting, and Charging.
Rollback
Should you face issues during or after updating that block you from using YSoft SafeQ, revert to the version prior to the update.
If a Snapshot of Servers Is Available
Stop YSoft SafeQ services on all Management and Site Servers.
If an external database server is being used, restore the YSoft SafeQ databases SQDB6, SQDB6_IMS, SQDB6_DWH, SQDB6_YPS to the state prior to the update.
Revert Management Servers to the state prior to the update (one by one).
Re-activate the YSoft SafeQ license.
Revert Site Servers to the state prior to the update.
If a Snapshot of Servers Is Not Available
Stop YSoft SafeQ services on all Management and Site Servers.
Uninstall Management and Site Servers.
Delete all YSoft SafeQ 6 folders.
Perform a clean installation of Management Server(s) of the previous YSoft SafeQ 6 version – use the same Local GUID that was used before.
Restore YSoft SafeQ 6 databases.
Restore the configuration files from backup – do not restore the file safeq.properties, keep the new one.
Re-activate the YSoft SafeQ license.
Perform a clean installation of Site Servers.
Restore the configuration files from backup.
If you were using custom certificates (e.g., for Web Interface or Terminal Server), set them up again according to the documentation.
Troubleshooting
Device Is Unable to Establish a Secure Connection with Terminal Server in MU17 and Newer, Although It Worked with the Previous MU
A new, more secure certificate was introduced with MU17 . Older devices may be unable to establish a secure connection with the Terminal Server.
Solution: Generate a new certificate compatible with the device and configure Terminal Server to use it. See Configuring secured connection between terminals and Terminal Server for detailed instructions.
FlexiSpooler Installation is Stuck During the Update
Installation is stuck on installing FlexiSpooler during the update without any obvious error. In installation log is the following exception: Exception calling "DeserializeObject" with "1" argument(s): "Unrecognized escape sequence."
Solution: Open the spooler.config and ensure that there are only forward slashes in jobStorePath. (e.g., change "jobStorePath":"<install_dir>\Spool\JobStore" to "jobStorePath":"<install_dir>/Spool/JobStore").