Mobile Print Server - Configure access to Microsoft Exchange Online IMAP using OAuth
How to enable OAuth in Mobile Print Server
Using OAuthClient
Logout from all Microsoft accounts linked with your default web browser manually or using this link https://login.microsoftonline.com/logout.srf.
Navigate to the Service folder of the MPS e.g. <install_dir>\MPS\Service.
Run OAuthClient.exe from the command line. The client is located in the Service folder of the MPS e.g. <install_dir>\MPS\Service\OAuthClient.exe. The command must be executed directly on the machine with the installed MPS or through the remote desktop session to the machine. Run the tool with the following arguments:
provider – "Microsoft" for Microsoft Exchange Online IMAP
username – account to be later used in YSoft SafeQ Mobile Print Service Downloader, e.g. username of the Microsoft account that will be used in MPS
ExampleOAuthClient.exe Microsoft [email protected]
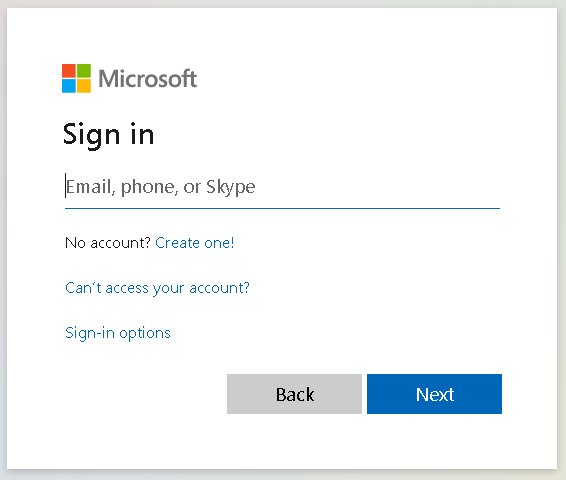
A new window will open in the web browser of the machine where Mobile Print Server is installed. Sign in with the username and password that will be used in the MPS. It should be the same as the username used in the OAuthClient command and in the config file.
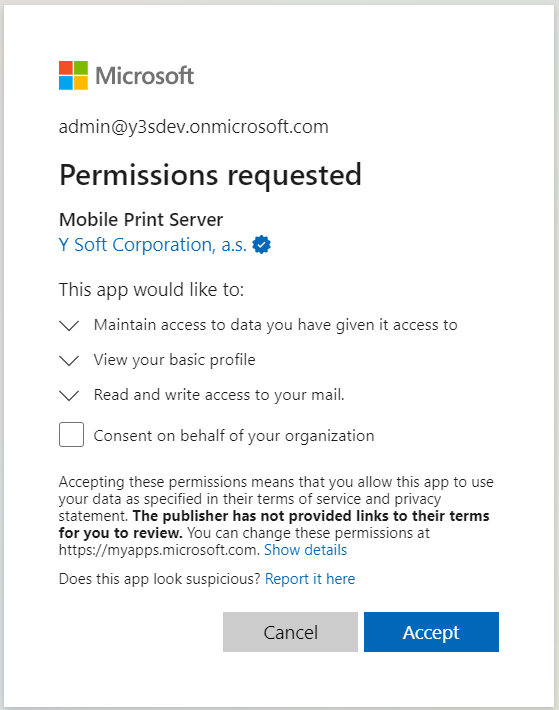
Accept the permission to read and write in your mailbox.
If the authorization succeeds, a confirmation message will appear in the browser and console app.
Configure Mobile Print Server
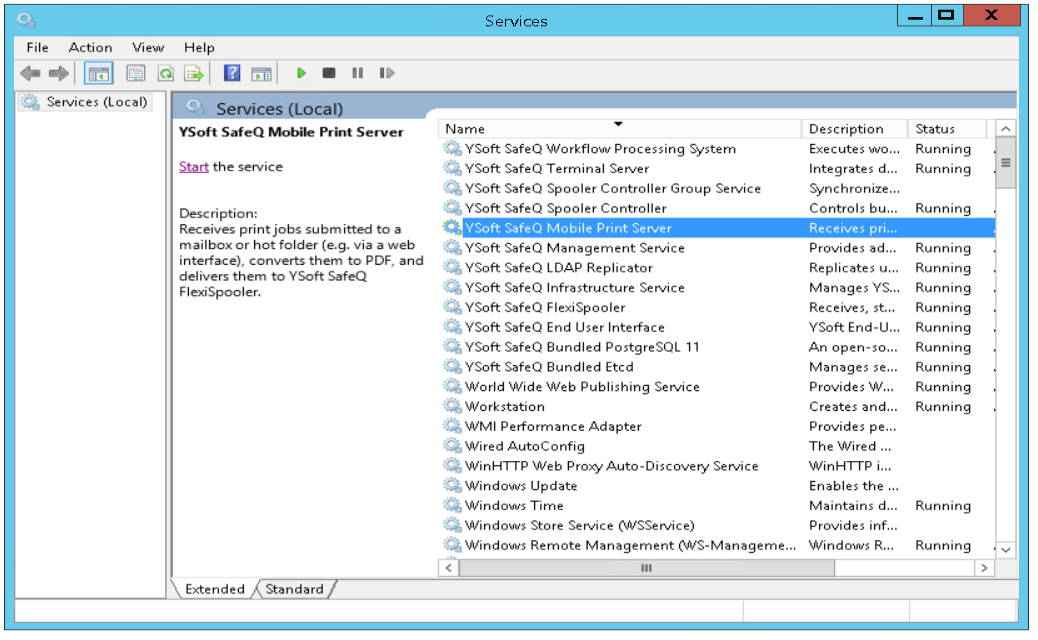
Stop the Ysoft SafeQ Mobile Print Server in the services manager.
Navigate to the conf folder of the MPS e.g. <install_dir>\MPS\Service\conf.
Open mps.config in the text editor.
Fill in the key values of the emailSources:
type: ImapOAuthMicrosoft
host: outlook.office365.com
userName: must be same as user used with OAuthClient.exe, e.g. [email protected]
password: should be empty
port: 993
secure: True
Example<?xmlversion="1.0"encoding="utf-8"?><mpsversion="6"><!-- AFTER CHANGING THIS CONFIGURATION PLEASE RESTART OR START THE "YSoft SafeQ Mobile Print Server" SERVICE MANUALLY. --><folderSources><addhost="127.0.0.1"path="C$\SafeQ6\SPOC\server\mobile"userName=""password=""downloadInterval="1000"/></folderSources><emailSources><!--Fill in.--> <addtype="ImapOAuthMicrosoft"host="outlook.office365.com"userName="[email protected]"password=""port="993"secure="True"/></emailSources><failedFilesfolder="Failed"maxAge="604800"/><localizationlanguage="en"default="en"/><communicatorconnectionLostTimeout="10000"controllerPort="5555"/></mps>Save the changes.
Start YSoft SafeQ Mobile Print Server in the services manager.
Azure API
Visit Security overview - OAuth 2.0 applications to know more about how we use Azure API.
Granting admin consent
Depending on the configuration of your tenant in Azure and the permissions of the account used in the Mobile Print Server integration, it might be required to grant consent to the application by the administrator.
In that case, you will see the following screen after authenticating in Step 4 of the Using OAuthClient section:
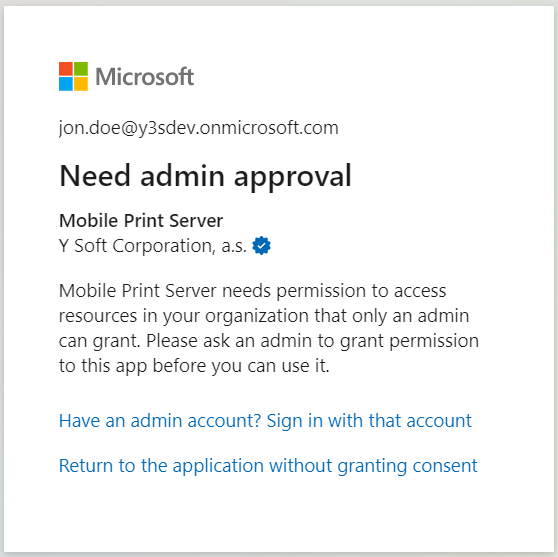
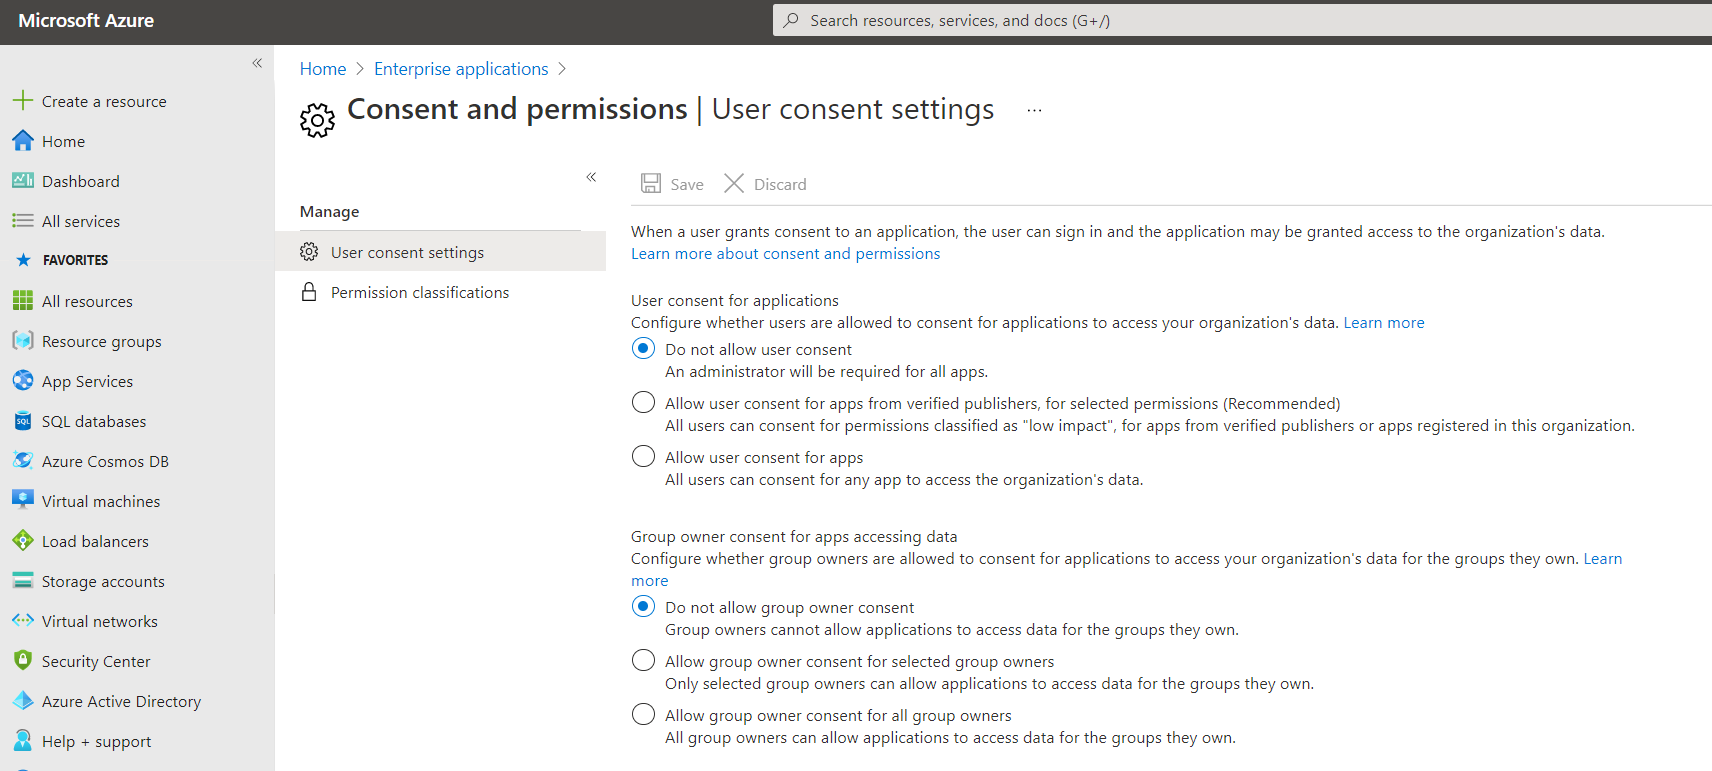
This window prevents the authenticated user to grant permissions to the Mobile Print Server application in their tenant. This happens when the tenant is configured to "Do not allow user consent" under the Consent and permission settings in the Enterprise applications.
There are three possibilities to allow the user account to authorize the Mobile Print Server application:
Use an account with an Azure Administrator role to allow consent for all the tenants
Azure Administrators can consent to the application on behalf of the whole organization. This can be done in few steps:
When the "Needs admin approval" screen appears, go to the link "Have an admin account? Sign in with that account".
Authenticate with the Administrator account
Check the option "Consent on behalf of your organization", as it is displayed in Step 5 of the Using OAuthClient section.
Accept the permission to read and write in your mailbox
You will be redirected to the OAuthClient with a successful message.
 At this moment the OAuth authorization is finished with an administrator account.
Remove completely the oauth-storage folder from <install_dir>\MPS\Service\oauth-storage.
Start again with the steps in Configure OAuth integration using OAuthClient, using the account which didn't have access before.
Grant the user with an Azure Administrator role
The following roles have elevated permissions, which allow the user to successfully authorize the Mobile Print Application to access their mailbox:
Application Administrator
Global Administrator
As mentioned before, Administrator roles can grant consent to the whole organization, so other users which attempt to authorize in the application won't require consent anymore.
Configure "Admin consent request" workflow
Azure has a feature called "Admin consent request", which allows users to request Administrator consent, so they can authorize applications that they do not have access to. This can be done in the User settings inside Enterprise applications:
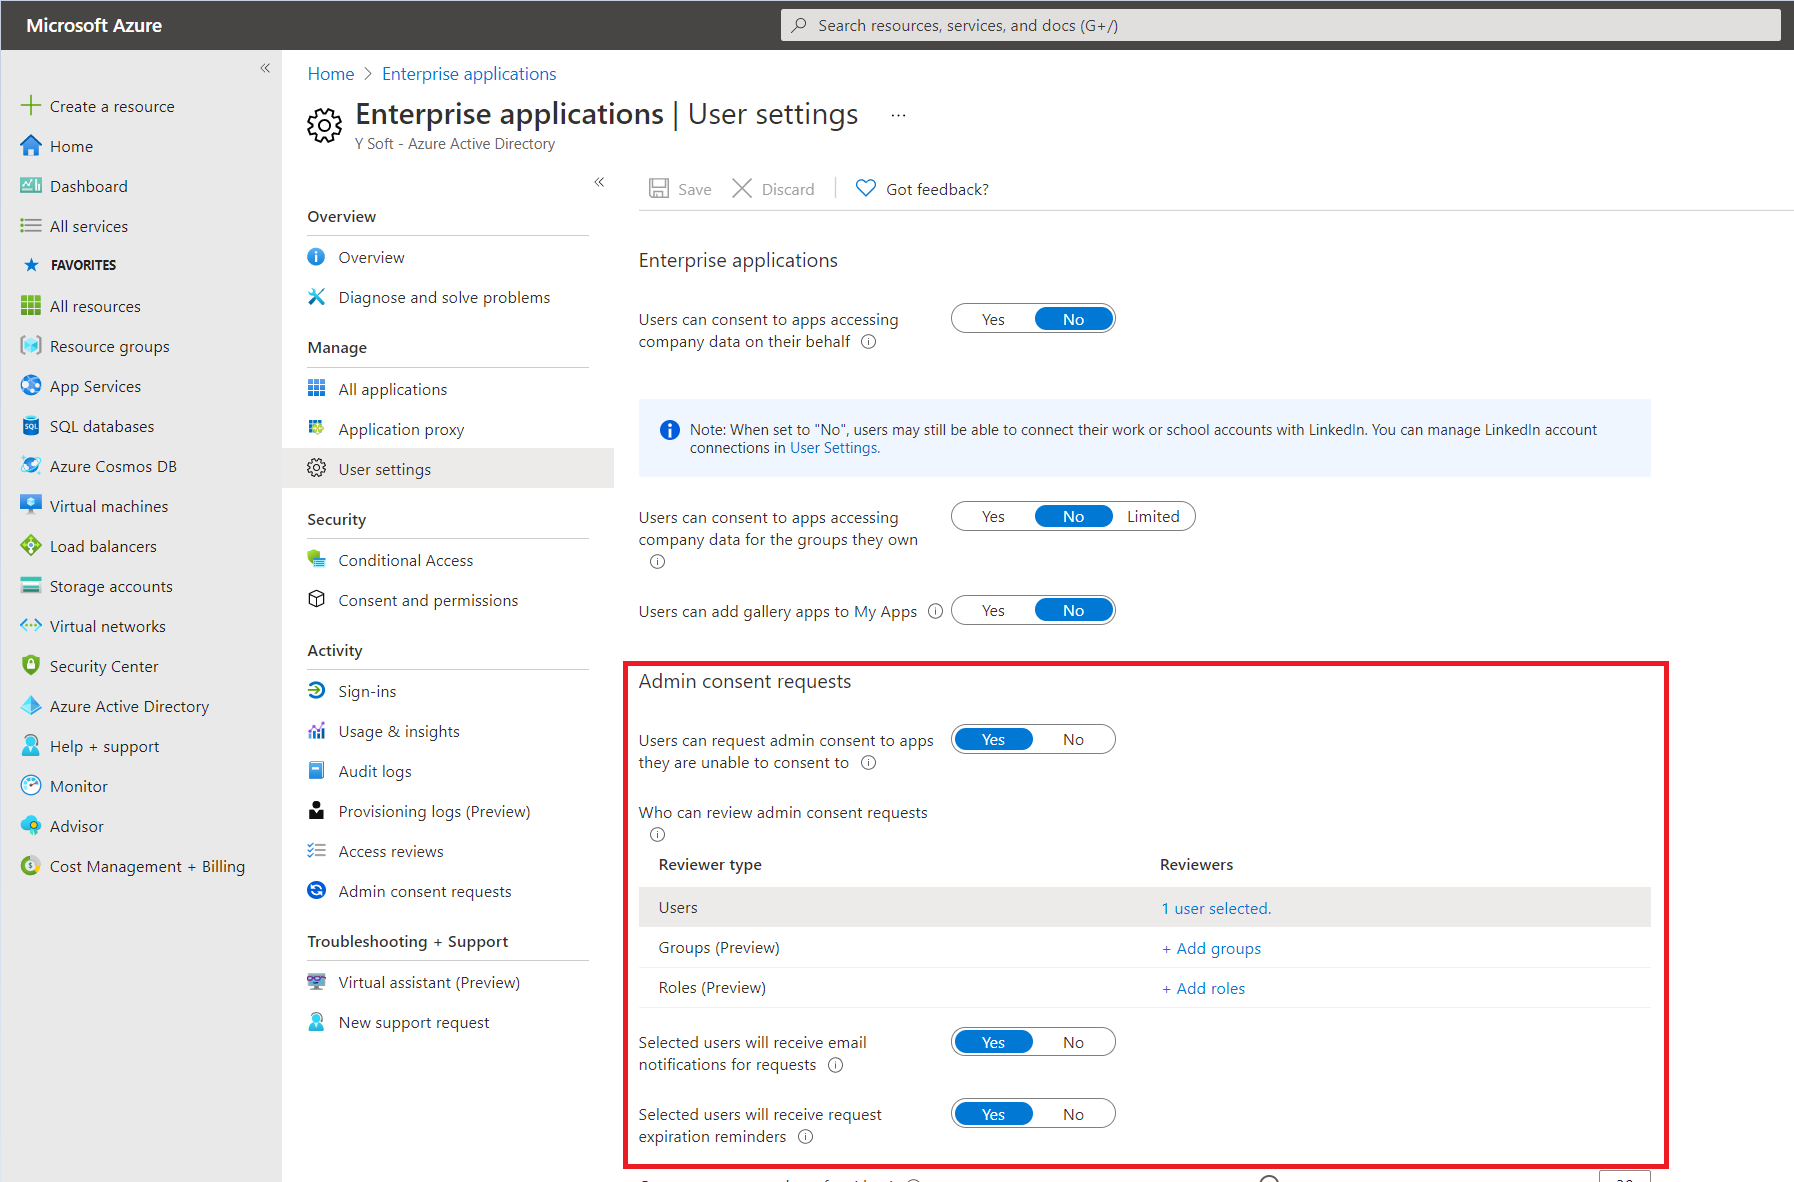
First, you have to enable the "Admin consent request" feature and then add Users, Groups, or Roles that will approve those requests. It is mandatory to add at least one.
Admin consent workflow explanation
1. Users sends a request for approval:
When the Admin Consent Request is enabled (it might take few minutes to be propagated), the users who do not have enough permissions will see the following screen:
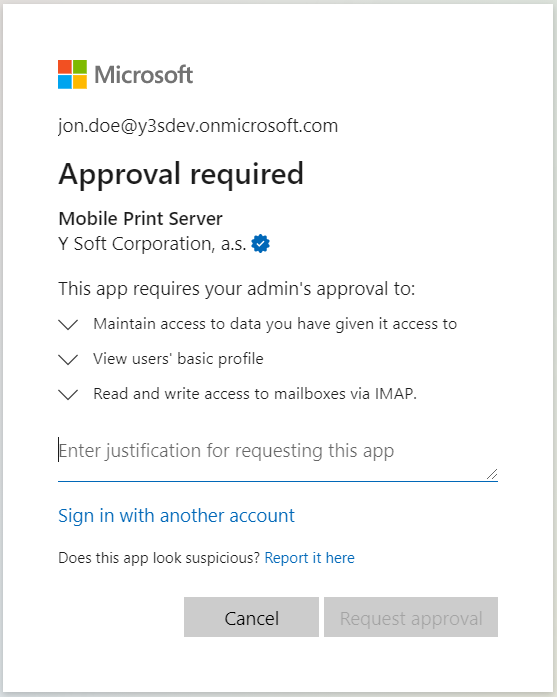
Now the user can provide a justification to the request and send it for review. Once the user sends the request, he will be asked to return to the application by clicking on the Back to app button.
IMPORTANT
At this point, the OAuth authorization was not configured yet. Follow the next steps to continue with the configuration of the OAuth authorization.
2. Admin reviews the requests
The administrator can review the requests in the Admin consent requests screen, inside Enterprise Applications:

3. User authenticates in the application
Once the consent was approved by the Administrator, the user should be able to proceed with the Using OAuthClient section.
Most common issues
This chapter is covering the most common issues that can be found in the log file while using the OAuth configuration.
Could not retrieve an access token from the OAuth storage
This is a common issue when we misconfigured usernames in config files, or there is some problem with files in oauth-storage.
Check your configuration files. OAuthClient.exe.config user key value should be the same as the OAuthClient.exe user argument. For more details see section Using OAuth Client.
Remove everything from the oauth-storage. The default location of the storage is <install_dir>\MPS\Service\oauth-storage.
Run OAuthClient.exe again. For detailed instructions see section Using OAuth Client.
Cannot refresh access token
This error message can be found in the logs when we are refreshing the access token.
This could mean that we are unable to contact the OAuth provider or there is a problem with the Azure application.
To fix this issue follow these steps:
Remove everything from the oauth-storage. The default location of the storage is <install_dir>\MPS\Service\oauth-storage.
Run OAuthClient.exe again. For detailed instructions see section Using OAuth Client.
Test connection was not successful
This error message can be found in the logs when we are unable to read, edit or delete messages of the account used in MPS.
This can be caused by removing permissions to the application in the account.
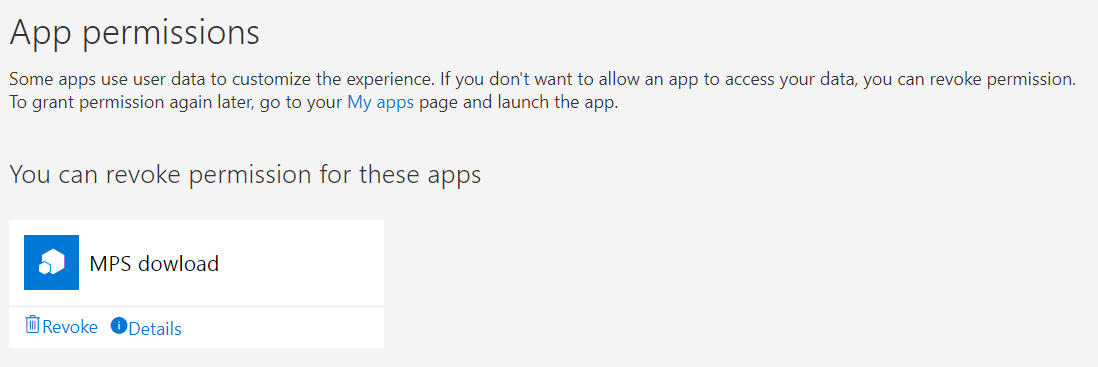
To check which applications have access to the account you can visit https://login.microsoftonline.com, go to My Account, and show App permissions.
If you do not see your application in the App permissions or you have issues with the authentication follow those steps:
Remove everything from the oauth-storage. The default location of the storage is <install_dir>\MPS\Service\oauth-storage.
Make sure everything is configured correctly.
Run OAuthClient.exe again. For detailed instructions see section Using OAuth Client.
Client secret could not be retrieved
This error message can be found in the logs when the token is expired and we try to obtain the new one but we are unable to get one.
This could mean that we are unable to contact the OAuth provider or there is a problem with the Azure application e.g. OAuth client ID or secret has changed.
To fix this issue follow these steps:
Remove everything from the oauth-storage. The default location of the storage is <install_dir>\MPS\Service\oauth-storage.
Run OAuthClient.exe again. For detailed instructions see section Using OAuth Client.
Changing or adding another service account
If you are changing or adding another account and the old one is still logged in your default web browser, the whole verification process may be skipped for a newly used account.
You need to log out from any logged-in Microsoft account from your default web browser if you see " Please return to the app. " in your web browser right after running the OAuthClient.exe command.
User is authenticated but not connected
The "The IMAP server replied to the 'NAMESPACE' command with a 'BAD' response: User is authenticated but not connected." in mps.log is often caused by disabled IMAP. Try to resolve the situation as follows:
Sign in with administrative account to https://admin.exchange.microsoft.com
Expand Recipients > click Mailboxes
Click the user that is configured in MPS > this will open a console tree on the right side of the screen
In the console tree go to General > Email apps & mobile devices > click "Manage email apps settings"
Enable IMAP > Press "Save"
"Save" button is only available for the users with sufficient rights, such as users being able to authenticate to https://admin.microsoft.com
Keep monitoring mps.log for an hour and verify if the situation is resolved