Mobile Print Server - Configure access to GMail IMAP using OAuth
How to use MPS in OAuth mode
To use Mobile Print Server in OAuth mode follow this steps.
Configure and run OAuth Client.
Steps are further broken down in the chapters below.
Configuring OAuth Client
Logout from all Google accounts linked with your default web browser manually, or using this link https://accounts.google.com/logout.
Navigate to the Service folder of the MPS e.g. C:\SafeQ6\MPS\Service\.
Run OAuthClient.exe from command line. Client is located in Service folder of the MPS e.g. C:\SafeQ6\MPS\Service\OAuthClient.exe. Command must be executed directly on the machine with the installed MPS or using remote desktop session to the machine. Run the tool with following arguments:
provider - "Google" for GMail IMAP
user - authorization identification to be later used in YSoft SafeQ Mobile Print Service Downloader, e.g. username of the GMail account that will be used in MPS
ExampleOAuthClient.exe Google [email protected]
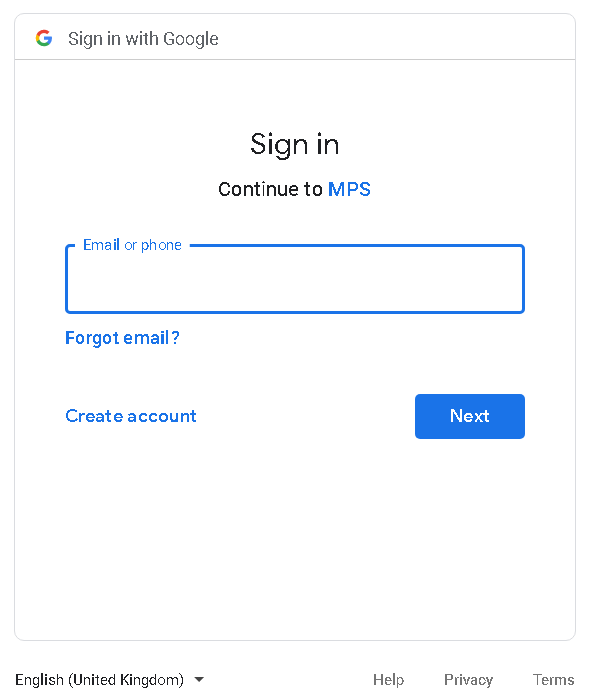
New window with Internet browser will open on the machine with installed MPS. Sign in with the username and password that will be used in the MPS. Should be the same as username specified in the config file.
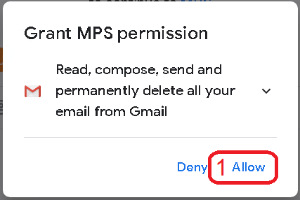
Grant permission for Read, compose, send and permanently delete all your email from Gmail.
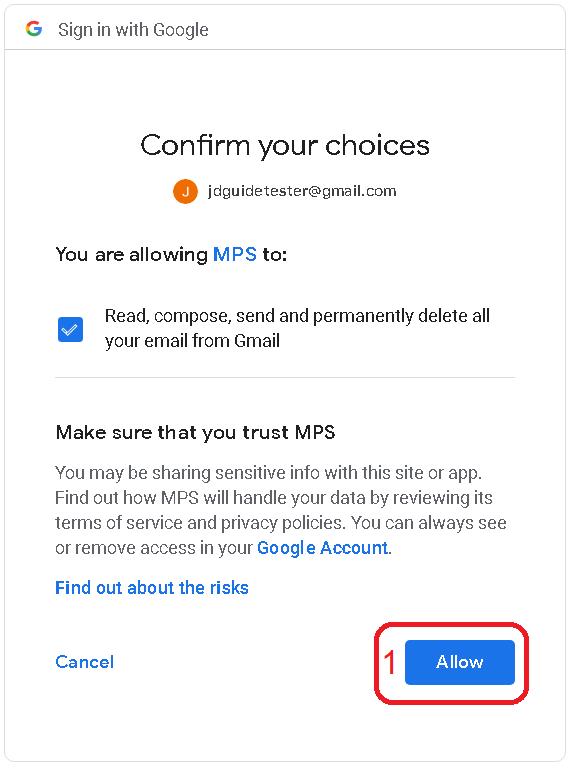
Confirm your choice.
On success, confirmation message will appear in the browser and console app.
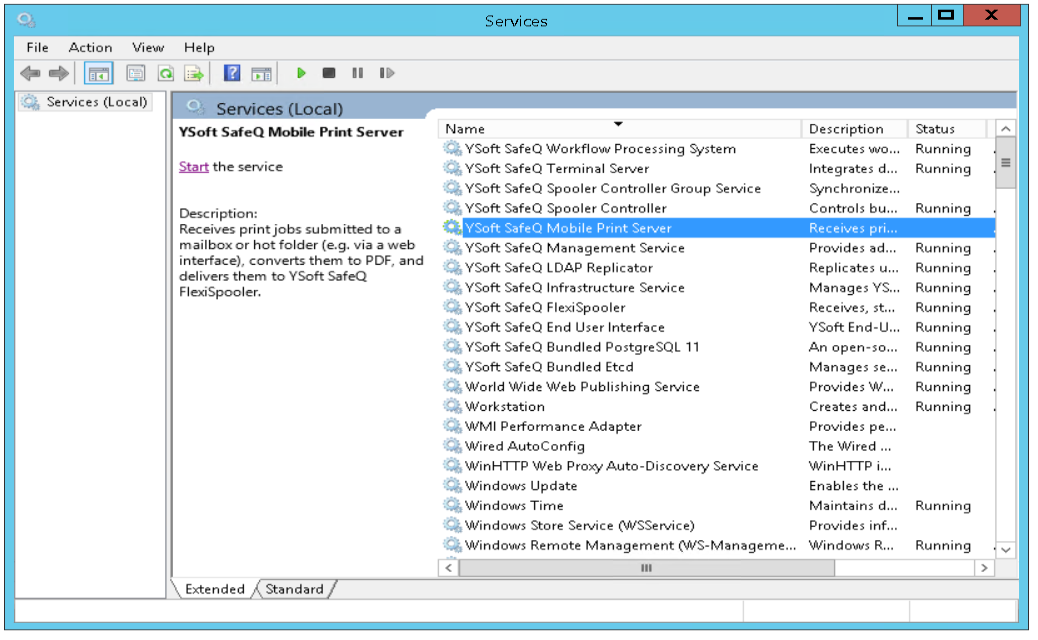
Then you can proceed to the Mobile print server configuration. First of all Stop the YSoft SafeQ Mobile Print Server in services manager.
Navigate to the conf folder of the MPS e.g. C:\SafeQ6\MPS\Service\conf.
Open mps.config in your favorite text editor.
Fill in the key values of the emailSources:
type: ImapOAuthGoogle
host: imap.gmail.com
userName: must be same as user used with OAuthClient.exe, e.g. [email protected]
password: should be empty
port: 993
secure: True
Example mps.config<?xmlversion="1.0"encoding="utf-8"?><mpsversion="6"><!-- AFTER CHANGING THIS CONFIGURATION PLEASE RESTART OR START THE "YSoft SafeQ Mobile Print Server" SERVICE MANUALLY. --><folderSources><addhost="127.0.0.1"path="C$\SafeQ6\SPOC\server\mobile"userName=""password=""downloadInterval="1000"/></folderSources><emailSources><!--Fill in.--> <addtype="ImapOAuthGoogle"host="imap.gmail.com"userName="[email protected]"password=""port="993"secure="True"/></emailSources><failedFilesfolder="Failed"maxAge="604800"/><localizationlanguage="en"default="en"/><communicatorconnectionLostTimeout="10000"controllerPort="5555"/></mps>Save the changes.
Start Ysoft SafeQ Mobile Print Server in the services manager.
Most common issues
In this chapter will be covered most common issues that can be found in the log file while using OAuth configuration.
Could not retrieve access token from the OAuth storage
This is a common issue when we misconfigure usernames in config files, or there is some problem with files in oauth-storage.
Check your configuration files. Mps.config userName value should be the same as OAuthClient.exe user argument. For more details look at chapter Configuring OAuth Client.
Remove everything from the oauth-storage. Default location of the storage C:\SafeQ6\MPS\Service\oauth-storage
Run OAuthClient.exe again. For detailed instructions take a look in Configuring OAuth Client chapter of this page.
Cannot refresh access token
This error message can be found in the logs when we are refreshing the access token.
This could mean that we are unable to contact the OAuth provider or there is a problem with the google application.
To fix this issue follow this steps:
Remove everything from the oauth-storage. Default location of the storage C:\SafeQ6\MPS\Service\oauth-storage
Run OAuthClient.exe again. For detailed instructions take a look in Configuring OAuth Client chapter of this page.
Test connection was not successful
This error message can be found in the logs when we are unable to read edit or delete messages of the account used in MPS.
This can be caused by removing permissions to the application in the google account.
To check which applications have access to the account you can visit https://myaccount.google.com/u/1/security-checkup and show Third-party access.

If you do not see your application in the Third-party access or have issues with the authentication follow this steps:
Remove everything from the oauth-storage. Default location of the storage C:\SafeQ6\MPS\Service\oauth-storage
Make sure everything is configured correctly.
Run OAuthClient.exe again. For detailed instructions take a look in Configuring OAuth Client chapter of this page.
Client secret could not be retrieved
This error message can be found in the logs when the token is expired and we try to obtain the new one but we are unable to get one.
This could mean that we are unable to contact the OAuth provider or there is a problem with the google application e.g. OAuth client ID or secret has changed.
To fix this issue follow this steps:
Remove everything from the oauth-storage. Default location of the storage C:\SafeQ6\MPS\Service\oauth-storage
Run OAuthClient.exe again. For detailed instructions take a look in Configuring OAuth Client chapter of this page.
App not verified
In some cases, e.g. during application verification, the app might not be verified by Google, warning will appear.
Always consult with YSoft's Customer support before taking this action.
Click on Advanced and Go to MPS (unsafe).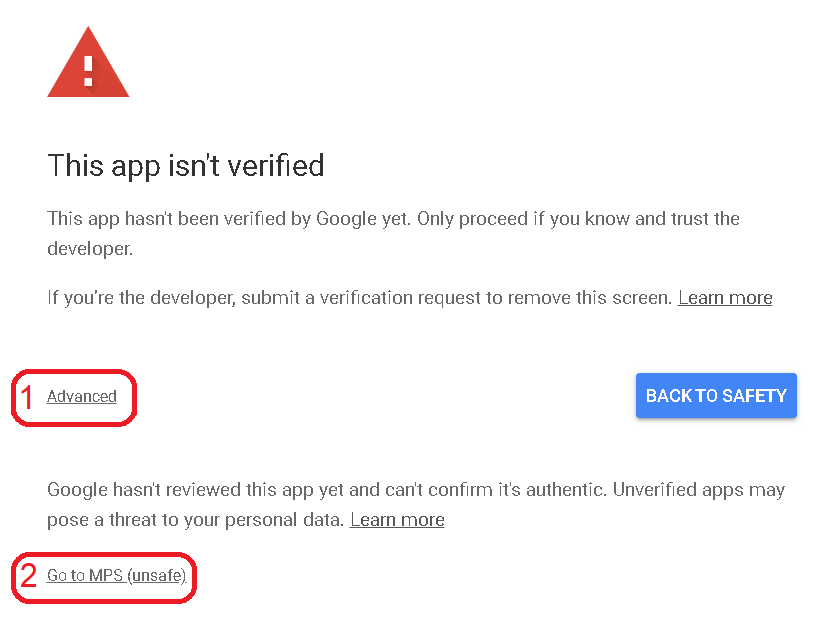
Changing or adding another service account
If you are changing or adding another account, and the old one is still logged in your default web browser. Whole verification process may be skipped for newly used account.
You need to logout from any logged in Google account from your default web browser, if you see " Received verification code. You may now close this window " in you web browser right after running OAuthClient.exe command.