How to change the IP address of YSoft SafeQ Management Service
This document describes how to change the IP address of the YSoft SafeQ Management Service. You would typically use these steps in an environment where YSoft SafeQ Management Server has its own server that is not used for other purposes (such as Spooler Controller, Payment system...).
Verification of the IP Address
This section describes the way to find the IP address of the current server.
Log into the server where the IP address is changed.
Open command prompt (e.g., Start => Run => cmd).
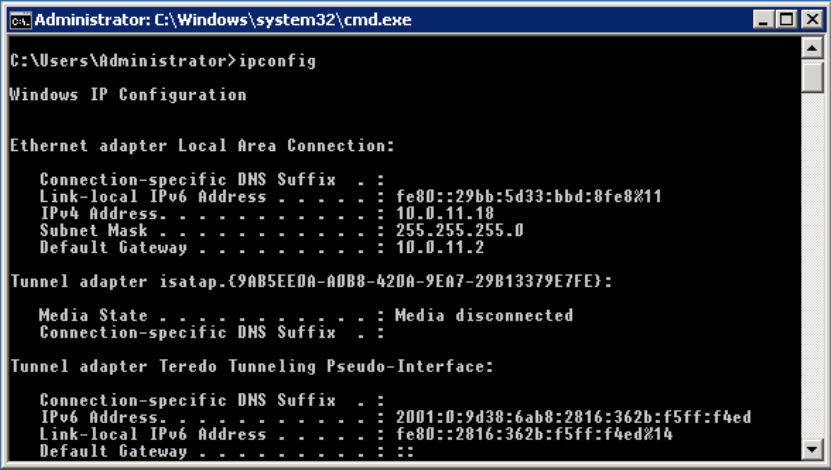
Enter the ipconfig command in the command prompt and press Enter.
Check IPv4 Address from the command output.
Reconfiguration of Management Service
An environment with a single server hosting Management Service
Enable license reactivation if you plan to move YSoft SafeQ to a different server with a new IP address.
This scenario assumes that you have Backup of Databases and Backup of configuration (and binary) files available.
If you have only one standalone Management Service, uninstall it
Prepare a server (or virtual machine) with the new IP address
If you are using an external database (on another server), check its state.
If the external database is damaged, perform Recovering Databases but skip the Finalization part for now.
Check backup of configuration files from the old server and note the following:
Management Server GUID. It is noted in the safeq.properties file as the value of property communicator.cml.guid. For example:
backup\Management\conf\safeq.properties# COMMUNICATORcommunicator.cml.guid=MGMT1
Install management server using the same build version of the installation package as you were using before.
Tick the I want to customize my YSoft SafeQ Management Server option.
Choose the Install a new YSoft SafeQ Management Server... option.
Use the same database type as was used before.
Provide wizard with the same Management Server GUID which was used before (see step 4.a.)
Finish the installation.
See Install the YSoft SafeQ Management Server for detailed procedure.
Stop almost all YSoft SafeQ services after installation is finished:
Leave only the YSoft Bundled PostgresSQL 11 service running (available if embedded PostgresSQL DB is used).
Stop all other YSoft SafeQ services.
You can use the following PowerShell script to perform the task
Get-Service*YSoft* |Where-Object{$_.Name-notmatch'YSoftPGSQL'} |Stop-Service
If you are using an embedded PostgreSQL database, perform Recovering Databases but skip the Finalization part for now (as new empty databases were created during installation).
Update IP addresses in the database
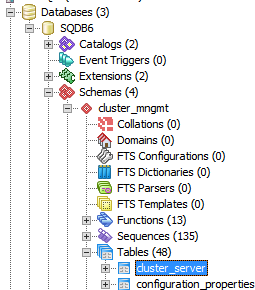
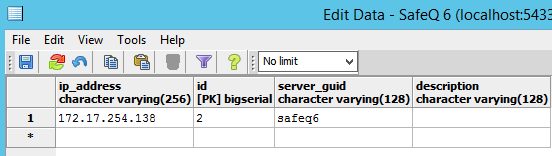
Connect to SQDB6 database, schema cluster_mngmt and check the content of cluster_server table:
If there is only one record with the server_guid of the reinstalled node, then update the ip_address value to match the new node
If there are two records with the same server_guid but different ip_address, then delete the record which contains the IP address of the old server
Start YSoft SafeQ services again
You can use the following PowerShell script to perform the task:
Get-Service *YSoft* | Where-Object {$_.Name -ne'YSoftSQ-SPOCGS'} | Start-Service
Re-activate the YSoft SafeQ license using your preferred method (online/offline). See Management Interface - License Activation for detailed instructions.
Restore customized configuration:
If you used customized configuration (such as your own certificates for the web services), seek the relevant documentation and set the configuration again
An environment with two Management Services in a cluster
If the affected node is the one on which the YSoft SafeQ license was activated, enable license reactivation before transferring the license to a new server.
This procedure is valid only for installations where an external database located on another server is being used.
If you have a two-node cluster, add a third node that is using the new IP address
Uninstall the node which was replaced
Remove the IP address of the uninstalled node from the database
Connect to SQDB6 database, schema cluster_mngmt and check the content of cluster_server table
Delete the record which contains ip_address and server_guid of the server which was uninstalled
Restart YSoft SafeQ Management Service service on both Management Services in the cluster
If the reinstalled node was the one on which the YSoft SafeQ license was activated, re-activate the YSoft SafeQ license using your preferred method (online/offline). See Management Interface - License Activation for detailed instructions.
An environment with three or more Management Services in the cluster
This procedure is valid only for installations where an external database located on another server is being used.
Stop YSoft SafeQ services
Stop all YSoft SafeQ services on the affected server
You can use the following PowerShell script to perform the task
Get-Service*YSoft* |Stop-Service
Update IP address in the database
Replace the old IP address with the new one in the database SQDB6, schema cluster_mngmt, table cluster_server, column ip_address:
Update Management
Edit <install_dir>\Management\conf\safeq.properties - set new IP address in entry "safeq.network.address"
Edit <install_dir>\Management\tomcat\conf \server.xml - replace all occurrences of the old IP with the new IP (use search and replace function in your text editor)
Apply changes
It is recommended to reboot the server with the changed configuration (make sure the new IP is active). If a reboot is not possible you will need to follow these steps:
Stop all YSoft SafeQ services
You can use the following PowerShell script to perform the task
Get-Service*YSoft* |Stop-Service
Start all YSoft SafeQ services again
You can use the following PowerShell script to perform the task
Get-Service*YSoft* |Where-Object{$_.Name-ne'YSoftSQ-SPOCGS'} |Start-Service
Reconfigure Site Servers to connect to the new IP of the Management Service
Edit <install_dir>\SPOC\conf\modules\spoc.conf and replace the IP of the affected Management Service in the corresponding serverIP parameter at the end of the file.
If you had a two-node Management Server cluster before you started with the procedure, make sure to replace also ServerGUID parameter in <install_dir>\SPOC\conf\modules\spoc.conf for the replaced server with a new IP address. The correct ServerGUID can be obtained from the web interface of the node with a new IP address
Reconfigure also Infrastructure Service Proxy service settings
If you have YSoft SafeQ 6 MU14 or earlier build:
stop YSoft Infrastructure Service Proxy service
move to <install_dir>\SPOC\ims\ directory and edit the application.properties file
replace the old IP address of Management Service with the new IP of the server and save changes
start YSoft SafeQ Infrastructure Service Proxy service again
If you have YSoft SafeQ 6 MU13 or older build:
stop YSoft SafeQ Infrastructure Service Proxy service
move to <install_dir>\SPOC\ims\ directory and start the following command from the command line
prunmgr.exe//ES//YSoftImsProxyYSoft SafeQ Infrastructure Service Proxy Properties dialogue shall open
move to Java tab and check the value of -DinfrastructureServiceAddress parameter inside Java Options:
if the old IP address of Management Service is there, replace it with the new IP of the server and confirm changes
start YSoft SafeQ Infrastructure Service Proxy service again
If database recovery was not performed in previous steps then restart the Spooler Controller service
Skip this section and move to the next one if database recovery was performed
For standalone Site Servers restart the Spooler Controller service after previous changes on all servers.
If Site Server is part of a Spooler Controller group, always perform a restart of the Spooler Controller service on only one server at a time.
Once the service is restarted and Spooler Controller is visible online on Management Server (management interface > Devices > Spooler Controller Groups), wait for about 5-10 minutes before proceeding to restart the Spooler Controller service on the next server in the Spooler Controller group.
If database recovery was performed in previous steps then delete cache and restart all services
Skip this section if database recovery was not performed
Cache on Spooler Controllers needs to be deleted after Database restore to avoid possible inconsistencies.
Delete Spooler Controller cache directory on all servers
Delete YSoft SafeQ Spooler Controller cache by deleting whole folder <SAFEQSPOC_DIR>\SpoolCache (e.g. c:\SafeQ6\SPOC\SpoolCache)
Start Management service again
Open the Services window (e.g. Start > Run > services.msc) and start the following services:
Start YSoft SafeQ Management Service
Verify the Spooler Controller cache recovery settings
Go to tab System > Configuration on YSoft SafeQ management interface and set orsCacheRecovery property to enabled.
In case of YSoft SafeQ Spooler Controller cache data corruption, cache can be manually deleted and all job-related metadata will be recovered from YSoft SafeQ Management Server.
If you omit this step, all jobs stored on the YSoft SafeQ Spooler Controller might be lost after the end of procedure.
Start the remaining services on all servers
Do not start YSoft SafeQ Spooler Controller Group Service manually. If YSoft SafeQ Spooler Controller is part of Spooler Controller group then this service will start automatically when its configuration is ready.
Start remaining YSoft services with Automatic startup type in no particular order
You can use the following PowerShell script to perform the task:
Get-Service *YSoft* | Where-Object {$_.Name -ne 'YSoftSQ-SPOCGS'} | Start-ServiceVerify the correct Spooler Controller functionality
Once the YSoft SafeQ Spooler Controller cache is deleted and YSoft SafeQ Spooler Controller services are running, verify the correct YSoft SafeQ Spooler Controller functionality according to the article YSoft SafeQ Spooler Controller Health Check.