YSoft SafeQ with Microsoft Universal Print Connector
General
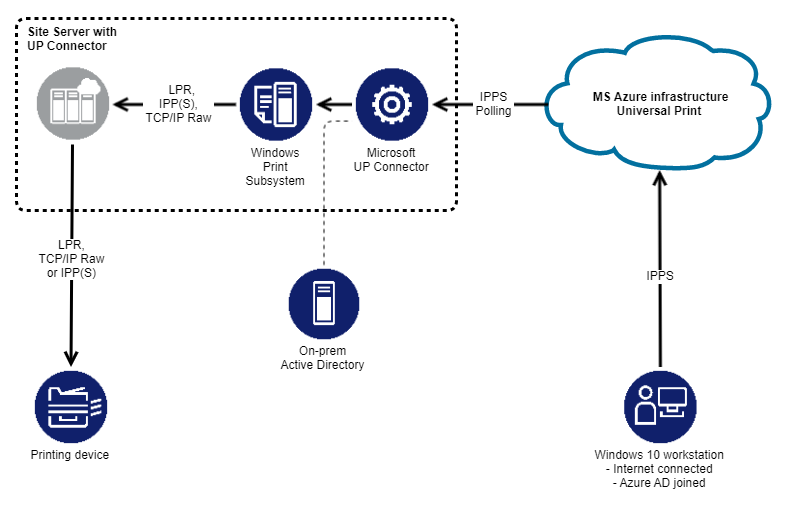
Print job data flow diagram

Print job data flow description
User adds Universal Print printer on the Windows 10 workstation and prints the document using the printer.
The document is converted to some of the supported formats (PWG Raster, JPEG, PDF) and send to the server over IPP(S) protocol.
The job can converted to defined format on the server by enabling document conversion feature ( for details, see https://docs.microsoft.com/en-us/universal-print/fundamentals/universal-print-administrator-roles, https://docs.microsoft.com/en-us/universal-print/fundamentals/universal-print-document-conversion),
The data is spooled inside Microsoft cloud infrastructure in a secure way (for details, see https://docs.microsoft.com/en-us/universal-print/fundamentals/universal-print-administrator-roles, https://docs.microsoft.com/en-us/universal-print/fundamentals/universal-print-encryption).
When the job reaches the cloud infrastructure the MS UP connector responsible for the target printer downloads it using the opened secure session (IPPS polling).
MS UP connector translates IPP attributes into the driver configuration options and apply the job with settings to the windows printing subsystem (on localhost).
The data are processed by the local print queue and delivered to the target specified in the printer port (LPR or TCP/IP Raw).
YSoft SafeQ Site Server spools incoming jobs and prints them in standard way depending on the queue name (secure or direct print).
Prerequisites
Microsoft 365 subscription with the Universal Print (hereinafter the UP) enabled and configured.
UP is currently in public preview. Please refer to Microsoft documentation details about accessing the public preview (for details, see https://docs.microsoft.com/en-us/universal-print/fundamentals/universal-print-administrator-roles)https://docs.microsoft.com/en-us/universal-print/fundamentals/universal-print-preview-access).
YSoft SafeQ environment.
Windows Print Server (can be one of YSoft SafeQ servers).
The server must be joined in Hybrid Azure AD (for details, see https://docs.microsoft.com/en-us/azure/active-directory/devices/concept-azure-ad-join-hybrid and here: https://techcommunity.microsoft.com/t5/universal-print-discussions/job-owner-quot-system-quot/m-p/1363904).
There are local windows print queues on the server configured to send print jobs to YSoft SafeQ environment.
Azure AD account with Printer Administrator role (for details, see https://docs.microsoft.com/en-us/universal-print/fundamentals/universal-print-administrator-roles).
Azure AD joined Windows 10 user workstations (for details, see https://docs.microsoft.com/en-us/universal-print/fundamentals/universal-print-administrator-roles, https://docs.microsoft.com/en-us/azure/active-directory/devices/concept-azure-ad-join).
Deployment
MS UP Connector installation
The Microsoft Universal Print Connector (hereinafter the MS UP Connector) must be installed on the on premises Windows Print Server.
See Microsoft documentation for the installation files and installation steps: https://docs.microsoft.com/en-us/universal-print/fundamentals/universal-print-connector-installation.
It is needed to change configuration setting of the MS UP Connector after the installation to enable correct job owner identification. The job owner identification is based on communication with the on premises Active Directory in so called "Hybrid Azure AD" (for details, see https://docs.microsoft.com/en-us/azure/active-directory/devices/concept-azure-ad-join-hybrid). To enable this communication set enable-hybrid-ad-aad-environment parameter in the c:\WINDOWS\PrintConnectorSvc\config.json file to true (default is false). The resulting configuration should look like this:
{"enable-hybrid-ad-aad-environment":"true"}
Registering UP print queue
Create local windows print queues on the Windows Print Server where MS UP connector is installed.
The queues can use any print driver and can be configured to print using LPR, TCP/IP Raw or even IPP(S).
The print queues must be configured to deliver print jobs to the YSoft SafeQ environment.
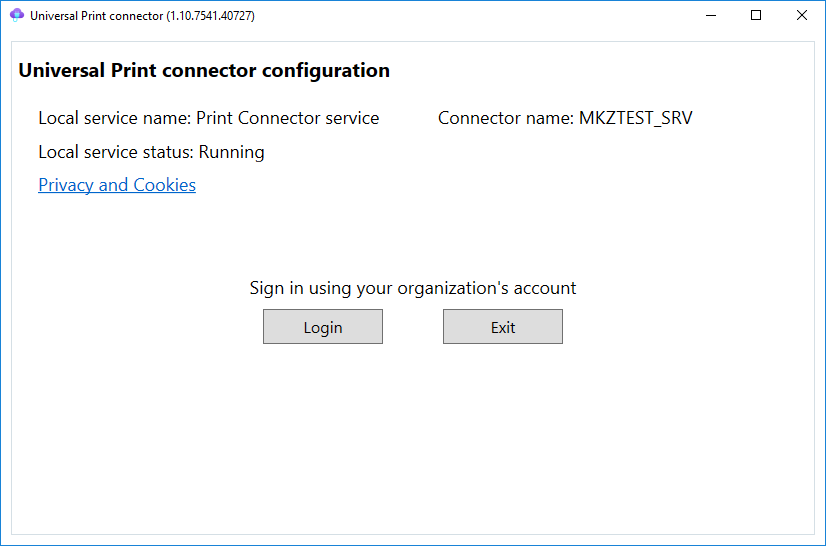
Run the MS UP connector application and log-in using your Azure AD account with Printer Administrator role.

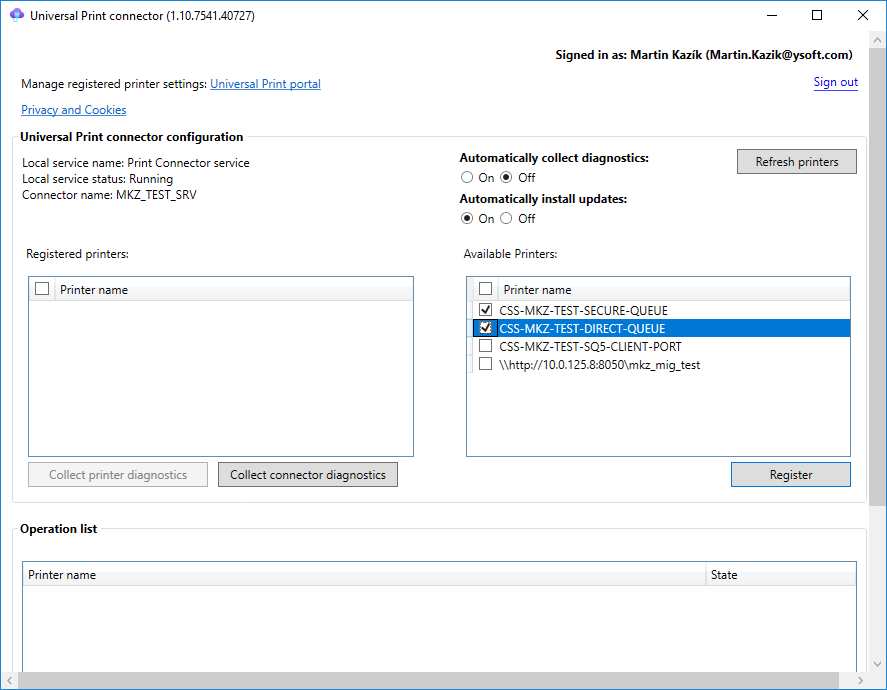
Local printers will be listed in the "Available Printers" section. Mark the printers you want to register and click "Register" button to register them for Universal Print.

Registered printers will appear in the "Registered printers" section of the MS UP Connector window and also in the Universal Print section on the Azure Portal.
Printer management
Printers are managed in the Universal Print section of the Azure Portal. For details, see https://docs.microsoft.com/en-us/universal-print/fundamentals/universal-print-printer-property-settings
Printer sharing and access control
Printers are shared in the Universal Print section of the Azure Portal. For details, see https://docs.microsoft.com/en-us/universal-print/fundamentals/universal-print-printer-permissions
Add a Universal Print Printer on a Windows device
See Step 4 here: https://docs.microsoft.com/en-us/universal-print/fundamentals/universal-print-getting-started
Print to YSoft SafeQ using a Universal Print Printer
Printers added to the Windows device in the previous step can be used as any other standard windows print queue. You can print from any application by selecting the printer and the print jobs will be delivered to YSoft SafeQ and assigned to the logged on user.