Workflows List
The Workflows screen displays a list of all available scan workflows in the same order they are displayed to users on YSoft SafeQ terminal applications. The Workflows screen lets you perform various actions on scan workflows.
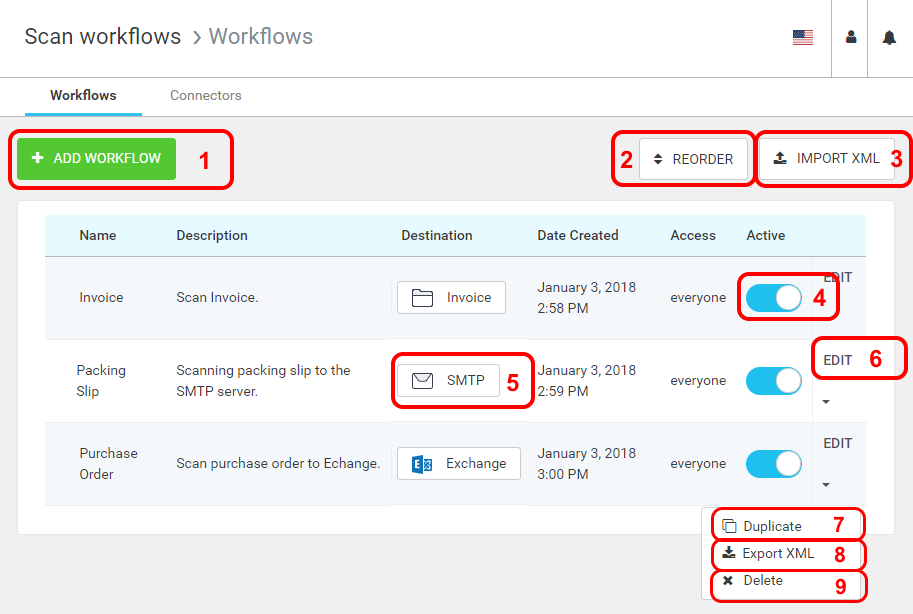
Add Workflow – Create a new workflow
Reorder/Confirm – Click the REORDER button to start changing the display order of workflows on the YSoft SafeQ terminal. Drag and drop a workflow and finish changing the display order by clicking the CONFIRM button.
Import XML – Import a workflow definition XML file (previously exported using the Export XML action). Imported workflows are disabled immediately after importing.
A new connector will be created for each imported workflow.
Importing YSoft SafeQ 5 scan workflow XML files is not supported.
Backward compatibility between builds functions from YSoft SafeQ 6 MU4 onward (inclusive), therefore, using XMLs from older versions might not work properly.
Enable/Disable – Enable or disable a workflow. Disabled workflows are not available to users on the YSoft SafeQ terminal.
Connector Name – The connector used as a workflow destination. Clicking the connector name opens the connector in edit mode – see Edit Connector for more details.
Edit – Opens the Edit workflow page – see Edit Workflow for more details.
Duplicate – Click the duplicate button to create a copy of the workflow.
Export XML – Click the arrow icon next to a workflow in the list to display the actions menu. The Export XML button exports the selected workflow to an XML file. It is possible to import the workflow again to any YSoft SafeQ 6 instance using the IMPORT XML button.
Delete – Click the arrow icon next to a workflow in the list to display the actions menu. The Delete button deletes the selected workflow.