Upgrading from YSoft SafeQ 5
The installer automates the process of upgrading to YSoft SafeQ 6 by configuring and running the upgrade tool. Detailed information can be found in upgrade tool documentation.
Details for each deployment scenario of YSoft SafeQ 5 are covered below.
Payment System and Mobile Print Server migration is not supported at the moment.
General facts about the update procedure
YSoft SafeQ 6 is installed side by side with YSoft SafeQ 5.
YSoft SafeQ 5 CML will be mapped to the First Server scenario.
YSoft SafeQ 5 ORS will be mapped to the Site Server scenario.
The installer detects the configuration of YSoft SafeQ 5 and preselects choices that need to stay consistent in YSoft SafeQ 6.
YSoft SafeQ 5 will be stopped during the installation, and its services will be set to manual start.
Data migration will be configured and executed automatically. The user will be notified about the migration result. Data migration can fail or finish with warnings. The user can run data migration again later on after installation finishes.
When installation or data migration fails, YSoft SafeQ 6 services can be turned off or uninstalled, and YSoft SafeQ 5 can be turned back on again by starting YSoft SafeQ 5 services.
Data migration can be re-run manually by executing a batch script from <YSoft SafeQ 6_HOME>\upgrade\
YSoft SafeQ CML with an embedded PostgreSQL database
Run the YSoft SafeQ server installer.
The installer will preselect First Server with an embedded database deployment scenario.
Navigate through the rest of the YSoft SafeQ 6 installer screens the usual way, and click Install.
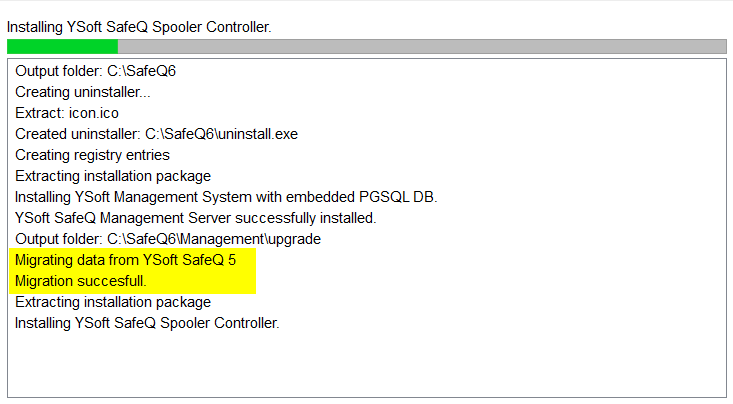
The installer will automatically dump and restore YSoft SafeQ 5 databases. Also, YSoft SafeQ 5 will be stopped at this point.
Check the result of the data migration. This can take up to several hours, depending on the YSoft SafeQ 5 database size.
Wait for the installer to finish.
YSoft SafeQ CML with an embedded Microsoft SQL server
Run the YSoft SafeQ server installer.
The installer will preselect First Server with an external Microsoft SQL database deployment scenario as an embedded Microsoft SQL scenario was discontinued in YSoft SafeQ 6.
Dump the SQDB5 and SQDB5_SQDW databases and restore them to an external Microsoft SQL server. This server will become the main database server for YSoft SafeQ 6.
Configure the connection to this database server as well as the names of both YSoft SafeQ 5 databases. The YSoft SafeQ 6 and YSoft SafeQ 5 databases need to be present side by side on the same database server in order to perform the data migration.
Navigate through the rest of the YSoft SafeQ 6 installer screens the usual way, and click Install.
Check the result of the data migration. This can take up to several hours, depending on the YSoft SafeQ 5 database size.
Wait for the installer to finish.
YSoft SafeQ CML with an external PostgreSQL server
Run the YSoft SafeQ server installer.
The installer will preselect First Server with an external PostgreSQL database deployment scenario.
Dump the SQDB5 and SQDB5_SQDW databases and restore them to an external PostgreSQL server. This server will become the main database server for YSoft SafeQ 6. Please check the minimal required version of PostgreSQL for YSoft SafeQ 6.
Configure the connection to this database server as well as the names of both YSoft SafeQ 5 databases. The YSoft SafeQ 6 and YSoft SafeQ 5 databases need to be present side by side on the same database server in order to perform the data migration.
Navigate through the rest of the YSoft SafeQ 6 installer screens the usual way, and click Install.
Check the result of the data migration. This can take up to several hours, depending on the YSoft SafeQ 5 database size.
Wait for the installer to finish.
YSoft SafeQ CML with an external Microsoft SQL server
Run the YSoft SafeQ server installer.
The installer will preselect First Server with an external Microsoft SQL database deployment scenario.
Dump the SQDB5 and SQDB5_SQDW databases and restore them to another external Microsoft SQL server or upgrade your existing Microsoft SQL server. This server will become the main database server for YSoft SafeQ 6. Please check the minimal required version of Microsoft SQL for YSoft SafeQ 6.
Configure the connection to this database server as well as the names of both YSoft SafeQ 5 databases. The YSoft SafeQ 6 and YSoft SafeQ 5 databases need to be present side by side on the same database server in order to perform the data migration.
Navigate through the rest of the YSoft SafeQ 6 installer screens the usual way, and click Install
Check the result of the data migration. This can take up to several hours, depending on the YSoft SafeQ 5 database size.
Wait for the installer to finish.
YSoft SafeQ ORS
Run the YSoft SafeQ server installer.
The installer will preselect a Site Server deployment scenario and reuse YSoft SafeQ 5 ORS GUID.
Navigate through the rest of the YSoft SafeQ 6 installer screens the usual way, and click Install.
Wait for the installer to finish.
YSoft SafeQ CML cluster
Migrate the first YSoft SafeQ 5 CML node of the CML cluster by using one of the above-mentioned scenarios.
Remove all other YSoft SafeQ 5 CML nodes.
Install the rest of the YSoft SafeQ 6 management server nodes by using the YSoft SafeQ 6 management server cluster installation procedure.
YSoft SafeQ and Payment System
The upgrade process of YSoft SafeQ 5 and Payment System with various deployment scenarios. Please contact support services for more details.