Installing YSoft SafeQ Management Server on external MSSQL using domain users
This page describes the installation of YSoft SafeQ Management Server on Microsoft SQL Server database with a usage of domain users for authentication to the database engine.
Prerequisites
Workstation, where YSoft SafeQ Management Server will be installed is registered in domain.
YSoft SafeQ Management Server installer is available.
Microsoft SQL database engine is installed.
MSSQL server requirements met (YSoft SafeQ server requirements).
A single domain user service account is available with the following:
account will be set as db_owner of YSoft SafeQ databases while creating the databases (described below; its username and password will be used during installation for DB connection)
account has local administrative rights and "Log on as a service" at YSoft SafeQ server (install package must be launched under this account by "run as"; YSoft SafeQ services will be running under it once the installation finishes)
account is different from the account creating the databases, but belongs to the same domain
account is not a sysadmin (SQL query "select CURRENT_USER" on master DB returns "guest", not "dbo")
Installation of YSoft SafeQ Management Server using domain users
Configure SQL Server and create domain user
Connect to the database server using a user account with sufficient privileges
You must be logged in into the Windows Server with a different user than the one which will be used for communication between YSoft SafeQ installer and the databases. But the user must be from the same domain.
Example:if domain user doe from domain EXAMPLE will be used for communication between YSoft SafeQ installer and databases, then you must connect to the Windows Server as a different user from domain EXAMPLE
do not use System Administrator (user sa) as it is not part of any Windows domain
Open SQL Server Management Studio and connect to the Database Engine.
Right-click database server and select Properties.
Switch to the Advanced tab and enable Containment mode.
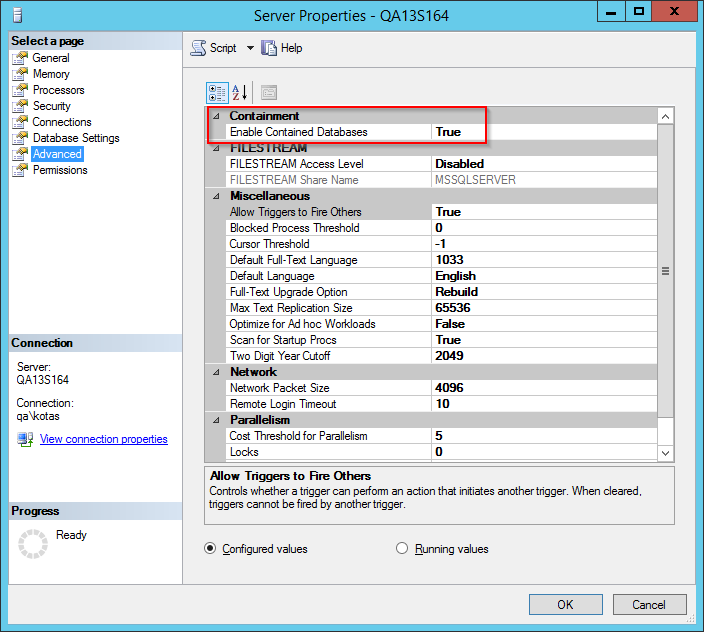
Confirm the changes by click on OK button.
Under database server, expand Security, right-click Logins and select New Login...
Add domain user, who will be used for communication between YSoft SafeQ installer and database. Enter Login name in following format 'domain\username' and select Windows authentication as the authentication method.
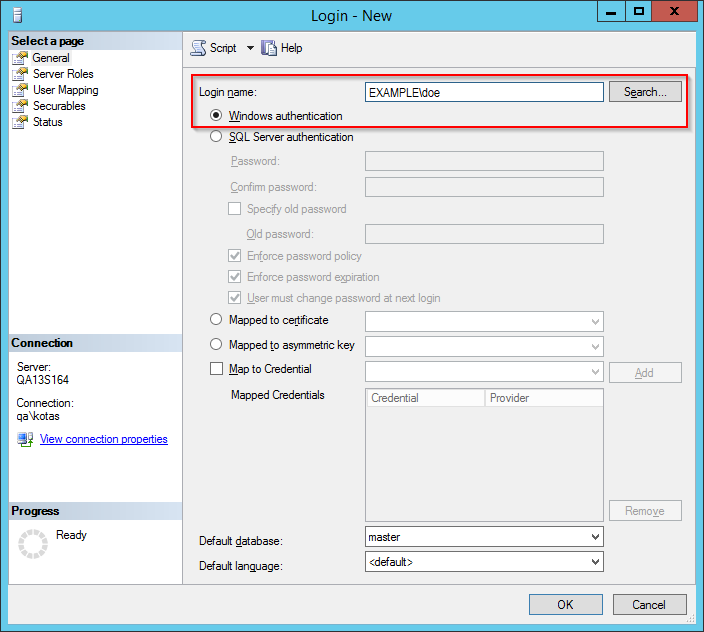
Confirm user creation by clicking OK button.
Create YSoft SafeQ database and configure access rights
Open SQL Server Management Studio and connect to the Database Engine.
Right-click Databases and select New database.... Choose the name (for example SQDB6) for the database, switch to the Options tab and select partial Containment type.

Confirm database creation by clicking OK button.
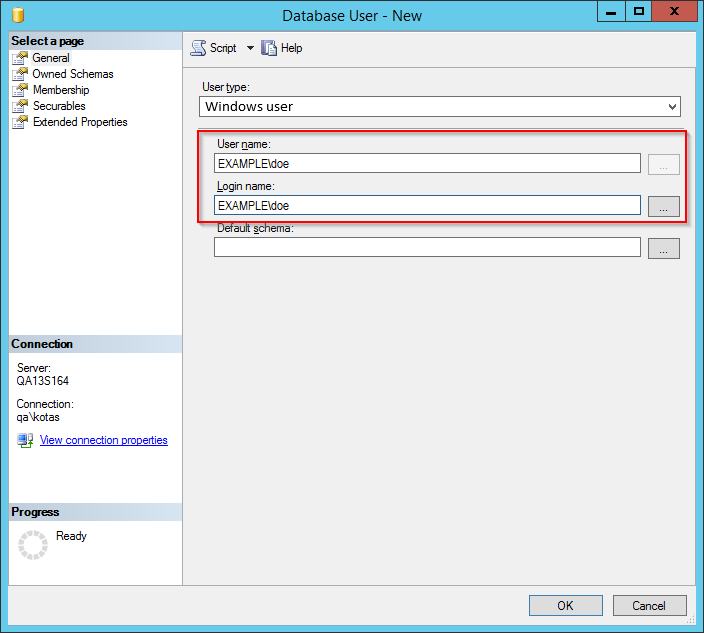
Expand Databases, find the newly created database, under the database expand Security, right-click Users and select New user...
Configure access right to the YSoft SafeQ database for the domain user. On the General tab, change User type to "Windows user", fill the Username and Login name with the user created in the previous section.
On the Membership tab, select db_owner.
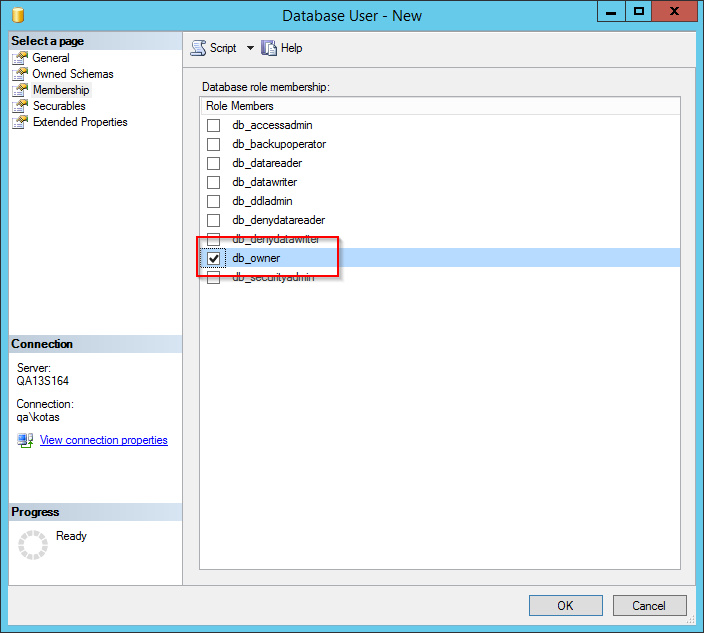
Confirm user creation by clicking OK button.
Create YSoft SafeQ data warehouse database and configure access rights
This section applies only in case you plan to use external database for data warehouse.
Repeat the steps from the Create YSoft SafeQ database and configure access rights section (previous section) and use the same user as for the main database but choose different name for the warehouse database (for example SQDB6_DWH).
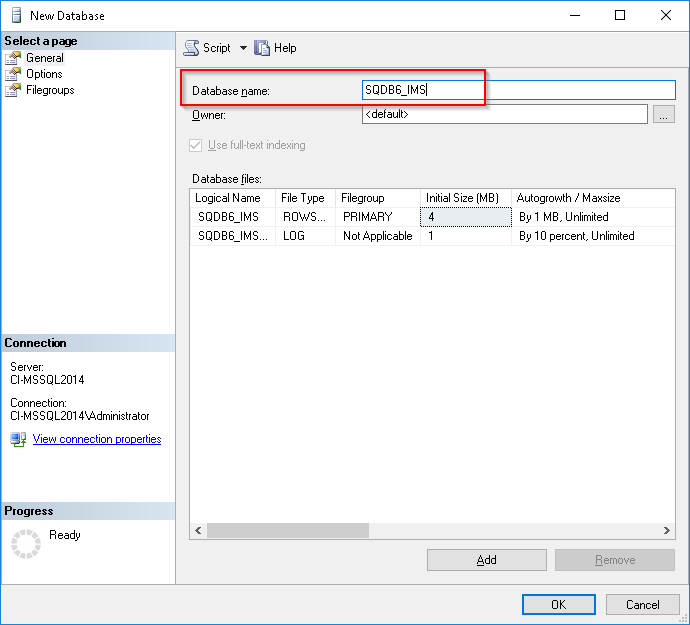
Create Infrastructure Management database and configure access rights
Open SQL Server Management Studio and connect to the Database Engine.
Right-click Databases and select New database.... Use the same name as for the Management Server database, but add the _IMS suffix. name (for example SQDB6_IMS for SQDB6). Confirm database creation by clicking OK button.
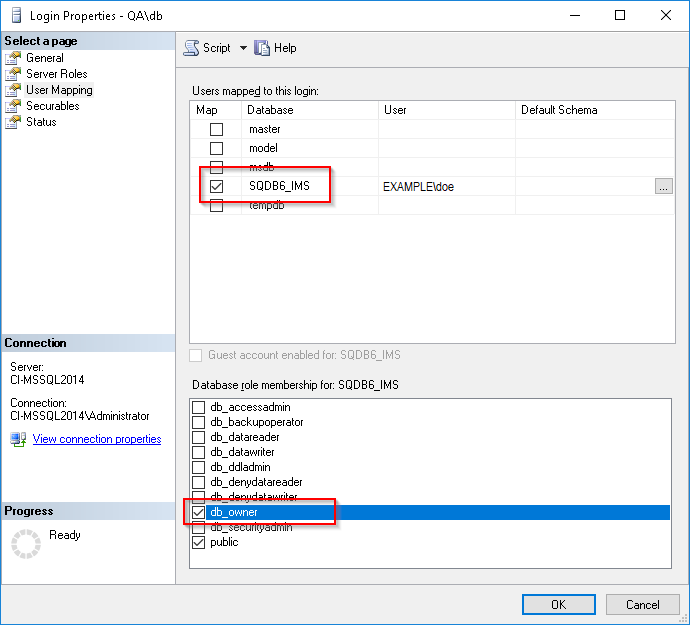
Expand (server lever) Security, expand Logins, right-click the domain user (created in the previous section) and click Properties.
Select User Mapping, check Infrastructure Management database and add the db_owner role. Confirm the changes by clicking OK button.
Install YSoft SafeQ Management Server
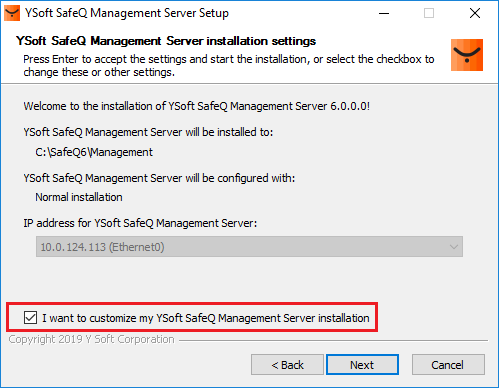
Log in to the server where Management Server shall be installed using the same domain user which is used for communication between YSoft SafeQ installer and databases. Domain user Doe is used in this example. This user account must have sufficient privileges on Management Server to run the installer.
Run YSoft SafeQ Management Server installer under the domain user which is used for communication between YSoft SafeQ installer and databases. Alternatively, you can run Server installer under the domain user. On installation settings screen check I want to customize my YSoft SafeQ Management Server installation and click Next.
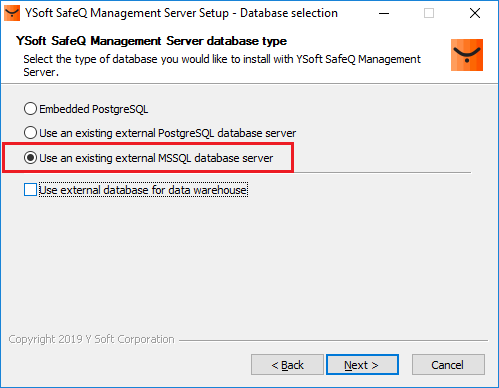
Select Use and existing external MSSQL database server in the database type selection step.
Check Use Windows Authentication (instead of SQL) checkbox and fill in Domain textbox. Fill in connection details for user. Use users and password registered in SQL Server.
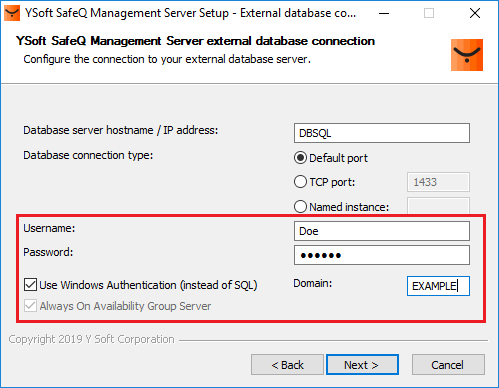
Username and domain are case-sensitive. It must match the SQL Server login.
Always On Availability Group Server checkbox is also automatically checked because database is deployed in contained mode.
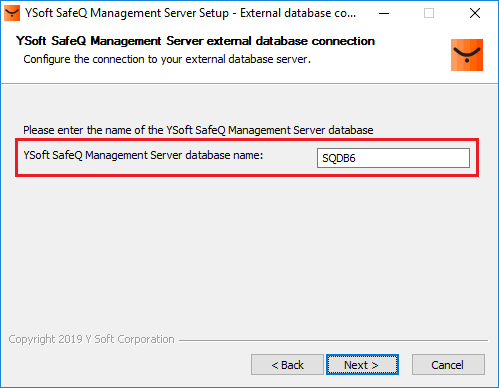
Enter the YSoft SafeQ database name. When using the domain authentication, the database must exist and be properly configured according to this manual.
Continue to further steps and start installation of Management Server.
When using external database for data warehouse on the same server
After YSoft SafeQ Management Server installation finishes, open SQL Server Management Studio and connect to the Database Engine as System Administrator (user sa) and run the following queries:
ALTER DATABASE [SQDB6_DWH] SET CONTAINMENT = PARTIAL WITH NO_WAIT;ALTER DATABASE [SQDB6_DWH] SET TRUSTWORTHY ON;Do not forget to change the database name in the queries above. The queries have the default data warehouse database name in them (i.e. SQDB6_DWH), change it to the correct YSoft SafeQ data warehouse database name you have chosen for your deployment.
Troubleshooting
Management Server is not working, there are "Invalid object name" errors in the log files
Domain user used to connect to the database cannot have sysadmin rights and cannot be the owner of the Management Server (SQDB6) database. Check effective rights of the domain user. It may inherit sysadmin rights from assigned groups. Check the database properties and verify that the Owner is not set to the used domain user.
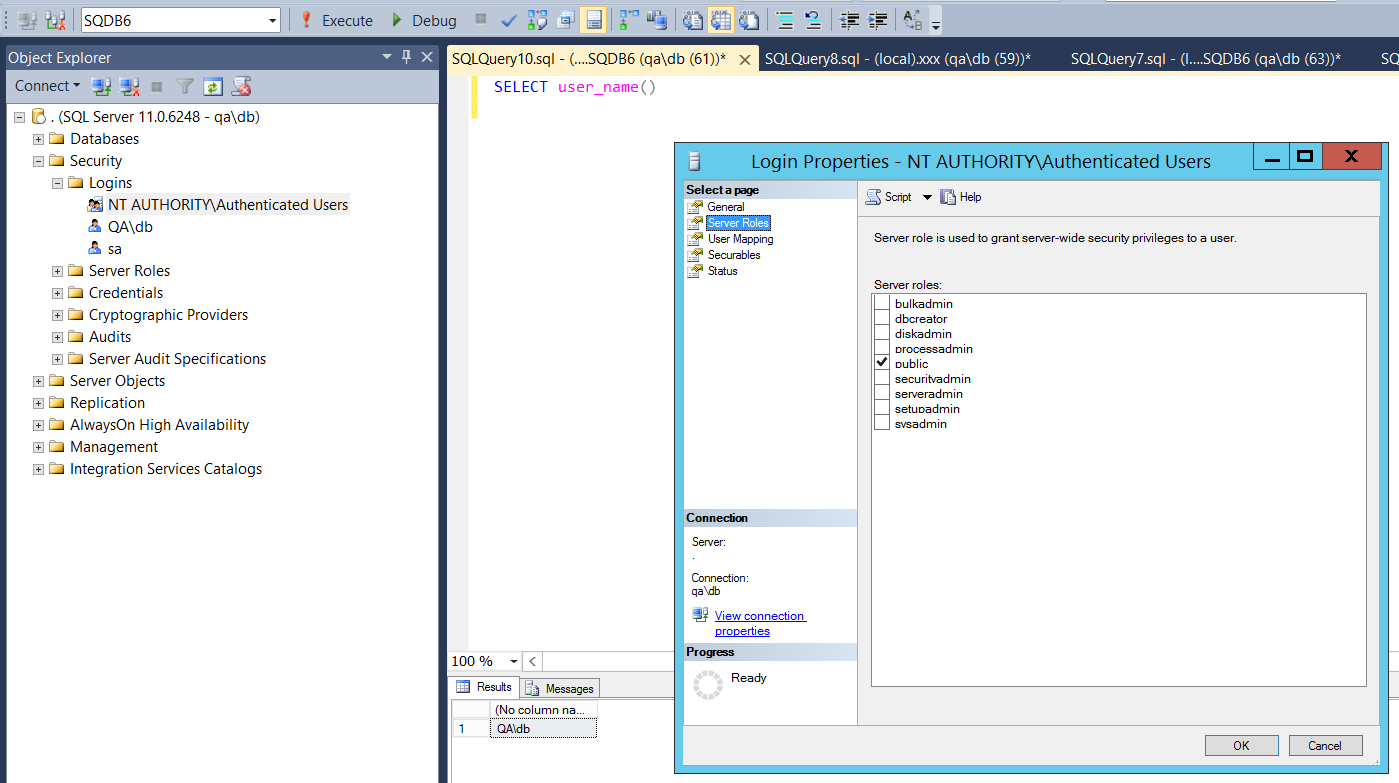
You should check domain user effective rights by database query: "SELECT user_name()". If the result will be domain name of the user and not "dbo", current effective rights are configured well. Usually you need to remove "sysadmin" role from "NT AUTHORITY\Authenticated Users" group.
Management Server is not working, there is a "Could not obtain information about Windows NT group/user" error in the log file
Make sure that the there is a correct database owner for both main database (e.g. SQDB6) and data warehouse database (in case an external database for data warehouse is used, e.g. SQDB6_DWH). It must be a domain user from the same domain as the domain user used to connect to the database from YSoft SafeQ, but the user itself must be different (see warning at the beginning of the Configure SQL Server and create domain user section).
In the case that the error persist even after above mentioned solution, change the database owner of the data warehouse database to System Administrator (user sa).
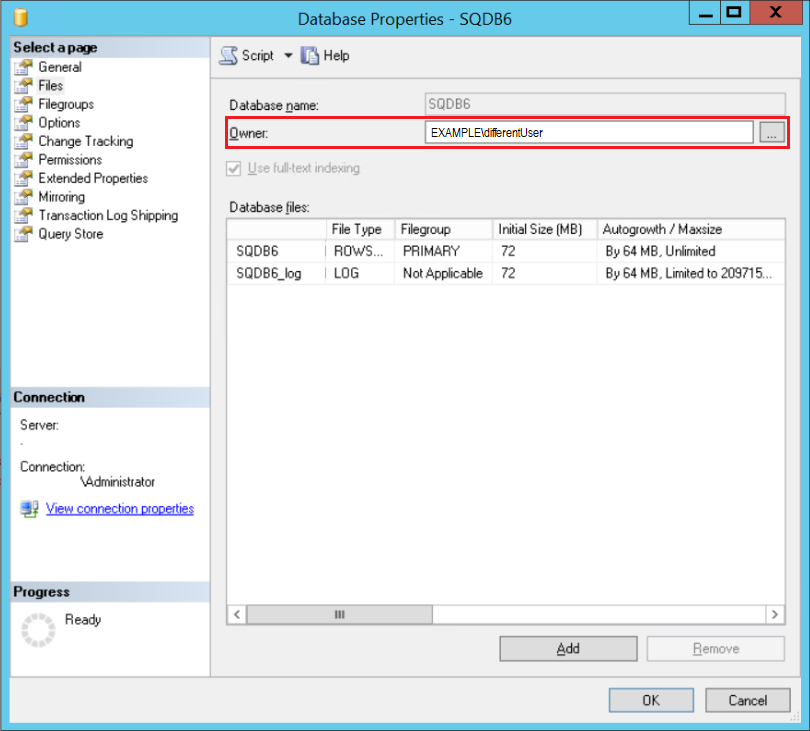
To check the owner of a database
Open SQL Server Management Studio and connect to the Database Engine.
Expand Databases, find the database you want to check, right-click the database and select Properties
Switch to Files tab
Check the Owner filed
Reports in the management interface are not working and there is a "The server principal is not able to access the database" error in the log file
Make sure you have run the queries mentioned in section "When using external database for data warehouse on the same server" after the Management Server installation finished.
An example error message looks like this:
The server principal "S-1-9-3-3170424900-1339531482-4223392158-4021304381" is not able to access the database "SQDB6" under the current security context.
Installation freezes during starting services
Domain user does not have the Log on as a service right. Open Local Security Policy editor, double-click Local Policies, User Rights Assignment, select Log on as a service and add the domain user.
ALTER USER or CREATE USER errors during installation or tenant creation
Check if the YSoft SafeQ database (e.g. SQDB6) and the database server have enabled the Contained mode. Check if the Always On Availability Group Server was enabled during installation.