YSoft SafeQ 5 Client Support
About
YSoft SafeQ 5 Client is an optional component available in previous YSoft SafeQ versions. Refer to YSoft SafeQ 4 or 5 documentation for the full feature set documentation.
Please note that there is a product extension (https://portal.ysoft.com/products/ysoft-safeq/extension-store/print-job-extension/job-routing-proxy) available. The extension provides an alternative way for usage of YSoft SafeQ 5 Client with YSoft SafeQ 6 and removes some of the limitations mentioned in this document.
What Functionality Is Available with YSoft SafeQ 6
Only a subset of its rich feature set was brought into YSoft SafeQ 6. When in doubt, consult with a Customer Support Services representative.
Identify user based on the local user login name
Identify user based on local user login name in multi-domain environment. CurrentUserNameFormat with values
empty (standalone user name),
DS_NT4_ACCOUNT_NAME (Engineering\someone),
DS_USER_PRINCIPAL_NAME ([email protected])
SAFEQ_SID_FORMAT (01:05:00:00:00:00:00:05:15:00:00:00:23:2e:93:00:5e:fc:94:30:e5:fd:ce:87:63:04:00:00)
Compress print jobs during the transfer to a Site Server
Failover
Load balancing
User roaming enabled by the client (consultation with a Y Soft Customer Support Services representative recommended)
What Functionality Is NOT Available
Print job data-in-transit encryption
Automatic server detection for failover. Site Server cannot communicate list of other Site Servers back to the client as YSoft SafeQ 5 could. The server list must be configured manually in the YSoft SafeQ Client.
Advanced username detection such as UserNameRegEx
Advanced user authentication methods such as login/password pop up window
Any pop-up windows:
Identify user with a popup request to specify credentials.
Display estimated price of a print job
Allow conversion from color to black and white
Display available money account balance
Delegation Print (VIP Shared Queues)
RBE desktop notifications
Billing code selection
Deployment Scenarios
Scenario: Single Print Queue with HA (local workstation queue)
The YSoft SafeQ 5 Client, print drivers, and print queues are be deployed locally to users' workstations. Means of deployment vary based on the infrastructure at hand (MSI package distributed by SCCM or Group Policy, etc.). See MSI Package Product Sheet on Partner Portal https://portal.ysoft.com/products/ysoft-safeq/professional-services-catalog
Use Cases
A single highly available print queue for a Site Server cluster. As long as at least one Site Server is available, the queue delivers print jobs to one of them.
A single load-balanced print queue for a Site Server cluster. The YSoft SafeQ 5 Client randomly selects which Site Server to spool on.
Network traffic reduction between the workstation and Site Servers. Print job data are compressed during the transfer from the workstation to a Site Server.
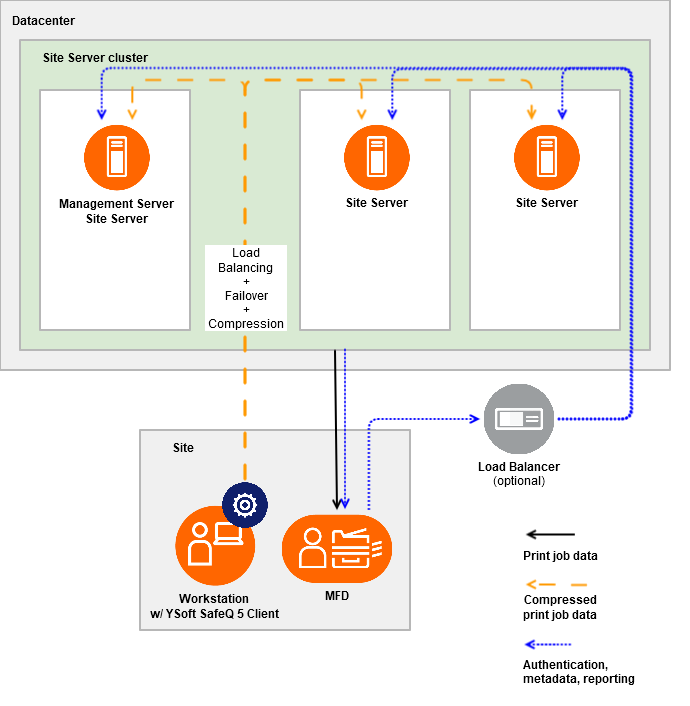
Sample Architecture
Scenario: Single Print Queue with HA (shared server queue)
The YSoft SafeQ 5 Client is deployed to a print server as a backend of a print queue shared from the print server. No workstation client is required for this scenario.
Use Cases
A highly available print queue for a Site Server cluster. As long as at least one Site Server is available, the queue delivers print jobs to one of them.
 If the shared queue itself becomes unavailable (e.g. server outage), no print jobs can be sent to YSoft SafeQ. Viable mitigation would be to share the queue from all servers and map users as needed.
A single load-balanced print queue for a Site Server cluster. The YSoft SafeQ 5 Client randomly selects which Site Server to spool on.
Reduced network traffic between the YSoft SafeQ 5 Client and Site Servers. Print job data are only compressed during the transfer from the client (on the server) to a Site Server.
Sample Architecture

Supported Platforms
YSoft SafeQ 5 Client supports the following operating systems:
Microsoft Windows 32 bit (XP/Vista/7/8/8.1/10)
Microsoft Windows 64 bit (XP SP3/Vista/7/8/8.1/10/11)
Microsoft Windows Server 2003/2003R2/2008/2008R2/2012 (32bit/64bit) including Remote Desktop Services (a.k.a. Terminal Server) and Citrix
Microsoft Windows Server 2016/2019
Notes:
YSoft SafeQ 5 Client does not support v4 printer drivers (bundled with Microsoft Windows 8+).
Vendors' v3 drivers must be used.YSoft SafeQ 5 Client v2.27 or higher is supported.
YSoft SafeQ 5 Client can communicate only with Site Server (FlexiSpooler in server spooling mode).
How to Configure
YSoft SafeQ 6
On the management interface in System Settings:
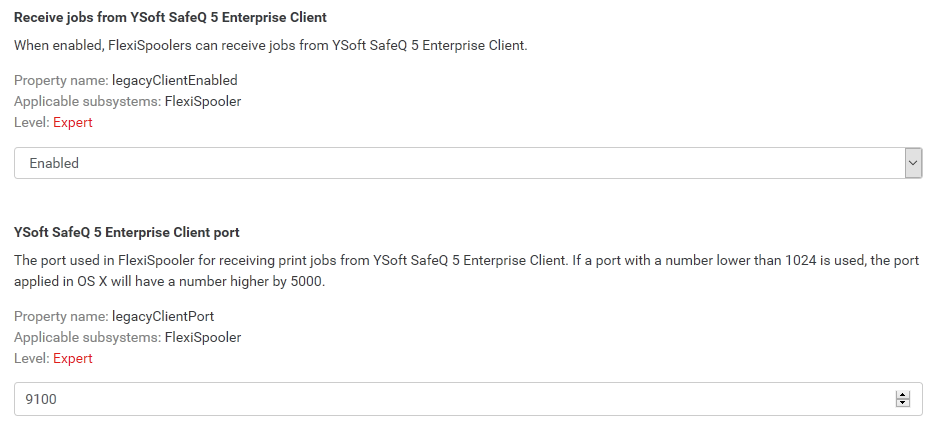
legacyClientEnabled = Enabled (default is Disabled)
legacyClientPort = 9100 (default)
Restart YSoft SafeQ FlexiSpooler service to apply the changes.
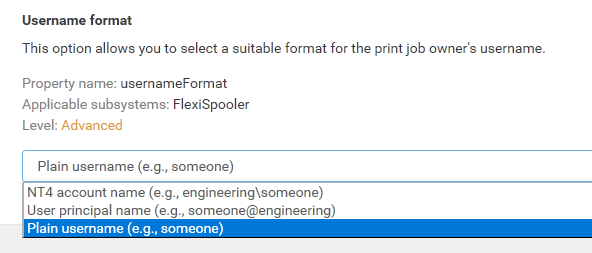
Also, set expected username in value usernameFormat. See CurrentUserNameFormat value in YSoft SafeQ Client configuration, they have to match.
YSoft SafeQ 5 Client
Configure
Edit the file SafeQ.ini with the options below. See SafeQ 5 Client Configuration Options for more details.
Always disable all pop-up windows:
WebBasedApplications =0Set how username should display in YSoft SafeQ. User with login "someone" is member of domain "domain123" in the example below. Option:
[empty] for "someone"
DS_NT4_ACCOUNT_NAME for "domain123\someone"
DS_USER_PRINCIPAL_NAME for "someone@domain123"
SAFEQ_SID_FORMAT for "01:05:00:00:00:00:00:05:15:00:00:00:23:2e:93:00:5e:fc:94:30:e5:fd:ce:87:63:04:00:00"
CurrentUserNameFormat =
Set ServerIP to point to Site Server (FlexiSpooler in server spooling mode). FQDN, hostname or IPv4 can be used. Also, enable load balancing if required.
ServerIP = safeq6server1.domain123.localServerIP2 = safeq6server2.domain123.localServerIP3 = safeq6server3.domain123.localLoadBalancing =1Set if compression is needed or not:
Compression =1
Example of SafeQ Client configuration which creates two identical ports:
[1]Description = SafeQ Secure PortWebBasedApplications=0ServerIP = safeq6server1.domain123.localServerIP2 = safeq6server2.domain123.localServerIP3 = safeq6server3.domain123.localLoadBalancing = 1ServerPort=9100Queue=secureAuthType=1Compression=1CurrentUserNameFormat=ProtocolLevel=4JobOwnerMethod=1Note="Note"[2]Description = SafeQ Secure PortWebBasedApplications=0ServerIP = safeq6server1.domain123.localServerIP2 = safeq6server2.domain123.localServerIP3 = safeq6server3.domain123.localLoadBalancing = 1ServerPort=9100Queue=secureAuthType=1Compression=1CurrentUserNameFormat=ProtocolLevel=4JobOwnerMethod=1Note="Note"Install
Run a command line as an administrator.
Navigate to the folder which contains the YSoft SafeQ installation files.
Configure the Client by editing the file SafeQ.ini. (Configuration options are described in SafeQ 5 Client Configuration Options)
From the command line, run the utility install.exe.
install.exe
Uninstall
Run a command line as an administrator.
Navigate to the folder which contains the YSoft SafeQ installation files.
From the command line, run the file install.exe, using the parameter -u.
install.exe -u
Add a Printer
To install a new printer for use with the YSoft SafeQ 5 Client, follow these steps:
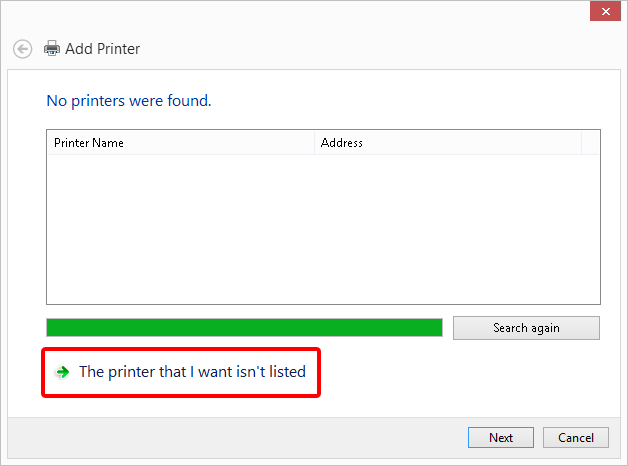
1 | For adding a printer to your workstation with Windows OS go to Control Panel > Devices and Printers > Add printer. When Add printer wizard will be opened click The printer that I want isn't listed button.
|
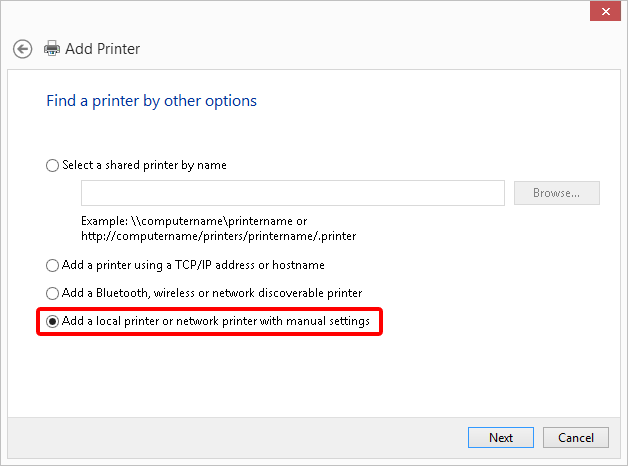
2 | Select Add a local printer or network printer with manual settings and click Next.
|
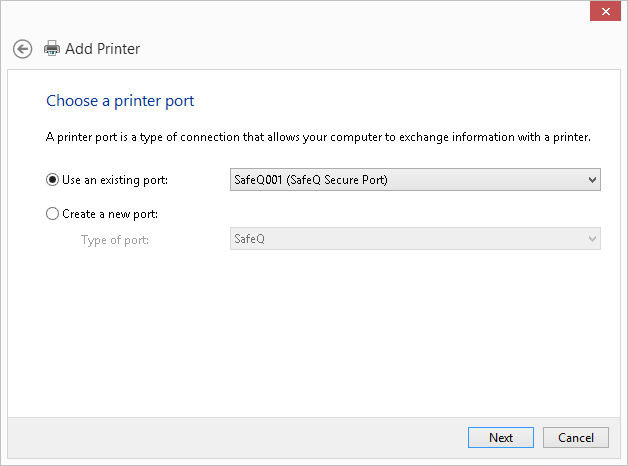
3 | Select the Use existing port and select SafeQ Client Secure Port as the printing port OR click Create a new port and select SafeQ.
|
4 | Perform a few other steps to set all necessary options for the new printer to finish the installation wizard. |
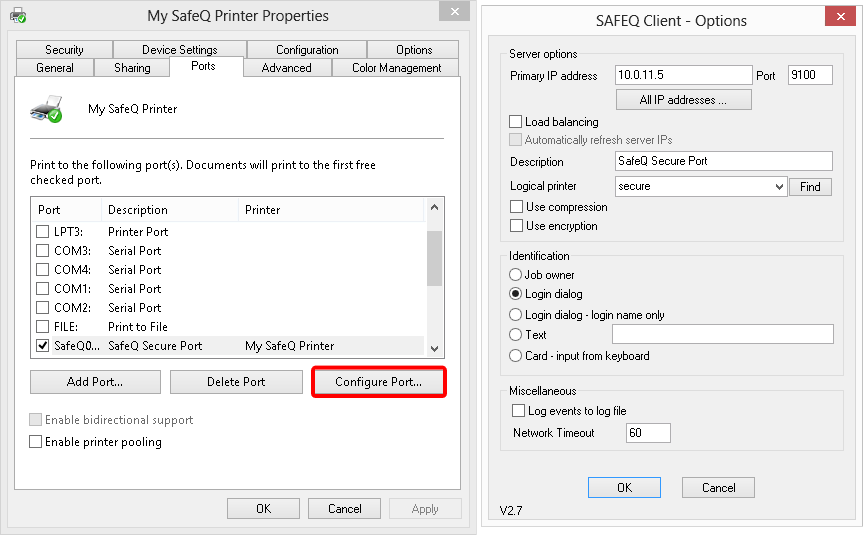
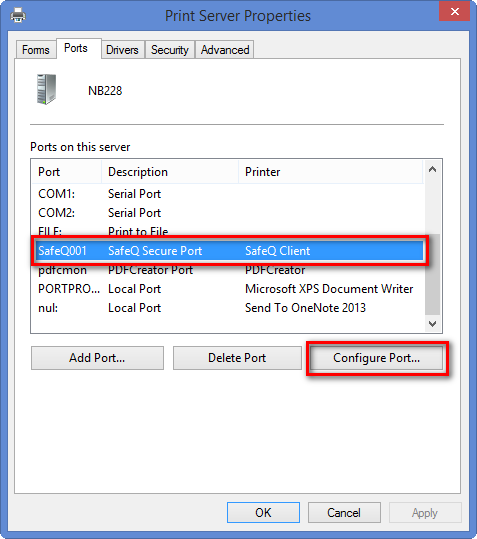
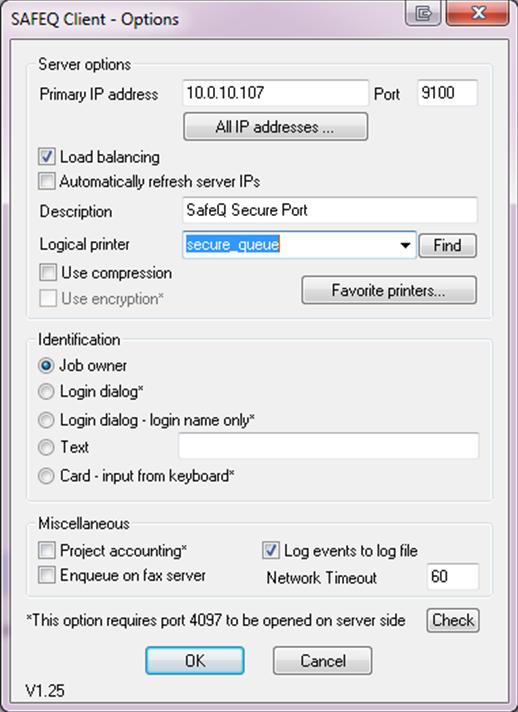
5 | If the device is installed, and YSoft SafeQ Client has not been yet been configured before installation in the SafeQ.ini file, configure it now. In your OS go to Devices > Printer properties > select SafeQ Secure Port > Configure port.
|
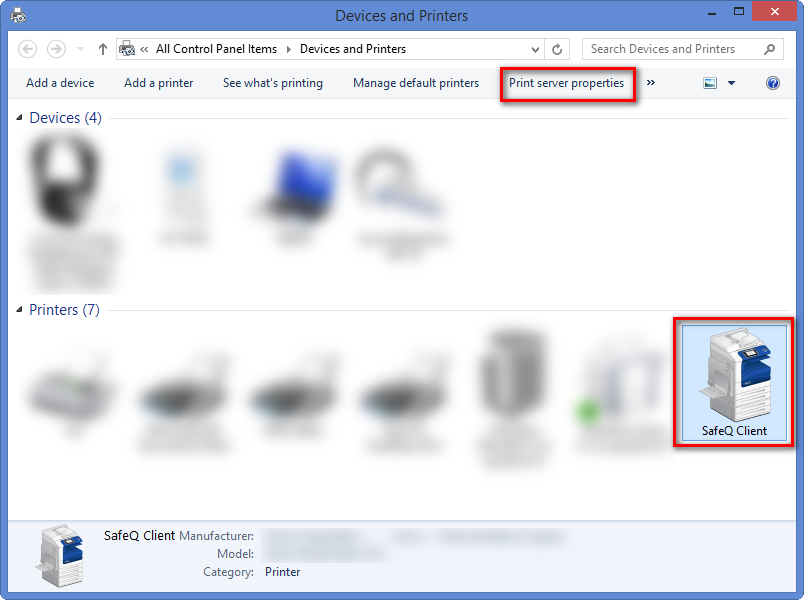
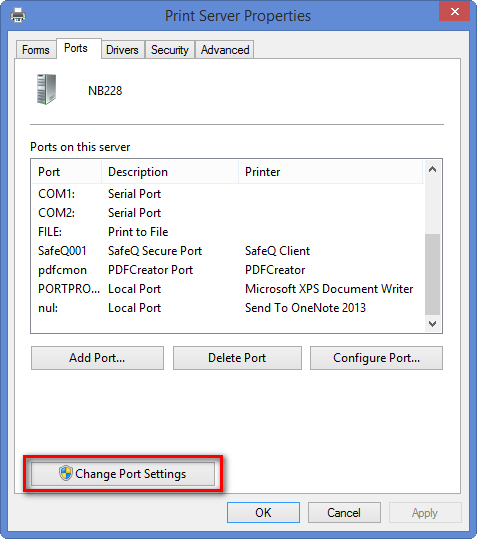
5b | If Microsoft Windows 7/8 OS is used, the port configuration is available with "elevated" right only accessible via Print server properties. Devices and Printers > select the printer which port you want to reconfigure or any other printer > Print server properties > navigate to Ports tab > Change ports settings > select SafeQ Secure Port > Configure port.
|