Edit Workflow - Destination
After selecting a destination connector, configure properties specific to individual connector types.
File System
Selecting a file system type connector as a workflow destination stores scanned files to a local or network file system either in a subdirectory of a connector's base location or directly in the base location. The connector can be configured to enable users to interactively browse the structure of a selected target directory and optionally select one of its subdirectories as the target.
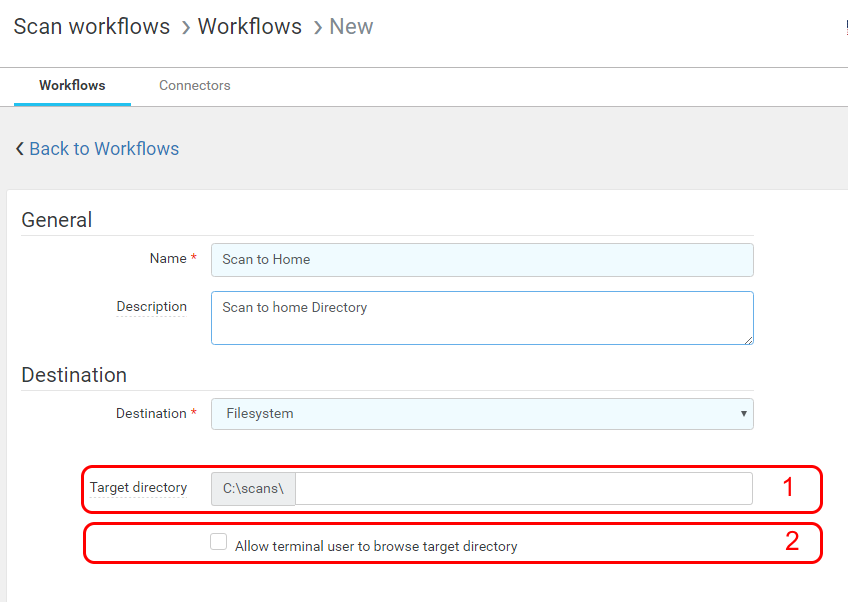
Target directory (optional) – The directory where the workflow delivers scanned files, relative to the connector's base location. Captured variables may be used. Process and user input variables are supported only if browsing is disabled (a path that is defined by user input cannot be browsed). Please keep in mind the limitation of characters that are allowed to be in paths.
Allow terminal user to browse target directory – If checked, the target directory is not the final destination. A new user input field is automatically added, which allows a terminal user to browse and select a subdirectory of the target directory as a destination. When this option is checked, an edit button appears to edit the title of this parameter. The user input is also visible in the "User input fields" section, so it can be arranged. For more information see section User Input Fields.
To allow users to browse target directories, the service account under which the Workflow Processing System runs must have read access to the target directory and all subdirectories that can be used as the scan destination.
Email (SMTP)
Selecting an Email (SMTP) type connector as a workflow destination delivers scanned files by email to one or more email addresses.
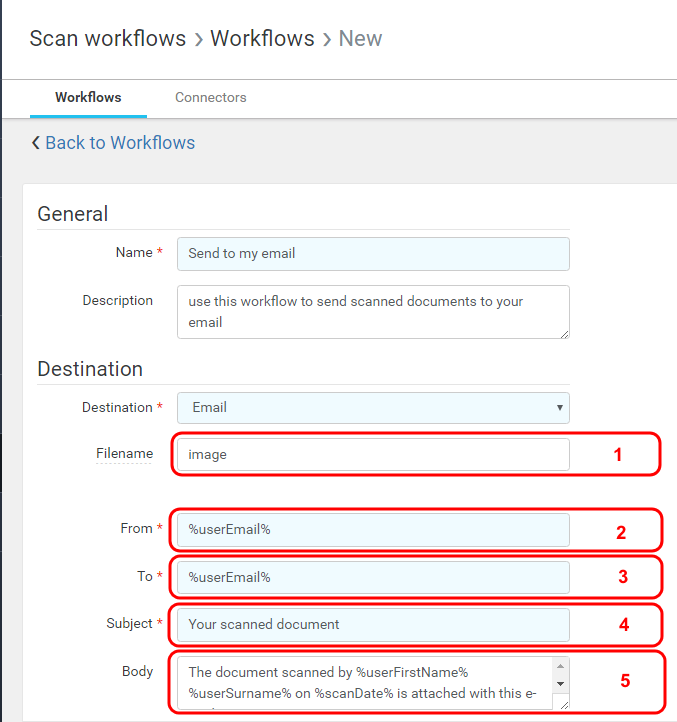
Filename (optional) – The name of the resulting scanned file (without an extension). Process, capture, and user input variables may be used. If scan workflow produces multiple files, the filename is appended with a numeric sequence in the "####" format, e.g., "0001", "0002", etc.
If the filename field is left blank, the filename generated by the device where the scan was made is used.
From – The email address from which the email is sent. Process, capture, and user input variables may be used.
To – Recipient email address. Process, capture, and user input variables may be used.
Multiple email addresses can be separated by a comma "," or semicolon ";".
Subject – The email subject. Process, capture, and user input variables may be used.
Body (optional) – The email body. Process, capture, and user input variables may be used. HTML tags may be used to format the body.
Microsoft Exchange
Selecting a Microsoft Exchange connector type as a workflow destination delivers scanned files by email to one or more email addresses. Microsoft Exchange is widely used in companies and the connector allows more precise configuration than the Email (SMTP) connector.
Basic settings
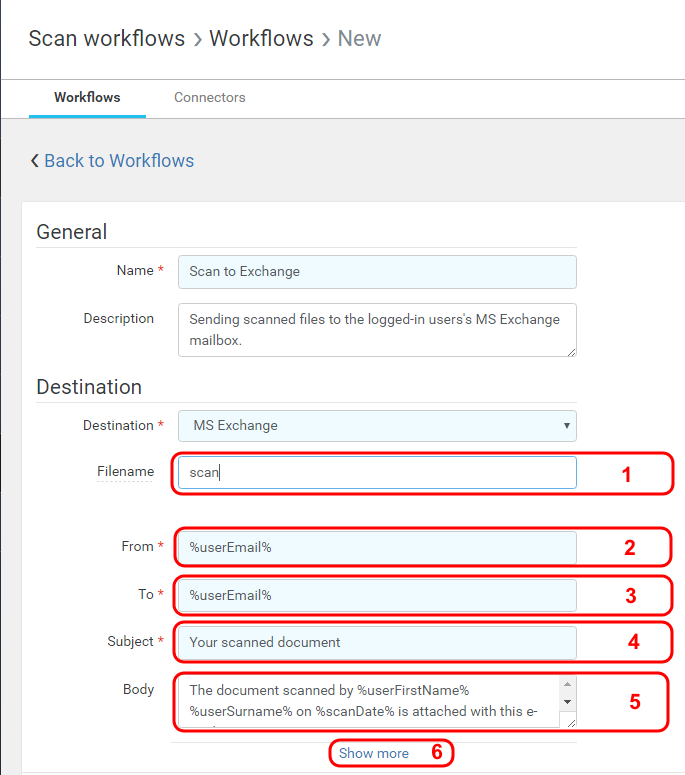
Filename (optional) – The name of the resulting scanned file (without an extension). Process, capture, and user input variables may be used. If scan workflow produces multiple files, the filename is appended with a numeric sequence in the "####" format, e.g., "0001", "0002", etc.
If the filename field is left blank, the filename generated by the device where the scan was made is used.
From – The email address from which the email is sent. Process, capture, and user input variables may be used.
This field can be used only when the connector is configured without impersonation in the connector configuration. For more information see Edit Connector section Microsoft Exchange.
To – The recipient email address. Process, capture, and user input variables may be used.
Multiple email addresses can be separated by a comma "," or semicolon ";".
Subject – The email subject. Process, capture, and user input variables may be used.
Body (optional) – The email body. Process, capture, and user input variables may be used.
Show more – Click the link to configure additional settings (below) for the workflow with a Microsoft Exchange destination. For more information see section Additional Microsoft Exchange workflow settings below.
Additional Microsoft Exchange workflow settings
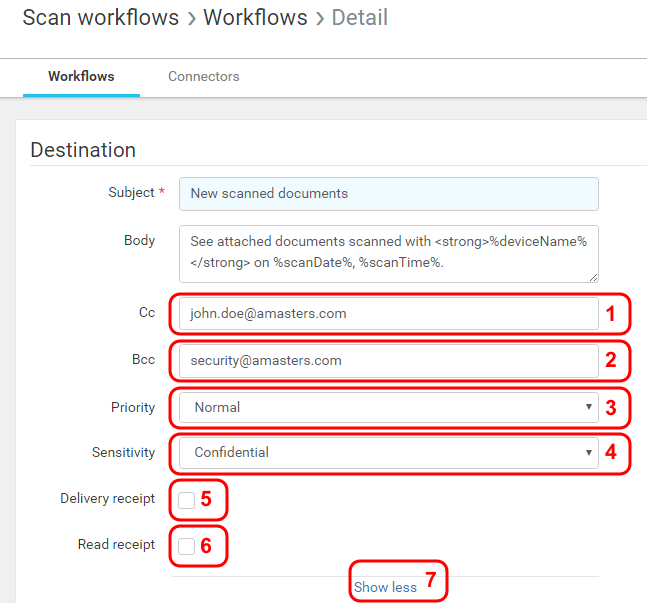
Cc (optional) – A carbon copy recipient email address. Process, capture, and user input variables may be used.
Multiple Email addresses can be separated by a comma "," or semicolon ";".
Bcc (optional) – The blind carbon copy recipient email address. Process, capture, and user input variables may be used.
Multiple Email addresses can be separated by a comma "," or semicolon ";".
Priority – Email priority.
Sensitivity – Email sensitivity.
Delivery receipt – If enabled, a delivery receipt email will be sent to the sender when the email with the scanned files is delivered to each recipient.
Read receipt – If enabled, the read receipt flag will be set in the email. If the recipient confirms read receipt, a confirmation email is sent to the sender.
Show less – The show less link hides additional Microsoft Exchange settings.
Impersonation
When impersonation is enabled in the Microsoft Exchange destination connector (for more information see Edit Connector section Microsoft Exchange), it is not possible to change the value of the From field.
When impersonation is disabled in the Microsoft Exchange destination connector, it is also possible to set the user logged in at the YSoft SafeQ terminal as the sender using the %userEmail% variable in the From field and assigning Send as permission to the service account Microsoft Exchange. However, in this case, the sent email will be in the service account's Microsoft Exchange Sent Items folder.
Dropbox Business/Enterprise
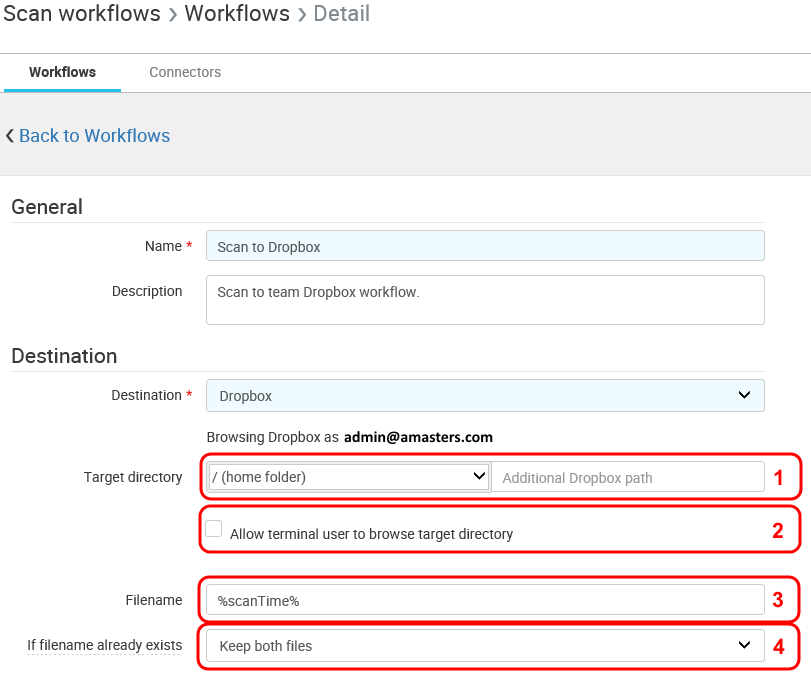
Target directory – The target directory relative to Dropbox's root folder ("/"). Capture variables may be used. Process and user input variables are supported only if browsing is disabled (you cannot browse a path that is defined by user input).
Allow terminal user to browse target directory – If checked, the Target directory is not the final destination. A new user input field is automatically added, which allows the terminal user to browse and select a subdirectory of the target directory as a destination. When this option is checked, an edit button appears, which can be used to edit the title of this parameter. The user input is also visible in the "User input fields" section so it can be arranged. Please see section User Input Fields.
Filename – The name of the resulting scanned file (without an extension). Process, capture, and user input variables may be used. If scan workflow produces multiple files, the filename is appended with a numeric sequence in the "####" format, e.g., "0001", "0002", etc.
If the filename field is left blank, the filename generated by the device where the scan was made is used.
If filename already exists – Determines the behavior applied if a file with the same name already exists in the target directory. The available options are:
Keep both files – if a file already exists, YSoft SafeQ creates a new file with a numeric sequence in the "_#####" format, e.g., "filename_00001", "filename_00002", etc. No files are deleted in this case.
Replace original file – replaces the original file with the new one.
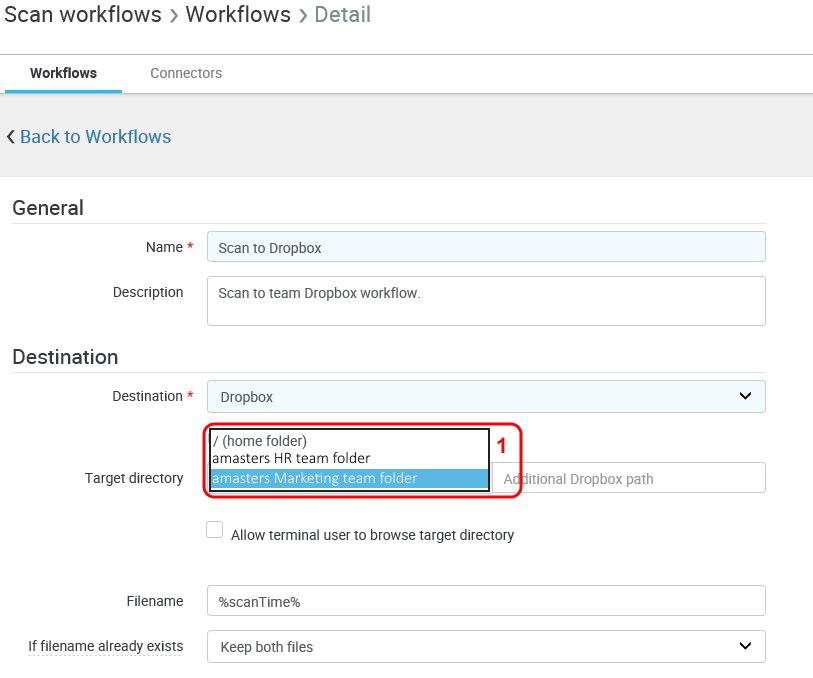
5. Alternatively choose a Dropbox Business team folder as the root for the target path composition.
An active Internet connection is required to retrieve a listing of the Dropbox Business team folder.
Microsoft SharePoint 2010, 2013 and 2016
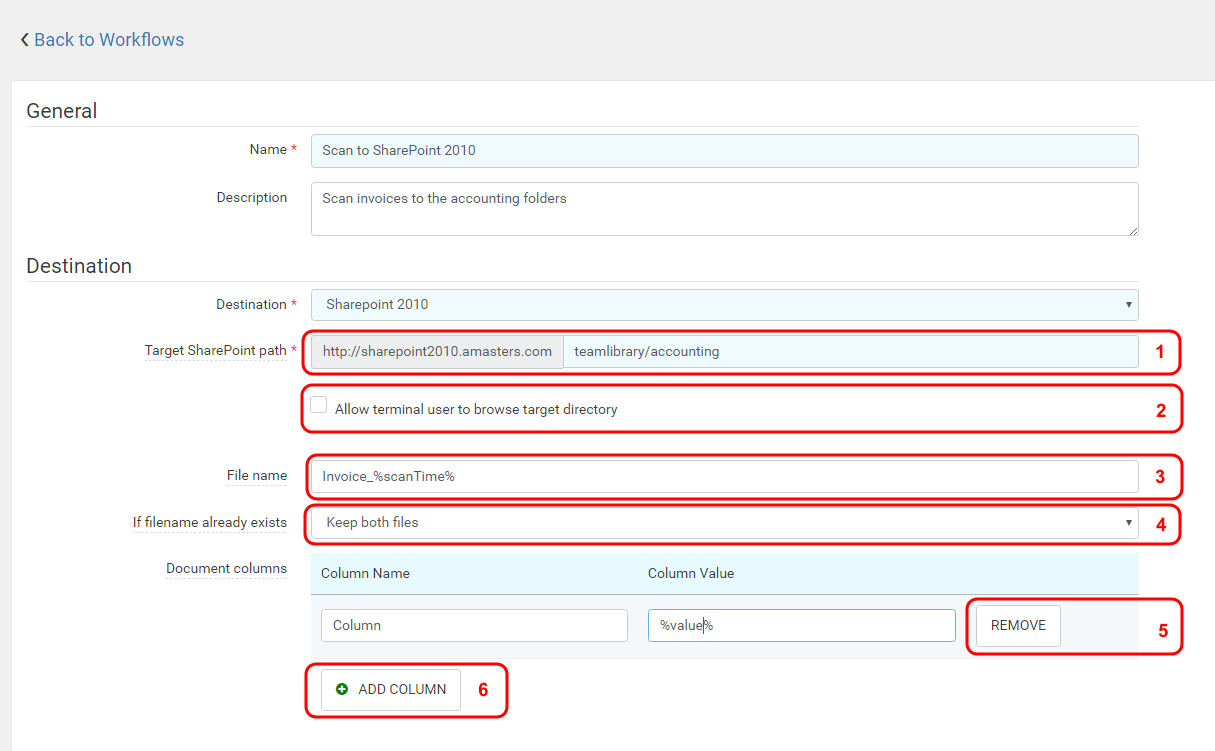
Target SharePoint path – Consists of two parts:
The first part is configured in the SharePoint connector and represents the address of the SharePoint site (in the example above, "http://sharepoint2010.amasters.com").
The second part consists of the title of a SharePoint document library (in the above example, "teamlibrary") and an optional subfolder structure (in the above example, a folder named "accounting"). If the Allow terminal user to browse target directory option is enabled, capture variables may be used – otherwise, use process, capture, and user input variables.
To acquire this information, please contact your Sharepoint administrator. There is no other way to find it.
Allow terminal user to browse target directory – If checked, the Target directory is not the final destination. A new user input field is automatically added, which allows the terminal user to browse and select a subdirectory of the target directory as the destination. When this option is checked, an edit button appears, which can be used to edit the title of this parameter. The user input is also visible in the "User input fields" section, so it can be arranged. Please see section User Input Fields.
Filename – The name of the resulting scanned file (without an extension). Process and capture variables may be used. If scan workflow produces multiple files, the filename is appended with a numeric sequence in the "####" format, e.g., "0001", "0002", etc.
If the filename field is left blank, the filename generated by the device where the scan was made is used.
If file name already exists – Determines the behavior applied if a file with the same name already exists in the target directory. The available options are:
Keep both files – if the file already exists, YSoft SafeQ creates a new file with a numeric sequence in the "_#####" format, e.g., "filename_00001", "filename_00002", etc. No files are deleted in this case
Replace original file – replaces the original file with the new one
Document Columns – Remove Column – Removes a column from the SharePoint document metadata
Document Columns – Add Column – Adds an administrator predefined document column to the corresponding SharePoint document metadata. The user can fill in the Name of the column and the Value. Variables may be used in column values
The document column value must be a string in the format expected by the SharePoint column, otherwise, the column value will not be saved.
Scan to Script
The Scan to Script destination is a special type of destination that allows custom scripts and executables. Unlike other types of destinations, Scan to Script does not require configuration of a connector.
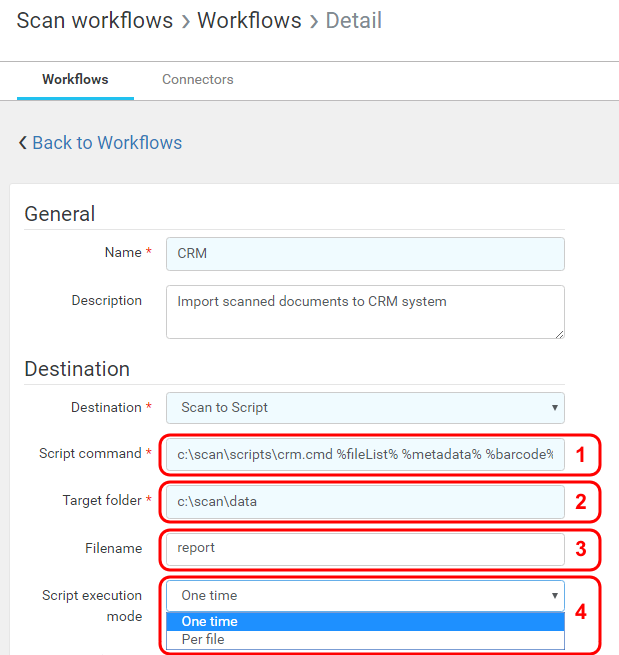
Script command – The command to be executed when scanned files are delivered to the Target folder. It can contain any capture, processing, or user input variables as command line arguments. In addition, it is possible to use the following special variables:
%fileList% – Available in One time execution mode only (see Script execution mode). File system paths to all scanned files delivered to targetDir are written to a text file as individual lines in UTF-8 encoding. The %fileList% variable used in the "Script command" is replaced by the absolute path to the created text file. The path to the text file becomes one of the script parameters. YSoft SafeQ then invokes the specified script only one time. It is the responsibility of the external script to resolve all scanned files from the text file, process them within a single script execution and clean up as necessary.
%metadata% – Available in One time execution mode only (see Script execution mode). Similarly to the %fileList% variable, use the %metadata% variable in script parameters. YSoft SafeQ will write all scan workflow variables to a text file and replace the %metadata% variable with the absolute path to the created file. Each variable is written on a single line in the text file in UTF-8 encoding in the "name=value" format, e.g., "userUsername=administrator".
%targetDir% – Available in One time execution mode only (see Script execution mode). Specifies the location where scanned files (and optionally metadata and file list files) are stored.
%filePath% – The full path of the currently executed file if script execution mode is Per file or the path of the last file processed by the Workflow Processing System if script execution mode is One time.
Target folder – The folder where scanned files are placed for execution by script. Scanned files and additional files produced by the use of the %fileList% and %metadata% variables are not automatically deleted after script execution – deletion must be performed by the script. Process, capture, and user input variables may be used.
Filename – Name of the resulting scanned file (without extension). Process, capture, and user input variables may be used. If scan workflow produces multiple files, the filename is appended with a numeric sequence in the "####" format, e.g., "0001", "0002", etc.
If the filename field is left blank, the filename generated by the device where the scan was made is used.
Script execution mode
One time – The script is executed only once. Files produced by using %fileList%. %metadata% and %targetDir% variables may be used to process all scanned files. Any capture or processing variables may be used as command line arguments.
Per file – The script is executed for each scanned file separately. The %filePath% variable can be used to get the currently processed scanned file. Any other capture or process variables may be used as command line arguments.
Microsoft OneDrive for Business (registered app with full access)
Selecting a Microsoft OneDrive for Business (registered app with full access) connector type as the workflow destination delivers scanned files to the selected OneDrive for Business drive.
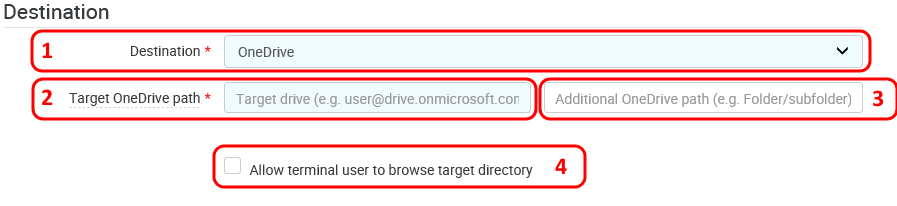
Destination – Select a OneDrive Connector
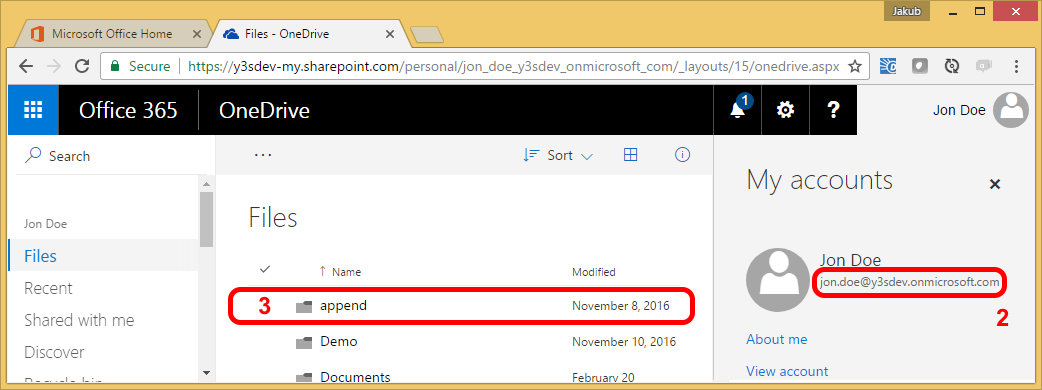
Target OneDrive path – User Principal Name (UPN), name of a user in an email address format. A UPN (for example: [email protected]) consists of the user name (login name), separator (the @ symbol), and domain name (UPN suffix). Be aware that the UPN is case-sensitive! It can be obtained from the user profile in OneDrive or it can be seen encoded in the URL, please see the picture below. Also note, variables here can be used to use a different drive for each user/device session, e.g., %userUsername%@y3sdev.onmicrosoft.com
A UPN is not the same as an email address. Sometimes, a UPN can match a user's email address, but this is not a general rule.
To acquire this information, please contact your OneDrive administrator. There is no other way to find out.
Additional OneDrive path – The directory where the workflow delivers scanned files, relative to the connector's drive name. Capture variables may be used. Please keep in mind the limitations to characters that are allowed to be in paths. A path can be specified to a subfolder.
Allow browsing of the target destination on the terminal.
See the picture below for additional info.
Microsoft OneDrive for Business (OAuth 2.0 with user-based access)
Selecting a Microsoft OneDrive for Business (OAuth 2.0 with user-based access) connector type as the workflow destination delivers scanned files to the selected OneDrive for a Business drive with user-based authorization.
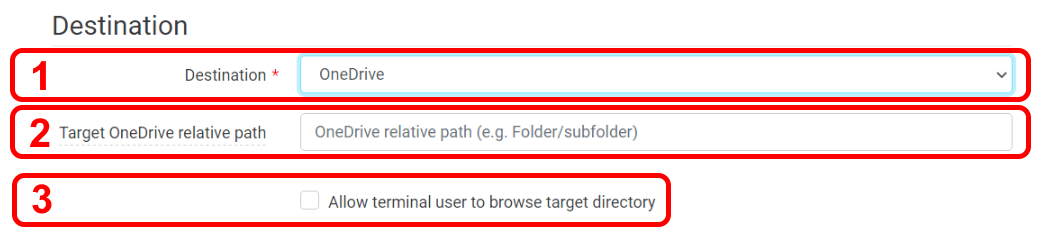
Destination – Select a OneDrive Connector
OneDrive path – The directory where the workflow delivers scanned files, relative to the root of the user's drive. Capture variables may be used. Please keep in mind the limitations to characters that are allowed to be in paths. A path can be specified to a subfolder.
Allow browsing of the target destination on the terminal.
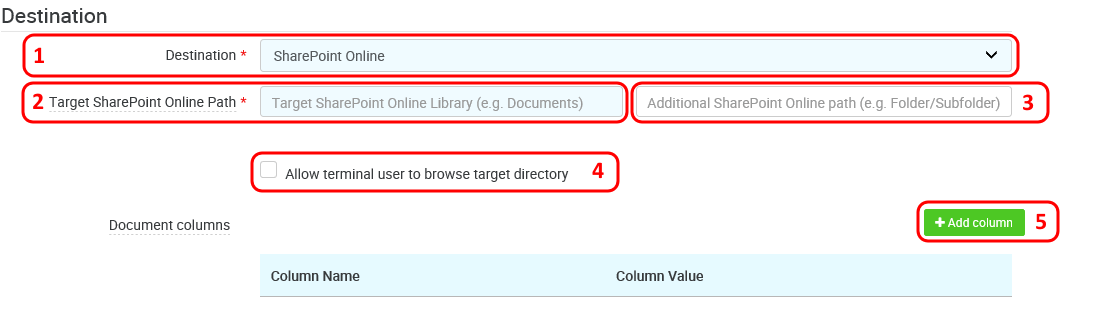
Microsoft SharePoint Online
Selecting a Microsoft SharePoint Online connector type as the workflow destination delivers scanned files to the selected SharePoint Online document library.
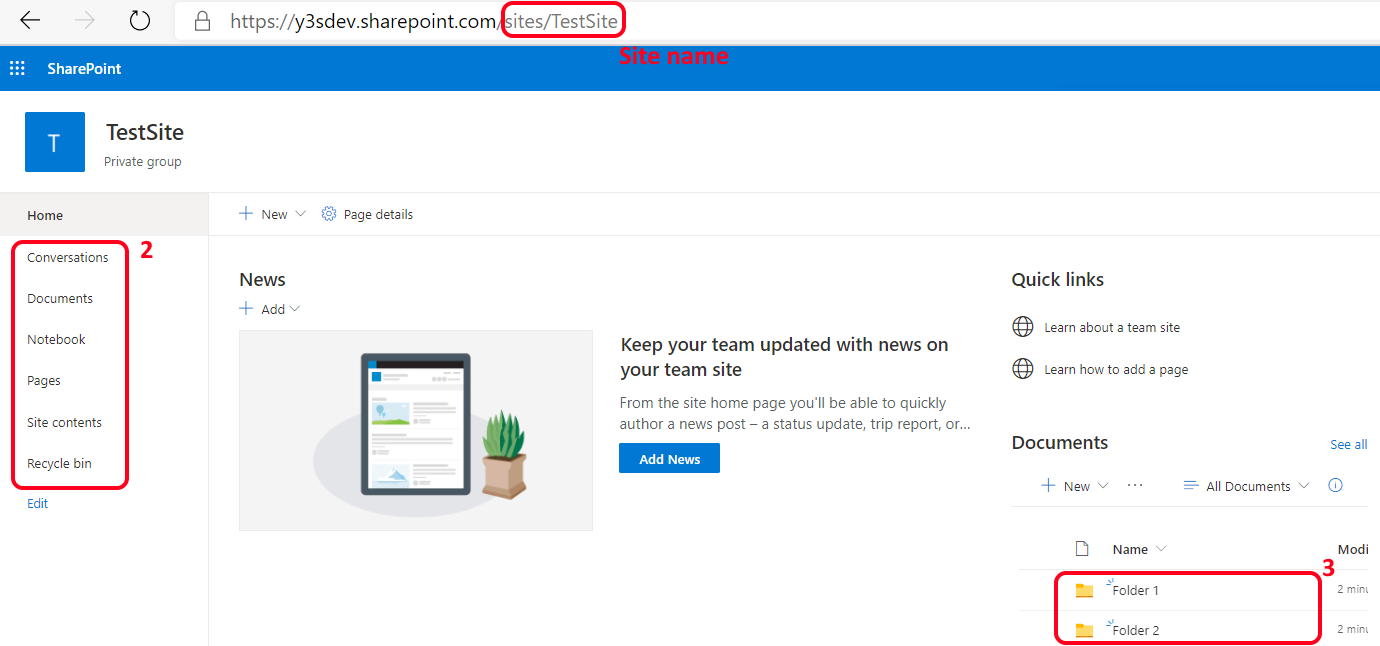
https:// <myCompanyName> .sharepoint.com/ sites/<mySite>/<myOptionalSubsite> / <myDocumentLibrary> /Forms/AllItems.asp – when using custom site
https:// <myCompanyName> .sharepoint.com/ <myOptionalSubsite> / <myDocumentLibrary> /Forms/AllItems.asp – when using default SharePoint site, typically "Communication site"
Destination – Select a SharePoint Online Connector
Target SharePoint Online path (blue) – Define the public SharePoint library. Be aware that the SharePoint library name is case-sensitive! Usually, at least the library "Documents" exists by default so an initial test can be made with this one.
If the library was renamed or if problems are encountered during testing, please contact your SharePoint administrator to get the correct value.
Additional SharePoint Online path – The directory where the workflow delivers scanned files, relative to the connector's document library. Capture variables may be used. Please keep in mind the limitations to characters that are allowed to be in paths. A path to a subfolder can be specified. This parameter is optional.
Allow browsing of the target destination on the terminal. This configuration is optional.
Add Column – Adds an administrator-predefined document column to the corresponding SharePoint document metadata. The user can enter the name of the column and the value. Variables may be used in column values. This point is optional.
The document column value must be a string in the format expected by the SharePoint column, otherwise, the column value will not be saved.
See the picture below for additional information:
Microsoft SharePoint Online (OAuth 2.0 with user-based access)
Selecting a Microsoft SharePoint Online (OAuth 2.0 with user-based access) connector type as the workflow destination delivers scanned files to the selected SharePoint Online document library.
Destination – Select a Microsoft SharePoint Online (OAuth 2.0 with user-based access) Connector
Target SharePoint Online path – Define the public SharePoint library. Be aware that the SharePoint library name is case-sensitive! Usually, at least the library "Documents" exists by default so an initial test can be made with this one.
Library name is taken from the Document Library, that user can see on his SharePoint page.
Additional SharePoint Online path – The directory where the workflow delivers scanned files, relative to the connector's document library. Capture variables may be used. Please keep in mind the limitations to characters that are allowed to be in paths. A path to a subfolder can be specified. This parameter is optional.
Allow browsing of the target destination on the terminal. This configuration is optional.
Add Column – Adds an administrator-predefined document column to the corresponding SharePoint document metadata. The user can enter the name of the column and the value. Variables may be used in column values. This point is optional.
The document column value must be a string in the format expected by the SharePoint column, otherwise, the column value will not be saved.
See the picture below for additional information:
Micro Focus Content Manager WORKFLOW CONNECTORS B
Selecting a Micro Focus Content Manager connector type as a workflow destination delivers scanned files as records in Micro Focus Content Manager.
Note that the Micro Focus Content Manager connector type is only available when YSoft SafeQ is activated with a valid Workflow Connectors B license. Please contact your sales representative if a license for the Micro Focus Content Manager connector is needed.
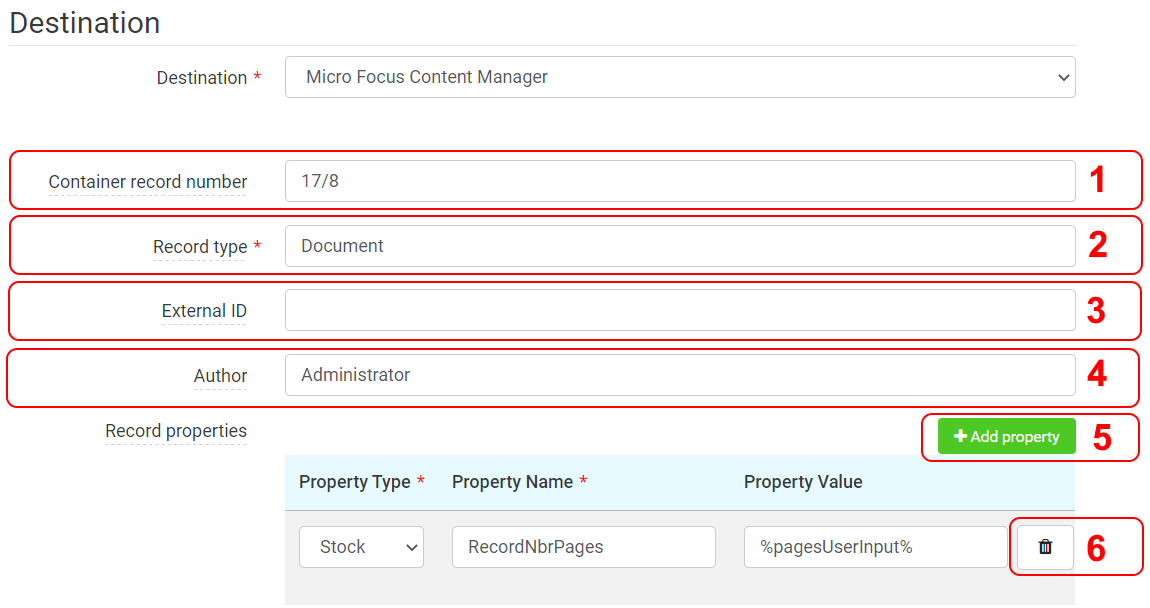
Container record number – The container where the record will be created. If it is left empty, the record will be created in the root of Micro Focus Content Manager. Variables may be used.
Record Type – The type of record that will be created. The record type must be a string in the format expected by Micro Focus Content Manager – it must match the Record type existing in the Micro Focus Content Manager.
External ID – The data that will be stored in the related record metadata field, can be left empty
Author – The user who will be stored in the related record metadata field, must either be left empty or match a user from Micro Focus Content Manager
Record properties - Add property - Adds a Micro Focus Content Manager property. Micro Focus Content Manager allows setting Stock and Custom properties. Please note, that you can use variables in both "Property Name" and "Property Value".
Stock properties are pre-defined by Micro Focus Content Manager, you can find them in documentation, e.g. Micro Focus Content Manager SDK 9.4. Property name needs to be set to property ID, some examples are RecordSecurity, RecordNbrPages, RecordTitle, RecordExternalReference . Please note, that you can over-write settings pre-defined by YSoft SafeQ with Stock properties, e.g. "RecordExternalReference" Stock property is equivalent to "External ID" setting, e.g. if "External ID" is set to "10" and "RecordExternalReference" Stock property to "20", record external ID will be set to "20".
Custom properties are defined by Micro Focus Content Manager users and are sometimes referred to as User properties. Property name needs to be set to custom property "Search Clause" which can be found in Micro Focus Content Manager Client or provided by your Micro Focus Content Manager administrator.
Record properties - Remove property – Removes associated property.
Box
These features are currently available only under Early Access Program .
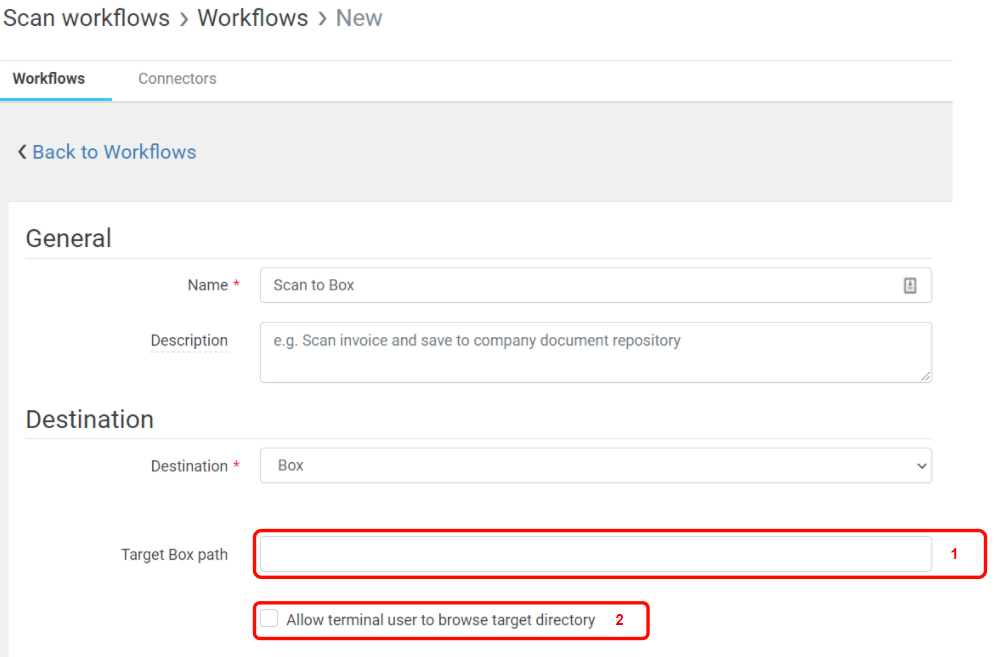
Target Box path - The target directory. Capture variables may be used. Process and user input variables are supported only if browsing is disabled (you cannot browse a path that is defined by user input).
Allow terminal user to browse target directory - If checked, the Target directory is not the final destination. A new user input field is automatically added, which allows the terminal user to browse and select a subdirectory of the target directory as a destination. When this option is checked, an edit button appears, which can be used to edit the title of this parameter. The user input is also visible in the "User input fields" section so it can be arranged. Please see section User Input Fields.