Distributing YSoft Mobile Connect activation codes to end users
Overview
The MFX Mobile solution consists of three components:
YSoft MFX Mobile Reader (hardware).
YSoft Mobile Connect (mobile app)
YSoft Connect ID (user credential vouchers)
Based on your order for YSoft Connect ID vouchers, you will receive them in a printed version. The package contains a key to get a digital version. The digital version is a csv file with activation codes and Connect IDs.
If your company uses Active Directory for identity management purposes, the most convenient way is to store the Connect IDs (the ID portion of the voucher) in your Active Directory, similar to a traditional ID badge number, and to set your YSoft SafeQ to read the IDs from the Active Directory. Alternatively, you can store the Connect IDs directly in your YSoft SafeQ as card IDs, see Card and PIN Management.
The next step is distributing the activation key portion of the credential voucher to the end users.
For information on the application itself, see Using YSoft Mobile Connect.
Prerequisites: MS Excel, Word, and Outlook, working knowledge of Active Directory and PowerShell.
Uploading Connect IDs to your Active Directory
Download the csv file with activation codes and Connect IDs and paste into this file the email addresses of all users to whom you wish to send the activation codes.
Name all the columns, for example, ID, Activation code, Email.

Save the file.
Upload the Connect ID for each user from the excel file to an unused attribute in your Active Directory, such as otherFacsimileTelephoneNumber.
An example of uploading the IDs via PowerShell:$pathToExcelFile="C:\Temp\codes.xlsx"$ldapAttribute="otherFacsimileTelephoneNumber"Import-Excel-path$pathToExcelFile|`ForEach-Object{Get-ADUser-Filter"EmailAddress -eq '$($_.Email)'"-PropertiesEmailAddress |Set-ADUser-Replace@{"$($ldapAttribute)"="$($_.ID)"}}$pathToExcelFile – the location of the excel file which you saved in the previous steps
$ldapAttribute – the name of the attribute in your AD where you are uploading the Connect IDs. You may use whichever attribute that you consider suitable.
Email – the name of the column with email addresses in your excel file. If you named it differently in your excel file, use your chosen name.
ID – the name of the column with Connect IDs in your excel file. If you named it differently in your excel file, use your chosen name.
Adjusting the LDAP replication settings in YSoft SafeQ
Log in to YSoft SafeQ management interface and go to System > LDAP integration.
Click Advanced settings.
In the User schema section, add the AD attribute where you uploaded the Connect IDs to field Attributes containing cards/PINs, i.e if you used the attribute otherFacsimileTelephoneNumber, enter this attribute.
Click SAVE CHANGES.
Distributing the activation codes to the end users
The process of distributing the activation codes to the end users consists of preparing an email template in MS Word, using the mass mailing function in MS Word, and sending the emails through MS Outlook.
In MS Word, prepare a text of the email that you will send to the users.
Go to the Mailings tab and click Select recipients > Use an existing list.
Select the excel file which you created in the previous steps.
Click Insert a merge field and select the name of the column in your excel file which contains the activation codes.
If you wish to insert the activation code as a QR code, press ctrl + F9 and write MERGEBARCODE <name of the column in your excel file with the activation codes> QR Code into the brackets.

If you wish to change the properties of the QR code, right-click on the newly created field and click Edit barcode > Advanced.
Open your MS Outlook.
Go back to MS Word, and on the Mailings tab, click Finish&Merge > Send Email Messages.
In the Merge to E-mail dialog window:
In the To field select the name of the column in your excel file which contains the email addresses of users.
Fill in the Subject line of the email.
In Send records, choose whether to send all emails at once. If you have hundreds or thousands of recipients, we recommend sending the emails in batches, because the speed of sending will not be higher than tens of emails per minute, thus sending all emails at once would take a long time. In that case, use the From and To fields.
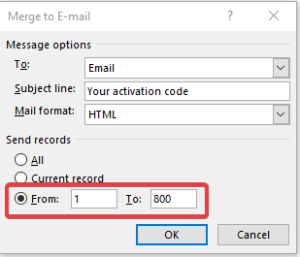
Click OK. MS Word will start generating emails into your MS Outlook, which will send the emails automatically.
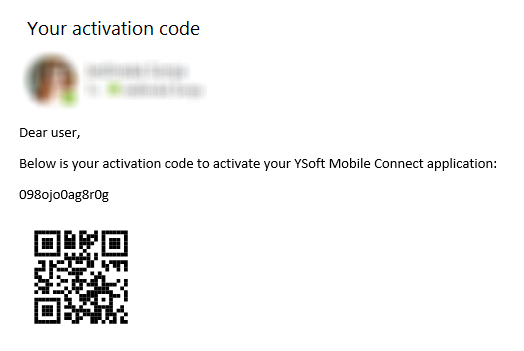
An example of email with activation code in both text and QR Code form that the users will receive: